Permissions Configuration
Configuring permissions in the system is crucial for precise access control, providing the administrator with the ability to tailor permissions to user roles and responsibilities. This enhances system security, protects confidential data, and minimizes the risk of unauthorized access to critical data.
Creating user accounts in the system
For an employee to start working in the system, it is necessary to create a user account for them. After setting up the account, the administrator has the ability to precisely define permissions and roles for each user. Such a process allows for limiting the visibility of selected records in the system and controlling access to their content and making changes to them.
REMEMBER: Precise data entry when creating user accounts in the system is crucial. A collective list of employees cannot be imported due to varied job positions, salary rates, and other variable values.
NOTE: You cannot create a user account without entering them on the list of employees or subcontractors (applies to a user for a subcontractor’s foreman).
Enter the employee on the list in the CRM menu, following the order below:
- Select the “CRM -> Employees” menu and enter the employee on the list using the “New” button.
REMEMBER: To enter an employee on the list, you must fill in all the required fields in the three visible tabs: “General”, “HR”.
- Fill in the personal data form in the “General” tab, paying attention to the fields:
- Groups: Assigning the employee to a “Contact Groups” category, i.e., choosing a position, such as Estimator, Field Worker, or Foreman. You can find more information here.
REMEMBER: An employee can be assigned to several “Contact Groups” at the same time.
- Permissions: Defining access to the employee’s record by other users - details are described here.
-
Go to the “HR” tab and set the status to “Employed”.
-
Fill in the personnel information:
-
Date of employment: Since when the employee is employed.
-
Department: Assign the employee to the “Employment Department” category (e.g., Administration, Painting).
-
Subdivision/Brigade: Optional name of the employee group (e.g., “Painting -> Interior Walls”)
NOTE: Values for the “Subdivision/Brigade” field will be visible on the list after entering them in the section “First steps - configuration” in Step 3.
-
Social Security Number, date of birth: Personal data.
-
Hourly rate: Determine the hourly rate from two available options:
-
Standard hourly rate: If the employee has a fixed salary, enter the estimated cost for one hour of their work (divide the gross salary value by the number of working hours in the month). This is the cost that will be used to generate statistics for projects.
-
Non-standard hourly rate: If the employee has negotiated different rates for different jobs, then define a “Scope of work” for them and set the gross hourly rate.
-
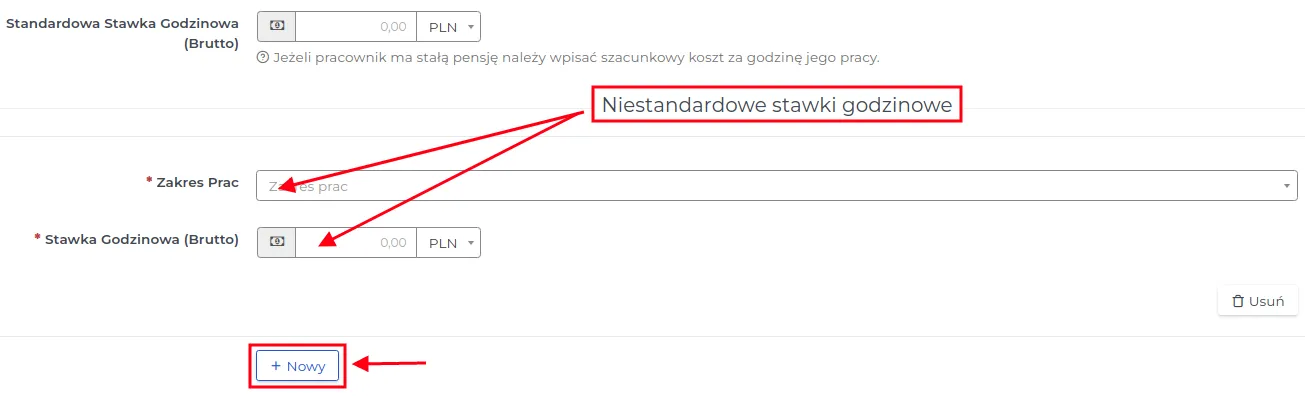
NOTE: For one employee, you can define several scopes of work, each additional scope is added with the “New” button.
REMEMBER: The specified method of accounting for hours is based on the work planner and the employee’s presence at work recorded through the mobile application of the employee or project manager.
- Custom percentage salary rates: If the employee has negotiated non-standard rates for overtime or night/weekend work, they should be entered here.
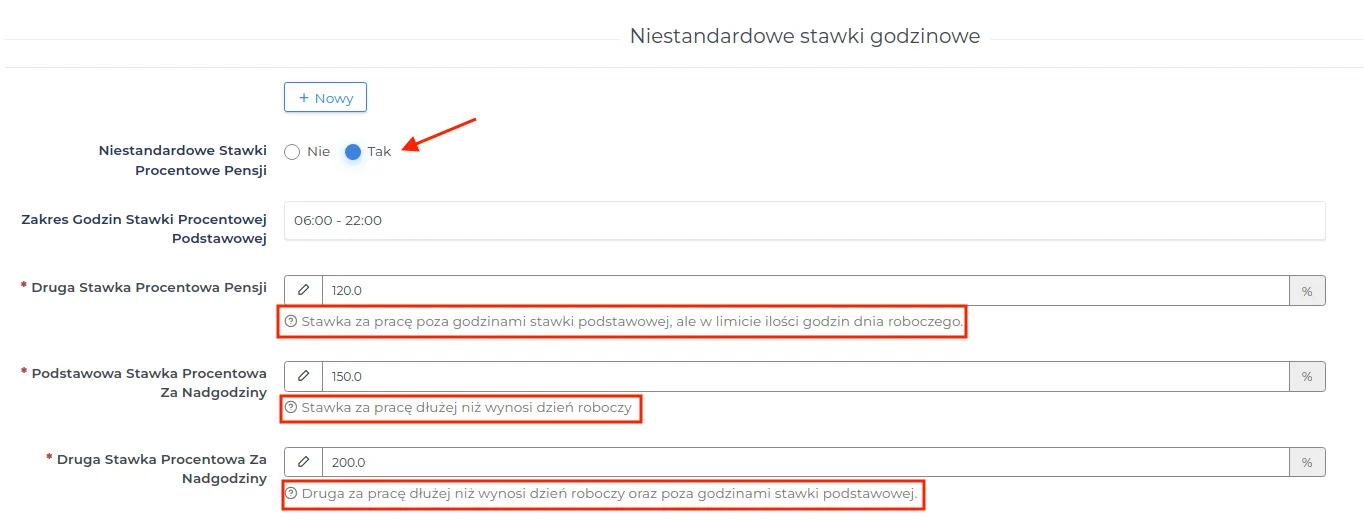
REMEMBER: The application of this settlement applies to field employees, for whom the possibility of overtime has been taken into account.
-
Benefits, obligations: Additional benefits granted to an employee or obligations they are burdened with.
-
Marital status: A designation of social status - single, married.
-
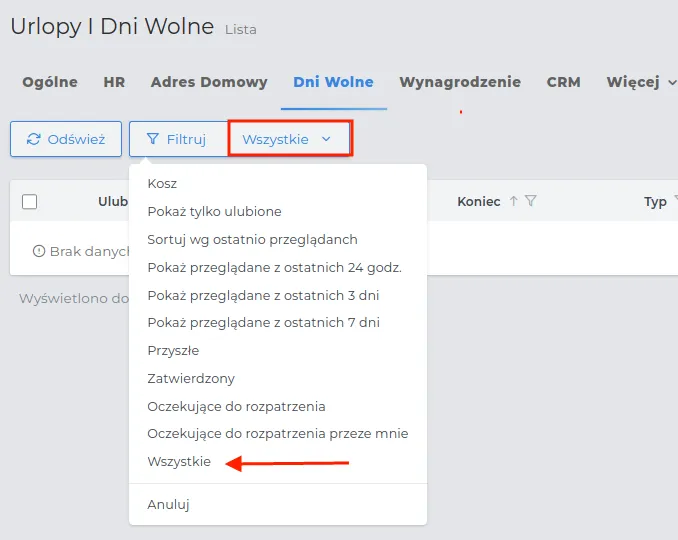
Leaves and days off: If an employee has negotiated different leave conditions than the default, they should be filled in here. Default values are taken from the system settings made earlier.
REMEMBER: All requests for days off submitted by the employee through the Contractors.es system, once approved, will be registered and visible in the employee’s tab named “Days off”.
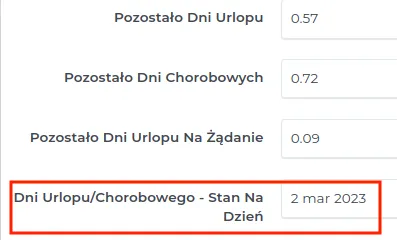
NOTE: The system calculates the value that the employee can enter in their request, based on the number of days worked in relation to the entitled days off.
-
Optionally, select the last tab “Home Address” and enter the employee’s address details. “Home Address” has a separate permission and is by default visible only to administrators and users with the HR role.
-
Save the completed form by clicking the “Confirm” button.
-
Go to the preview of a given employee in the list of records and click the green “Create User” button.
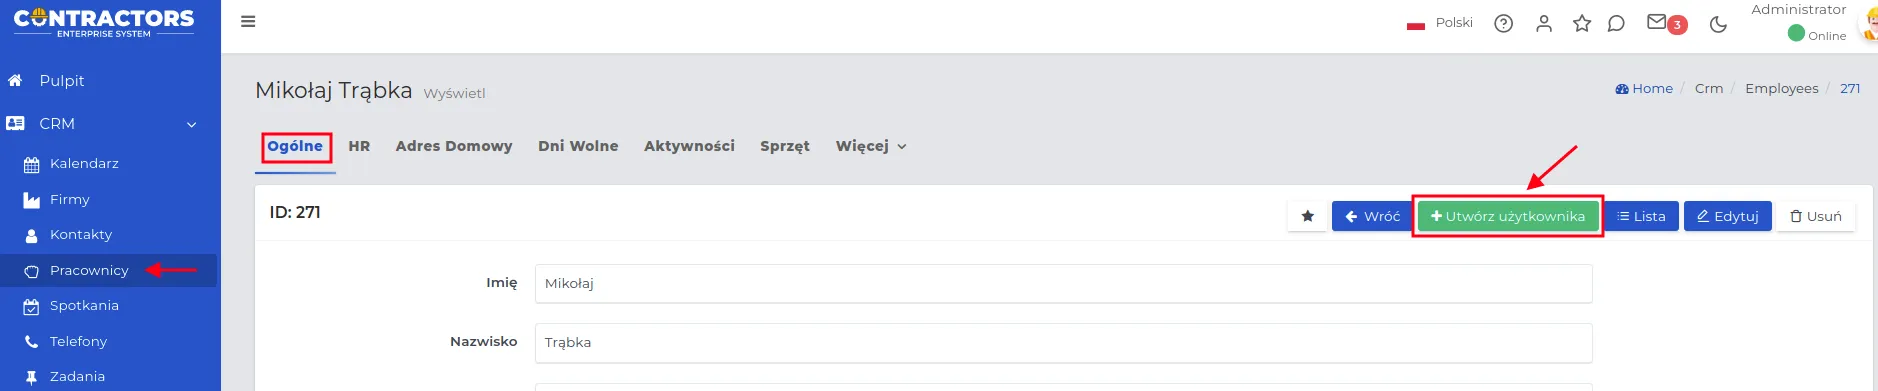
-
Fill in the blank fields in the user creation form and save the changes with the “Confirm” button.
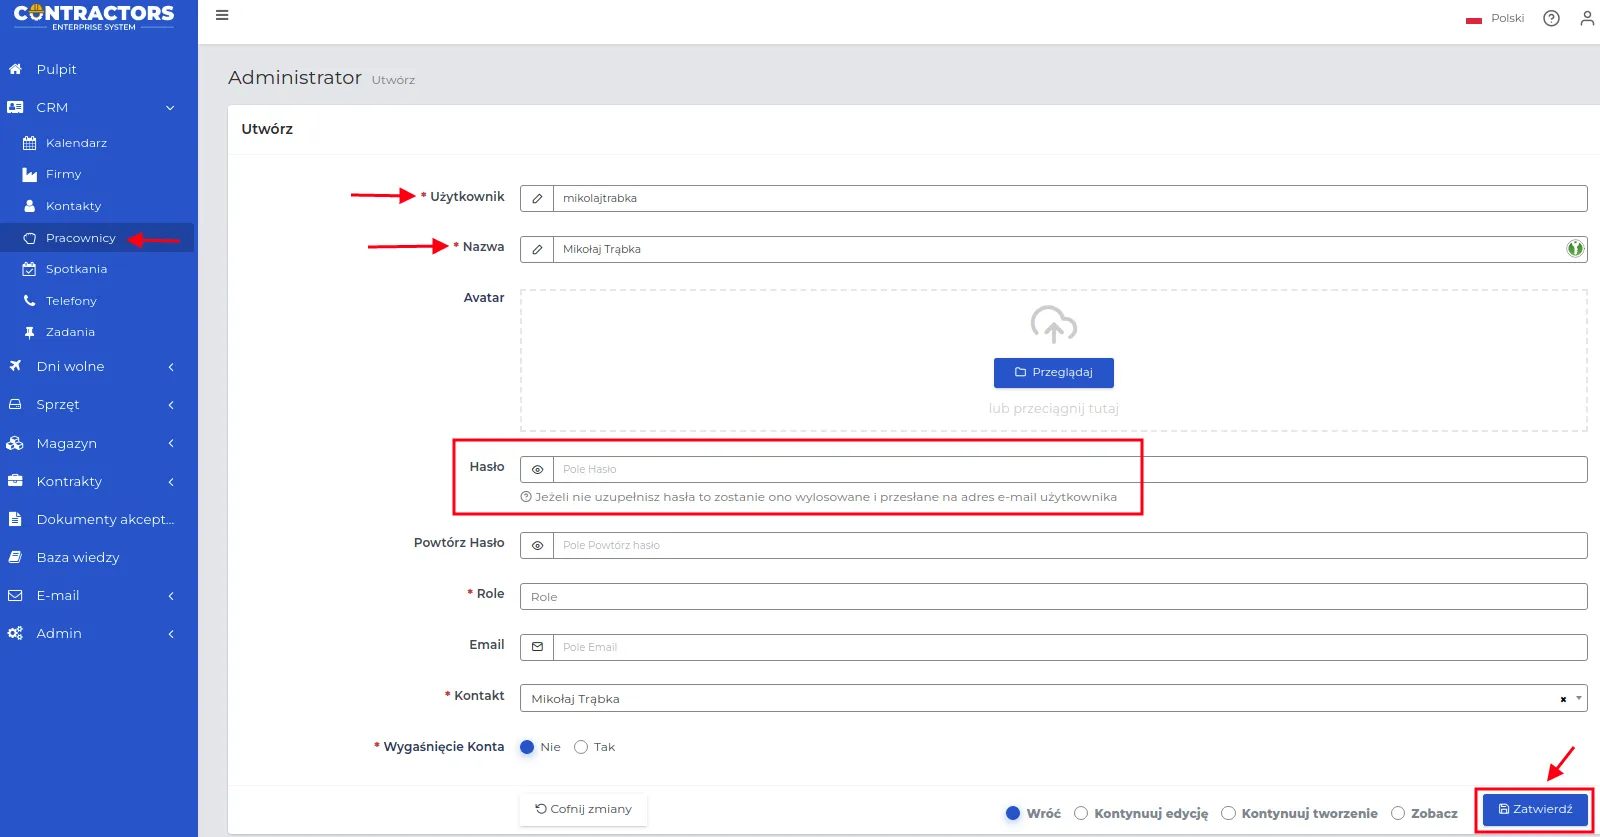
NOTE: The system will generate values for fields that you can change:
-
User: It will enter a login with which the user will log in, e.g., mikolajtrabka.
-
Name: Will be identical to the contact name entered into the system, e.g., Mikołaj Trąbka. If necessary, it can be changed.
REMEMBER: If you do not fill in the password in the “Password” field, it will be randomly generated by the system and sent to the user’s email address.
NOTE: The “Roles” field determines the permissions corresponding to the employment position, select it from the dropdown list, e.g., field worker.
REMEMBER: The account’s activity term in the system can be set by entering a date in the “Account Expiration” field, so that the user cannot log into the system after this date.
- An email will be sent to the employee’s address containing a link and data for the first login to the system.
The list of users added to the system is available in the menu “Admin -> Access -> Users”.
User Permissions
User permissions control access to modules.
You can view the entered permissions in two ways:
-
Click the “Display” button next to the selected user on the list “Admin -> Access -> Users”.
-
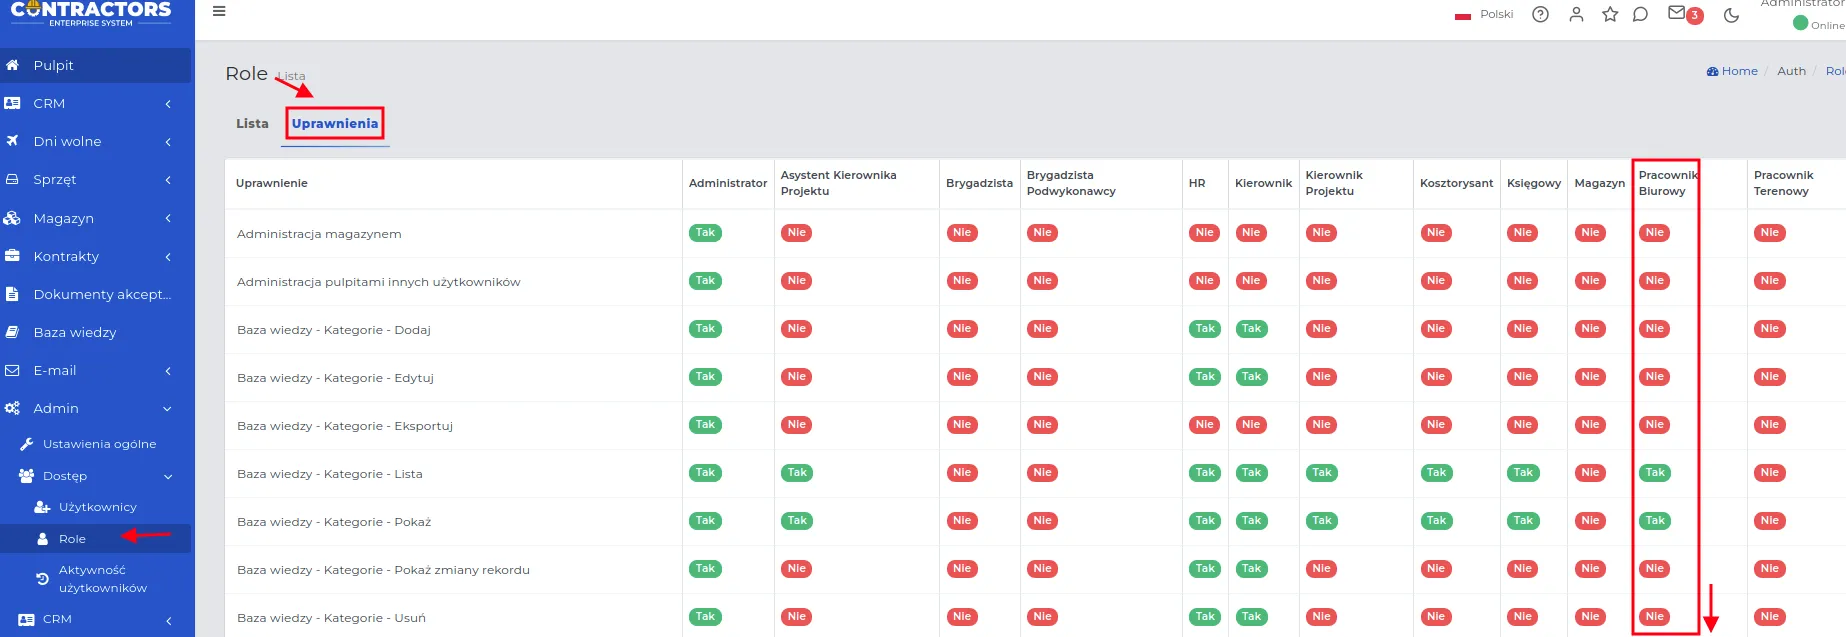
View the graphical list of permissions for all roles by selecting the “Permissions” tab in the “Admin -> Access -> Roles” section.
You can also make any changes to user permissions by following the order below:
-
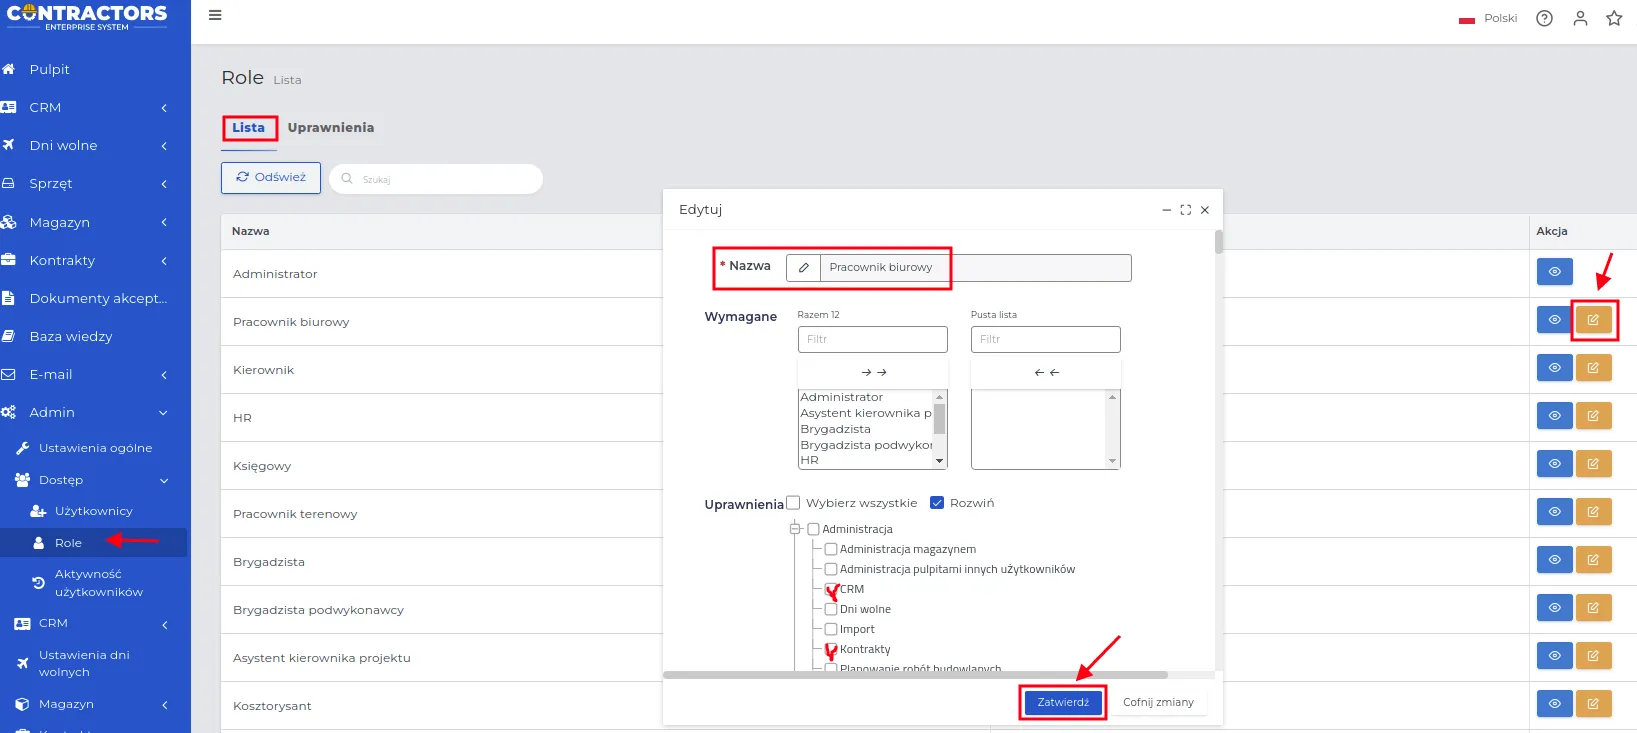
In the menu “Admin -> Access -> Roles” select the “List” tab.
-
Go to “Edit” next to the selected role record.
-
Mark the permissions on the list that you want to add or remove and save the form with the “Confirm” button.
NOTE: Significant modifications to basic roles are not recommended. Consider whether it is better to create a new role for significant changes in permissions.
REMEMBER: Any change in permissions for a given role in the system will directly affect the permissions of all users assigned to that role.
System Roles
System roles are a group of permissions assigned to positions depending on the functions performed in the enterprise. Each role defines specific functions and controls access to particular modules and system resources. The list with defined role names is available in the menu “Admin -> Access -> Roles”.
You can edit selected roles on the list through “Quick Edit” or create a new role by clicking the “New” button. The form remains the same, but a new role requires entering a name.
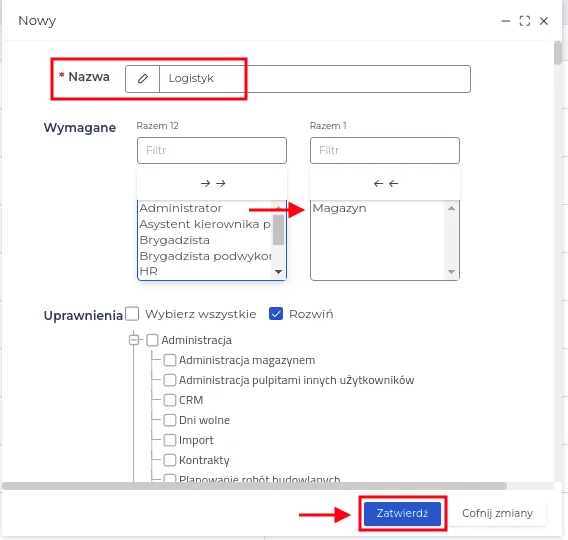
NOTE: If you want the new role name you are entering into the system to partially overlap with the permissions of another role, follow the steps below:
-
Add the name of the new role to the system roles list using the “New” button, e.g., Logistician.
-
Under the “Required” field, click on the name of the role whose permissions are to be inherited, e.g., Warehouse.
-
In the permissions tree, select from the list those permissions you want to additionally assign to the newly created role and save the form with the “Confirm” button.
REMEMBER: If the selected required role previously had another role from the list assigned, then the new role on the list will receive all those roles simultaneously.

NOTE: Roles without inheritance in the “Required” column have the least permissions. Roles with inherited other roles have broader permissions.

User Activity History
The system logs changes made to records, as well as their viewing actions.
REMEMBER: Only administrators have full access to the activity history, and this option cannot be disabled or limited by system settings.
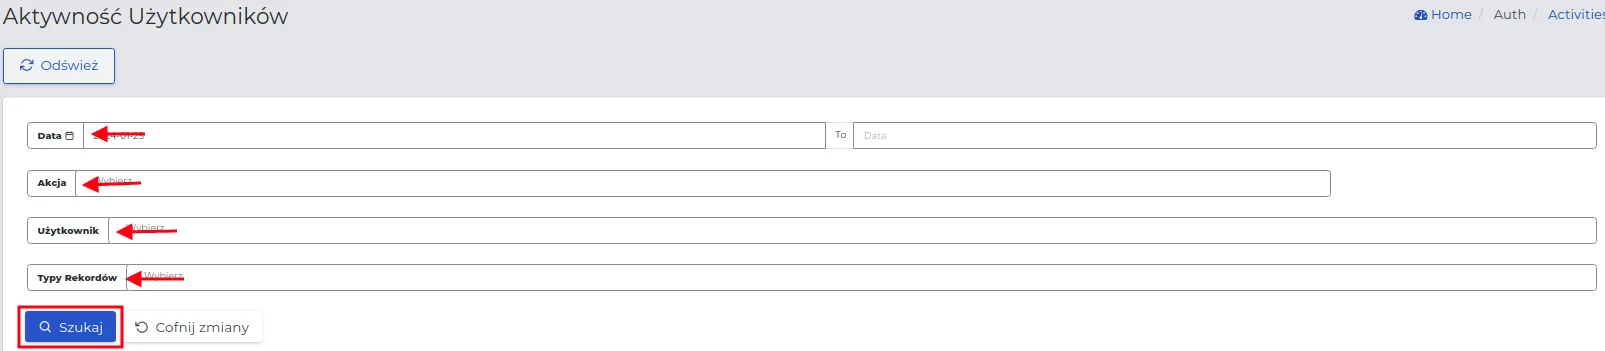
The history of changes in individual records can be tracked in the “More -> History” tab. You can find a complete list of all changes in the system in the “Admin -> Access -> User Activity” menu - you must be logged in as an administrator.
NOTE: The system’s record filtering function allows you to quickly find a specific entry. You can filter data by date, action, username, or record type. The more criteria you provide, the more efficiently you will find the entry you are interested in.
Note Categories in Records
Notes are short and precise pieces of information that users can add to records in the system. It is beneficial to categorize notes so that their view in the list of entries reflects the category to which a given entry belongs. Restricting access to notes only for selected roles in the system helps protect their content from people who do not have the appropriate permissions.
REMEMBER: Every user can add notes under selected records, but access to them can be limited if you configure visibility for specific note categories.
NOTE: The allowed types of associations are places in the system where, when entering notes, it will be possible to select the created category.
REMEMBER: Notes added to records do not have to be associated with specific categories - such notes are classified as others.
Examples of note categories that can be created in the system along with their possible associations:
-
Personal Data: Personal information of employees limited to the “HR” role -> Contacts.
-
Project Data: Remarks and information related to projects -> Acceptable Documents, Daily Reports, Phones, Subcontractor Agreements, Material Verification, Inspection Visits, Information Requests, Project Changes.
-
Finance: Related to payments and settlements - available only for the “Accounting” role -> Acceptable Documents, Costs, Amounts Paid to Subcontractors, Issues, Subcontractor Agreements.
-
Training: Related to planning and conducting training -> Contacts, Tasks, Meetings.
-
Issues: Concerning reports of problems that have arisen and ways to solve them -> Companies, Equipment Service.
-
Schedule: Planned delivery/work dates related to the project or subcontractor -> Companies, Projects.
-
Usage Recommendations: Information on the safe and efficient use of specific equipment -> Equipment.
Creating note categories is done in the following order:
-
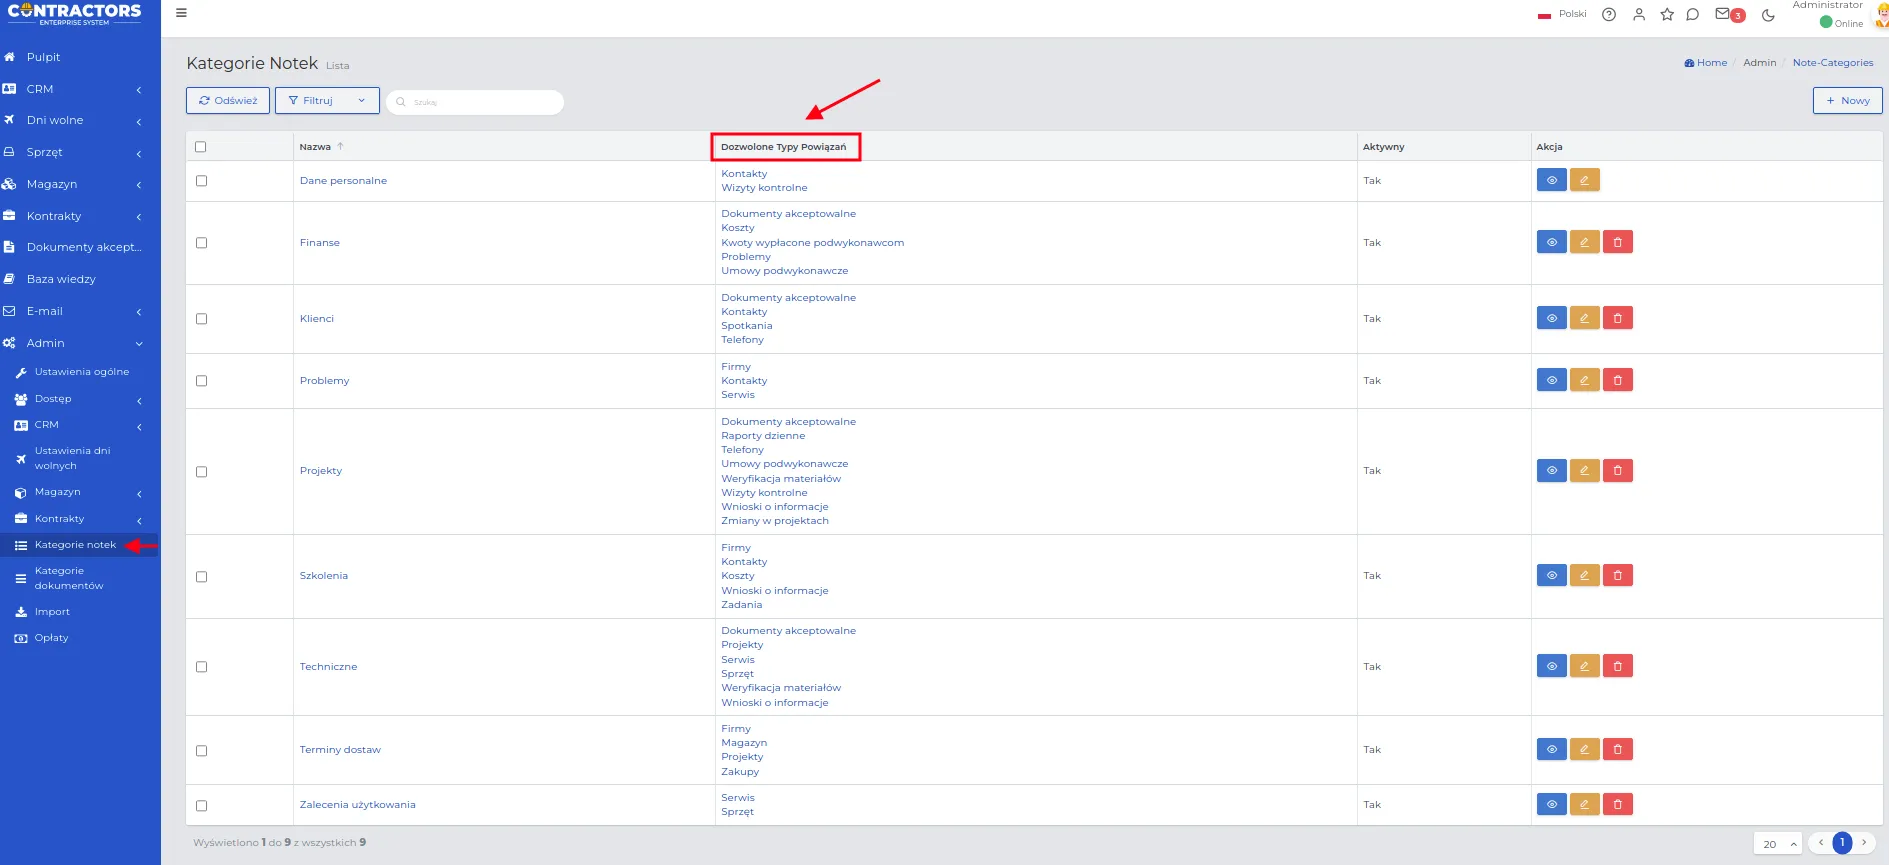
Go to the “Admin -> Note Categories” section and click the “New” button.
-
Add the category name and mark in which records users will be able to create entries with it, the so-called allowed types of associations.

-
Optionally, select the roles that will have access to such notes.
REMEMBER: Specifying roles effectively protects notes from access by unauthorized persons.
NOTE: Leaving the “Only for users with roles” field empty, notes will be visible to all users, regardless of the roles they hold.
-
Leave the “Active” slider on if you want the note category to be visible in the system.
-
Save the data with the “Confirm” button.
REMEMBER: If you have stopped using a particular category, it is recommended to deactivate it by moving the slider. Despite deactivation, notes assigned to this category will remain visible. However, it will not be possible to add new notes with this category.
NOTE: You cannot delete a category if there are any notes assigned to it.
Types of categories for attached documents
Documents that you add to records can include contracts, purchase invoices, and other arrangements. As with notes, you have the option to create categories, set links between records, and control access to them. In this system section, you should also define so-called acceptance steps for the selected document category. These are situations where the uploaded document requires approval by the appropriate person. This procedure may involve one or several stages, where the document is sent sequentially to users with assigned roles.
REMEMBER: Restricting access to document views allows you to protect their content from people who do not have the appropriate permissions.
Examples of document categories that can be added to the system along with their possible associations:
-
Candidate CVs -> Tasks (task of finding an employee).
-
Project plans -> Projects, Construction Changes (may require approval by a constructor or architect).
-
Cost accounts -> Tasks or without associations (equipment purchase approvals should be made by people knowledgeable about the type of devices).
-
Contracts -> Contacts, Companies, Projects (contracts may be approved by legal, accounting, and/or HR departments).
NOTE: The three types of categories for attached documents created in the system are editable. Verify their content before creating a new category.
Creating document categories is done in the following order:
-
Go to the “Document Categories” menu and select the “New” button on the right side of the screen.
-
Fill out the displayed form according to the scheme:
-
Name: A proprietary name for the newly created document category.
-
Accounting Code: A special identifier used for registration, recording, or marking a document. It is not a required field and in small/medium-sized companies, it is usually not used.
-
Association: Defines the record in which this category can be selected.

-
Required: The document can only be entered into the selected record, chosen from the available permitted types of associations.
-
Optional: It is recommended to assign the document to a specific association, but it is not a mandatory requirement.
-
None: Association will not be possible.
-
-
Only for users with roles: The ability to specify those roles in the system for which documents belonging to the created category will be visible on the list of records.
REMEMBER: Specifying roles effectively protects against unauthorized persons viewing the documents.
NOTE: Leaving the “Only for users with roles” field empty, documents belonging to that category group will be visible to all users, regardless of their roles.
-
Indicate whether the document should be accounted for after the acceptance of steps or not. This applies to those categories of documents that are related to costs.
-
Leave the “Active” slider on if you want the note category to be visible in the system.
REMEMBER: If you have stopped using a given category, it is recommended to deactivate it by moving the slider. Despite deactivation, documents assigned to this category will remain visible.
NOTE: You cannot delete a category if there are documents assigned to it.
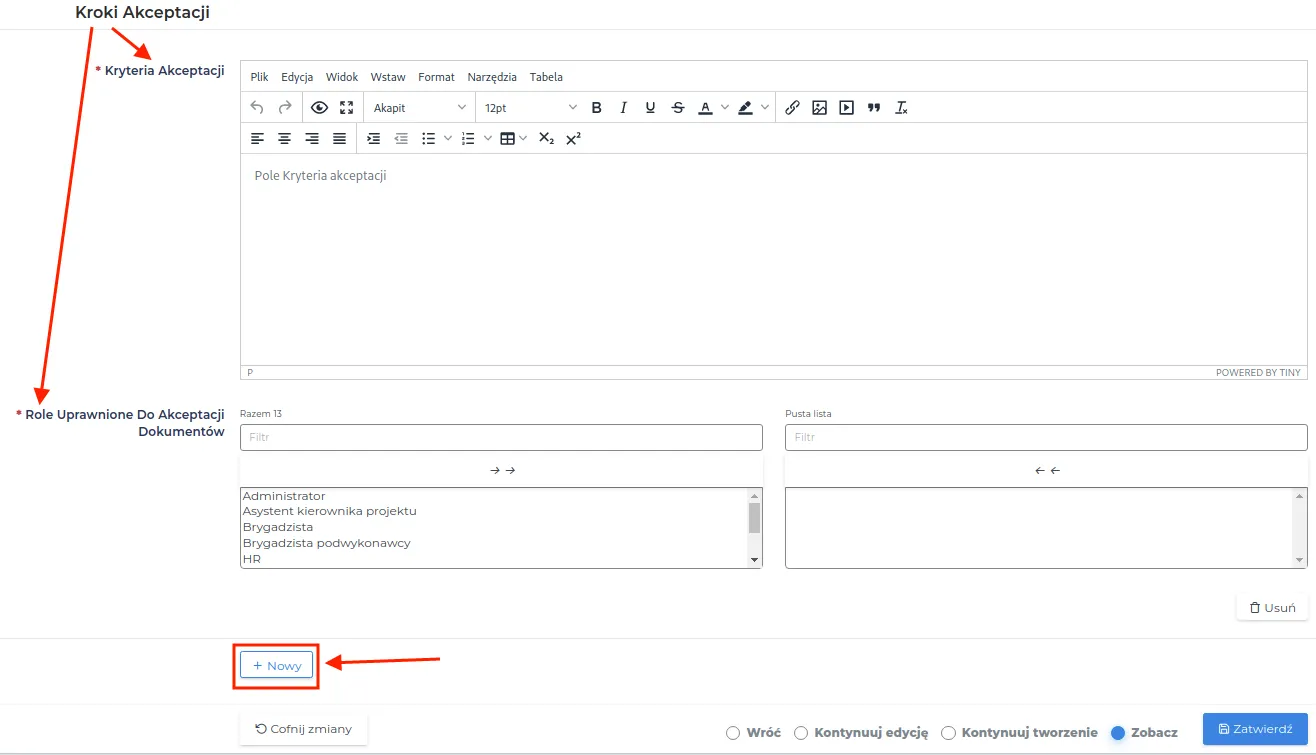
- Set at least one acceptance step by filling in the fields:
-
Acceptance Criteria: A formula defining the scope of confirmation of the requirements necessary to approve the document, e.g., Checked for substantive content, Checked for financial aspects, Checked for the actual enforceability of products and market price.
-
Roles authorized to accept documents: Users with selected roles will be able to accept the document.
NOTE: In the case of multi-stage document acceptance, add another acceptance step by clicking the “New” button and fill in the required fields.
- Save the data with the “Confirm” button.
Example illustrating the creation of a document category named “Candidates’ CVs”.
-
Go to the note category creation form in the “Admin - Document Categories” menu.
-
Fill in the fields and set:
-
Association: required.
-
Allowed association types: Tasks (documents for the created category name can only be added in this record).
-
Only for users with roles: HR (entry will only be visible to the HR department).
-
-
Complete the acceptance steps as a three-stage procedure in which:
-
The created document is first sent to the HR department, which after reviewing and accepting it, sends it back with the message “Verified the candidate’s past professional experience for the position of field worker” to the person designated in the second step of acceptance.
-
The document goes to the user with the Project Manager role, who after verification accepts its compliance, with the following message “I confirm the credibility of the candidate regarding his technical knowledge based on the conducted telephone conversation. Please arrange an interview with the candidate”.
-
The document returns again to the HR department, where they should arrange a meeting and conclude the process by confirming the step: “An interview meeting has been scheduled”.
-
-
Save the data with the “Confirm” button.
REMEMBER: The conditions specified during the creation of document categories are repeatable, and each procedure for their acceptance saved in them will be identical.