Data Import
The use of this feature requires the ability to export data from another program that has been used so far.
The data you want to copy into the system can be transferred automatically. This process is particularly helpful when the company’s database is very extensive, and rewriting (manual data entry) would take a considerable amount of time.
Preparing the file for import
-
The file with data intended for import must be properly prepared. You can generate it from the system you have worked on before.
-
The Contractors.es system importer supports the following file types: *.CSV; *.XLSX.
NOTE: This data must be arranged in columns, in accordance with the described headers, as shown below.
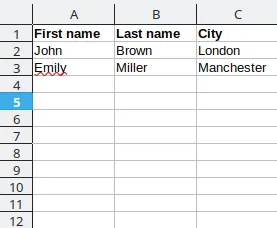
Example: Data for import belonging to the “Contacts” group:
-
First Name
-
Last Name
-
Title
-
Company (exact company name - must be in the system)
-
Company - Record ID (ID number of the company in the Contractors.es system)
-
Company - External ID
-
Business Phone
-
Mobile Phone
-
Fax
-
Email
-
Website Address
-
Address 1, 2
-
City
-
Country
-
ISO country code (for Poland it will be: PL)
-
Province
-
Province Code
-
Department (the name must exist in the system)
-
Groups (groups must be defined in the system and should be separated by commas or a vertical bar)
Basic data import
-
To start importing data, go to the data import module in the system menu: Admin → Import.
-
Click the “New” button in the upper right corner of the screen.
-
In the form, specify the type of file to be imported.
NOTE: The system allows data to be imported only to the groups: “Contacts”, “Companies”, “Equipment”, and “Materials Warehouse”. In these groups, statistically, there may be the most data to import.

NOTE: Completing as many fields as possible intended for import at one time will significantly speed up the data transfer process itself. A preview of fields in selected target groups (record types) is available by going, for example, to the creation of such a record:
-
CRM → Contacts
-
CRM → Companies
-
Equipment → Equipment List
-
Material Warehouse → Material List
-
Upload a file with data prepared in the appropriate format from your disk (*.CSV; *.XLSX).
-
Save the uploaded file to the system using the “Confirm” button.
Assigning Columns
Simply uploading the prepared file will not input the data into the correct fields in the system. You need to link the field names with the fields available in the data group forms you want to import.
-
Select the record from the list of uploaded records whose file columns you want to link with the data in the system first.
-
Go to its “Edit”.
-
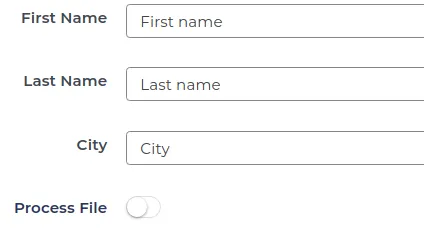
Fill in the fields in the form by selecting the appropriate columns from the uploaded file from the list.
-
Check the “Process File” box as active.

-
Save the entered data with the “Confirm” button located at the bottom of the form.
NOTE: If you do not set the column mapping correctly, the system will not allow the import to be performed.

REMEMBER: Correctly imported files on the record list will receive the status “Completed”.

NOTE: A record with this status will not be editable anymore.