Equipment
In the “Equipment -> List” section, you can find information regarding the storage location of the equipment, the date, and the amount of its purchase (the amount is only visible for roles specified in the permissions).
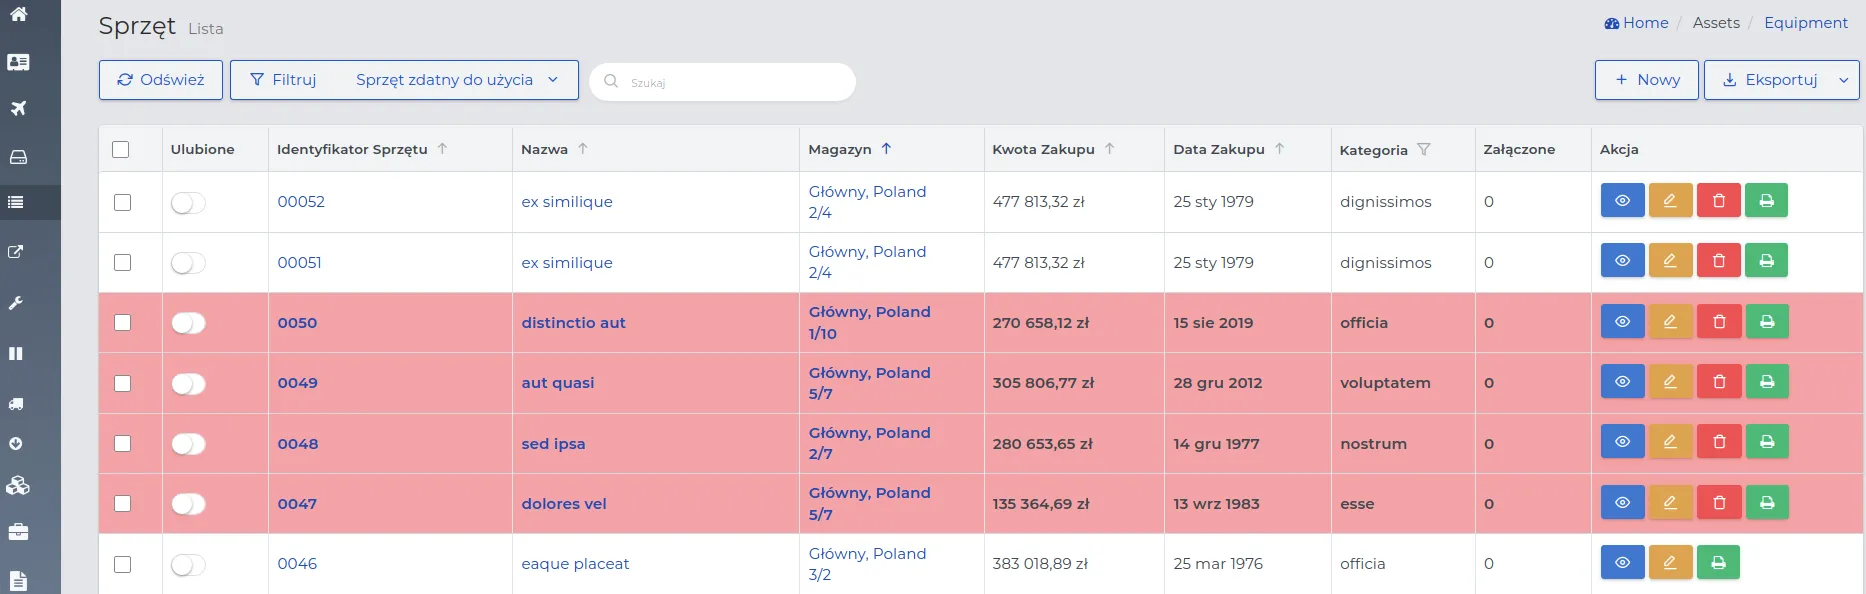
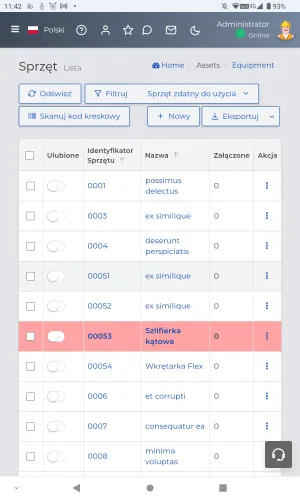
REMEMBER: If the service interval is exceeded, the equipment will be marked in red on the list of records, signaling the need to send it for service.
Using the action buttons, you can view, edit, or delete selected entries from the list. In the record preview, standard tabs available in different types of records are visible, where you can use auxiliary buttons, described in more detail here. In each section, there is the possibility to filter the list, and detailed information on this can be found here.
Adding equipment and hardware
You can import equipment and hardware into the system by preparing the appropriate data file as described here, or add it to the list manually in the following order:
-
Go to the “Equipment -> List” section and click the “New” button.
-
Fill out the form, for which the meaning of the fields is as follows:
-
Generate equipment identifier: The method of identifying equipment in the system.
-
Choosing the option “No” - will allow you to enter your own equipment identification name in the “Equipment Identifier” field.
-
Choosing the option “Yes” - generates a unique sequence of digits assigned in order, according to the addition of subsequent items to the list.
-
-
Equipment name: The name of the equipment being added.
-
Serial number: The unique serial number of the equipment provided by the manufacturer.
-
Warehouse: The place where the equipment is located when not loaned out, for example, “Main Warehouse”.
-
Location in warehouse: The specific location of the equipment in the warehouse, e.g., shelf, aisle, etc.
-
Purchase amount: The price at which the equipment was purchased.
-
Date of purchase: The date the equipment was purchased.
-
Supplier: The company or person from whom the equipment was purchased.
ATTENTION: Only a company belonging to the “Supplier” group can be a supplier. Make sure such a company exists in the system and add it if it has not yet been entered.
-
Invoice number: The number of the document confirming the purchase of equipment.
-
Category: Choose the appropriate category that defines the type of equipment.
-
Service based on meter readings: A method of determining the timing of maintenance or service based on the equipment usage meter.
-
Choosing the option “No” - the equipment does not require this type of service.
-
Choosing the option “Yes” - mark if the equipment requires service, dependent on the service interval e.g., the number of kilometers on the meter.
-
-
Service based on time: A method of determining the timing of service based on time intervals.
-
Choosing the option “No” - the equipment does not require this type of service.
-
Choosing the option “Yes” - mark if the equipment requires service, dependent on the time interval, e.g., once a year, once a month, etc.
-
-
Meter reading at the time of purchase: Provide the initial meter reading of the equipment, from which its usage will be counted.
-
Note: Optional addition of notes or additional description regarding the equipment.
-
Status: Determine the current state of the equipment from the available: usable, lost, damaged.
- Save the data using the “Confirm” button.
REMEMBER: After adding equipment to the system, you can print the device label by clicking the “Print Device Label” action button in the record. Stick the printed label on the device to easily issue or receive equipment. This way, you also gain the ability to identify the equipment.
ATTENTION: Records visible on the list that are marked in red indicate the need to send the equipment for service. This necessity arises from the fact that since the last service, the number of usage units has exceeded the specified service interval. The following message appears in the record preview:

Hardware Requirements
Requests for hardware can include both equipment stored in inventory and that which needs to be purchased or rented from an external company.
You can add a request for the necessary equipment or hardware to the system in the following order:
-
Go to the “Equipment -> Requirements” menu and select the “New” button.
-
Fill out the form, the meaning of the fields is as follows:
- Name: The name that best describes the required equipment, e.g., red 100l drum concrete mixer or Makita grinder.
REMEMBER: The name of the equipment does not have to be identical to the items found in the company’s inventory. You can enter it freely.
-
Equipment needed from the day: Specify the deadline by which the hardware request should be fulfilled.
-
Assign: Assess whether a link should be created in the system for the reported hardware requirement.
-
Choosing the option “No” - no links with other system records.
-
Choosing the option “Yes” - means that the request concerns equipment needed for a specific project or client, which should be specified on the list.
-
-
Estimated return date: The planned date for returning the equipment to the warehouse.
-
Reported by employee: Data of the employee reporting the requirement.
NOTE: You can only select contacts of persons who are currently employed workers.
- Save the entered data using the “Confirm” button.
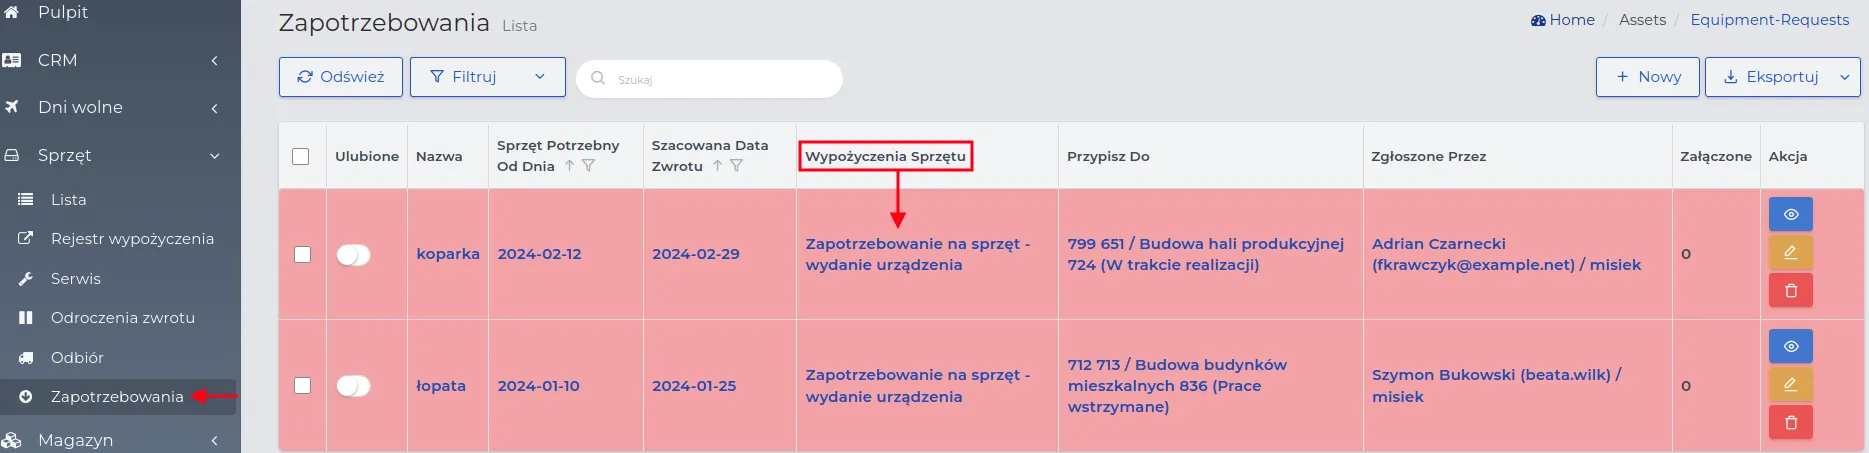
NOTE: Records highlighted in red indicate requests whose deadline for fulfillment has been exceeded and are still waiting for the requirement to be met.
REMEMBER: A construction worker has the ability to report a requirement through the mobile application. In this case, they only enter what equipment they are interested in and when they need it - the rest of the data is filled in automatically.
Issuing Equipment Based on Requests
The process of issuing equipment based on reported requirements proceeds as follows:
-
Go to the records with requests in the “Equipment -> Requirements” menu.
-
Adjust the list of requests by applying the appropriate type of filtering of entries, which you can read more about here.
-
At the selected record, in the “Equipment Rentals” column, click on “Equipment Demand - Device Issue”.
REMEMBER: Equipment that has been purchased according to the reported demand must first be entered into the equipment list. Only then will it be possible to assign it to a specific loan application.
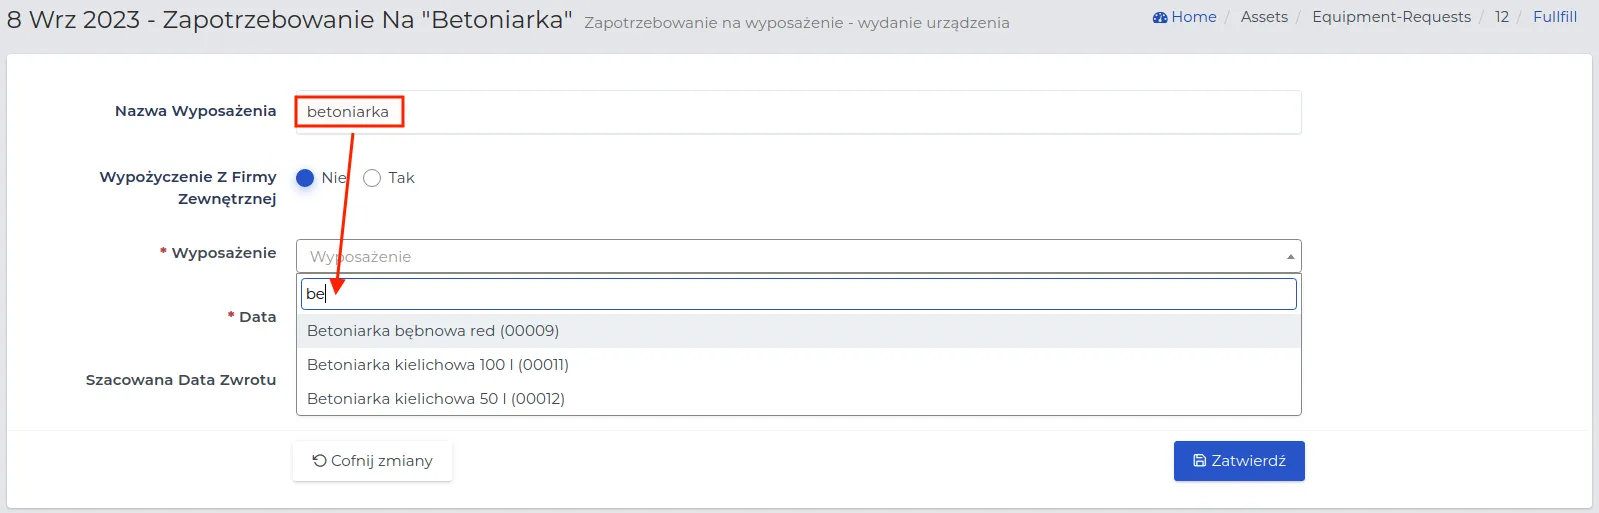
- Fill out the form, the meaning of the fields is as follows:
-
Name: The name of the equipment provided by the employee submitting the demand. This field is not editable and indicates the type of submission.
-
Rental from an external company: Determine whether the required equipment is available in the equipment warehouse, or if it needs to be rented.
-
Choosing the option “No” - there is no need.
-
Choosing the option “Yes” - the equipment should be rented from an external company, where the next fields to be filled in will concern:
-
-
Identification of the device from the rental company: Assignment of a characteristic symbol, number, or own name for the identification of this device.
-
Description of the device from the rental company: Additional description regarding the condition of the equipment or its features.
-
Renting company: Selection from the list of a record belonging to the “Supplier” group.
-
Cost of renting the device: The amount that must be paid for renting the device, according to the established billing period. This amount will be settled in the financial balance of the project on which the equipment will be used.
-
Billing period for the rental cost: The method of charging for the rental of the equipment, e.g., one-time, daily, weekly, or monthly.
The rest of the form will be identical regardless of whether the equipment is rented from an external company or is available in our warehouse.
- Equipment: Select the name from the equipment list that corresponds to the characteristics of the equipment provided by the employee.
NOTE: Only those items that are not currently rented out will be visible on the list of available equipment.
REMEMBER: If an employee is interested in specific equipment, check its return date on the “Rental Register” list and inform the employee when it could be available for rental.
-
Date: Specifies the date when the equipment will be needed by the employee submitting the request.
-
Estimated return date: The declared date for returning the equipment to the equipment warehouse.
- Save the data using the “Confirm” button.
REMEMBER: The consequence of fulfilling an equipment request is its rental. The completed application will be visible simultaneously in both system sections: “Requests” and “Rental Register”.
Equipment Rental
The system functions related to renting and returning equipment are designed to ensure the efficient circulation of equipment and to optimize the use of available resources.
REMEMBER: Every rented piece of equipment must be properly registered in the system, specifying the return date and the person responsible for its return.
To register the rental of equipment, follow these steps:
-
Go to the menu “Equipment -> Rental Register” and click the “New” button.
The form for creating equipment rental will be partially identical to the form concerning the issuance of equipment based on a reported request, described in detail here. The remaining fields will concern:
- Used by: Assign from the list the selected employee or subcontractor who is renting the equipment.
REMEMBER: If the person renting the equipment does not belong to any of these groups, enter their details in the field “Other -> Who is responsible”.
-
Assign: Choose the purpose of the equipment rental.
-
Selecting the option “No” - the rental is not associated with a client or project entered into the system.
-
Selecting the option “Yes” - specify the association with a client or project that the rental will concern.
-
-
Estimated return date: The declared date for returning the equipment.
-
Return date: Leave the field blank until the actual return of the equipment by the renting person.
- Save the form using the “Confirm” button.
NOTE: You can only rent equipment that is not currently rented out or in service.
REMEMBER: To check the location of a specific type of equipment, review all records in the “Equipment Rental” section. Use the list sorting function or enter the name of the equipment in the “Search” field.
Simultaneous Rental of Multiple Equipment
The system allows for the rental of several pieces of equipment at the same time. This way, for a single employee or subcontractor, we can assign more than one rented device at a time.
To rent several pieces of equipment simultaneously, follow the scheme:
-
Above the list of records in the “Equipment -> Rental Register” section, select the “Issue several pieces of equipment at once” button.
-
Fill out the rental creation form, according to the description available here.
-
For the “Equipment” field, sequentially select the names of the equipment from the list that are to pertain to this rental.

- Save the form using the “Confirm” button.
REMEMBER: When creating a collective rental of equipment, each selected piece of equipment will be registered as a separate record in the rental register. This will make it possible to submit individual requests concerning the postponement of the return or the collection of specific devices.
Return of Equipment
A report informing about the return of equipment to the equipment warehouse should be submitted each time an employee returns equipment. This will ensure that the data on available equipment in the system is always up to date.
The system allows for the registration of equipment return in two ways:
Method I: Return of equipment from the equipment list.
-
Find the equipment to be returned among the records in the “Equipment -> List” menu.
-
Go to the view of its entry by clicking on the name of the equipment or the order identifier.
-
Select the “Rentals” tab and in the “Return Date” column click on “Return”.
-
Fill out the form, the meaning of whose fields pertains to:
-
Return Date: The date of the equipment return.
-
Usage Counter Indicates: The method of recording the counter state, where:
-
Choosing the option “whole” - specifies the full state of the counter.
-
Choosing the option “part” - is the value corresponding to the difference between the counter state on the return date and the counter state on the rental date.
-
-
Usage Counter: The value of the usage counter, given in accordance with the selected setting.
-
Device returned in the same condition: Assessment of the actual condition compared to the state of the equipment on the day of its rental.
-
Selecting the option “No” - for damaged equipment, specify what has been damaged and optionally attach photos of the damage in the “Damage Photos” field.
-
Selecting the option “Yes” - the equipment has not been damaged.
-
-
Note: Additional information or comments regarding the returned equipment.
- Save the data using the “Confirm” button.
Method II: Returning equipment from the rental register list.
-
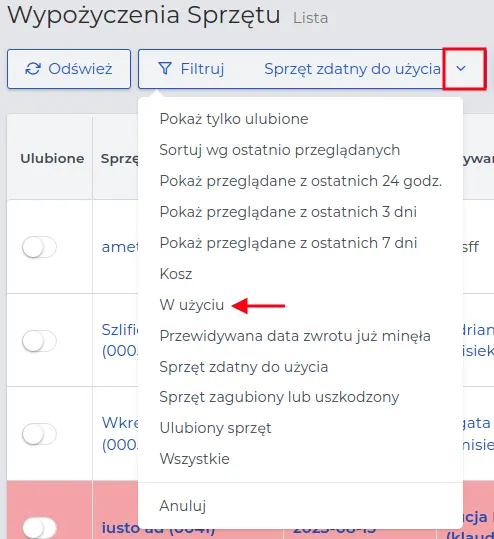
On the list available in the menu “Equipment -> Rental Register”, leave only the records specifying equipment “In use”.
-
Return the selected equipment by clicking on the word “Return” in the “Return Date” column.
-
Fill out the form according to the meaning of the fields described here and save it with the “Confirm” button.
Postponement of the return of rented equipment
If it is necessary to change the return date of the rented equipment, the system allows you to add a new date and register this change in the database.
The method of reporting the postponement of the return, you will perform in the following order:
-
Go to the menu “Equipment -> Return Postponements” and click on the “New” button.
-
Fill out the form, the meaning of the fields is as follows:
-
Equipment rental: Find the equipment on the list whose return date you want to change.
-
New planned return date: Specify the new return date for the equipment.
- Save the data using the “Confirm” button.
REMEMBER: Only after the application is approved by a person with the appropriate permissions in the system, and its status is changed to “Approved”, will you be able to return the equipment on the declared date.
NOTE: Lack of consent to postpone the return of the equipment means that the equipment must be returned immediately after exceeding the established deadline.
NOTE: A construction worker can create a request for postponement of the return and control the rented equipment through the mobile application.
Acceptance or rejection of the application with a change of return date
Any deferral of return can only occur after acceptance of the reported issue on the list.
NOTE: Only users with appropriate permissions can change the statuses in requests for deferral of equipment return.
Changing the status of requests for deferral of return proceeds according to the following scheme:
-
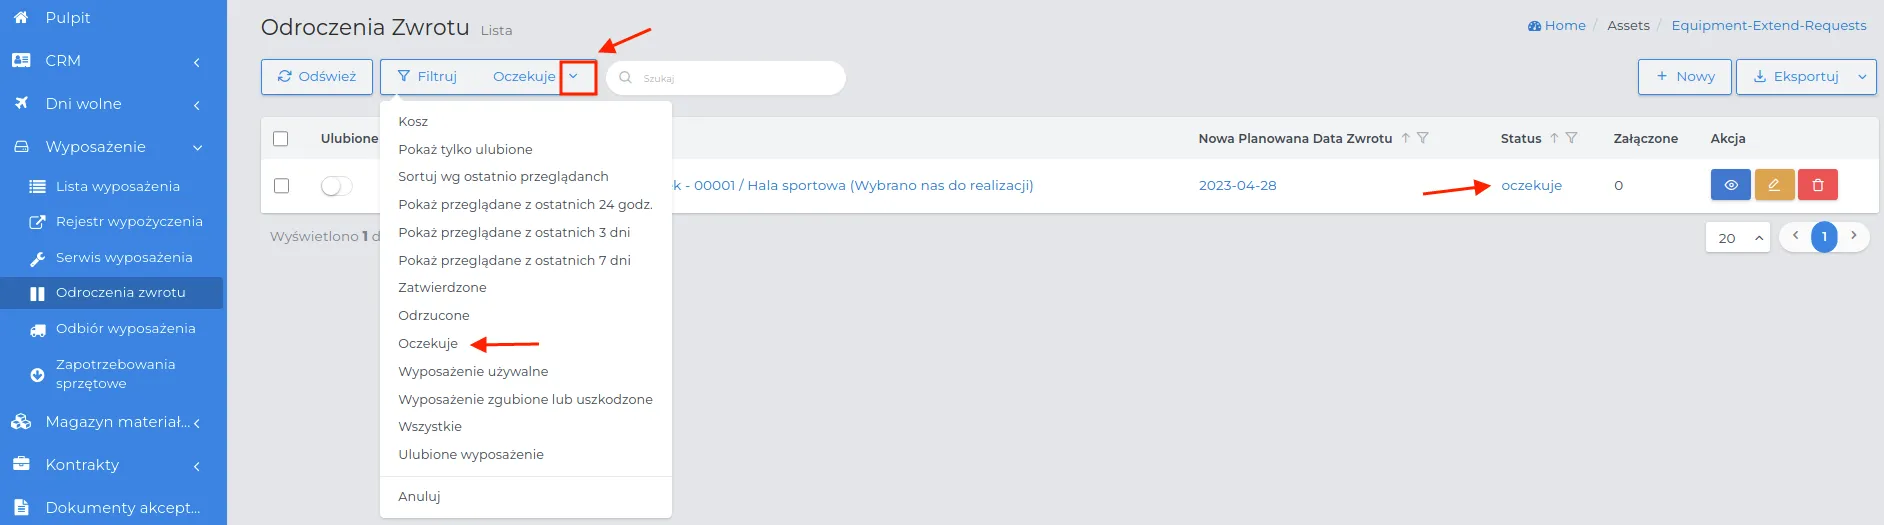
Open the list “Equipment -> Return Deferrals” and apply the “Pending” filter.
-
In the “Status” column, click on the status name.
-
On the displayed form, determine the new status, making a choice among the available options: “Approved” or “Disagreed”.
-
Optionally, in the “Note” field, enter the justification for your choice.
-
Save the form using the “Confirm” button.
NOTE: Returning equipment before the planned date for which the “Return Deferral” was applied will not allow for further change of its status. The change in the color of the status name from blue to black indicates the situation.

Equipment Collection
The equipment collection register gathers information about reports in which it is necessary for the company to collect the equipment due to the inability to return it independently, e.g., due to the lack of appropriate transport. The system allows for adding an equipment collection order and marking by whom and when it was delivered to the warehouse.
NOTE: The fields in the equipment collection order creation form are identical to those in the case of creating orders for equipment return deferrals.
NOTE: A construction worker can create a collection request record through the mobile app.
REMEMBER: The final stage determining the equipment collection is its delivery to the warehouse by the employee.
Equipment collection orders can be verified in two ways:
Method I: The employee collects and immediately brings the equipment to the warehouse.
-
On the list “Equipment -> Collection” apply the “Pending” filter and select the name of the equipment that the employee is to bring.
-
In the “Collection Date” column, click on “Collect”.

NOTE: Selecting “No” in the “Received” column will redirect you to the same form you are currently in.
-
Fill in the fields in the form regarding the selection from the list of the employee who is to receive the goods and mark the “Active slider” named “Return to warehouse”.

-
Save the data using the “Confirm” button.
-
The received goods are available on the equipment list. Employees can reserve it by reporting their needs.
Method II: The employee has received but has not yet delivered the equipment to the warehouse.
NOTE: This method of creating equipment receipt applies only to requests made on a desktop computer.
-
Follow the scheme described in Method I, only leave the slider named “Return to warehouse” inactive.

-
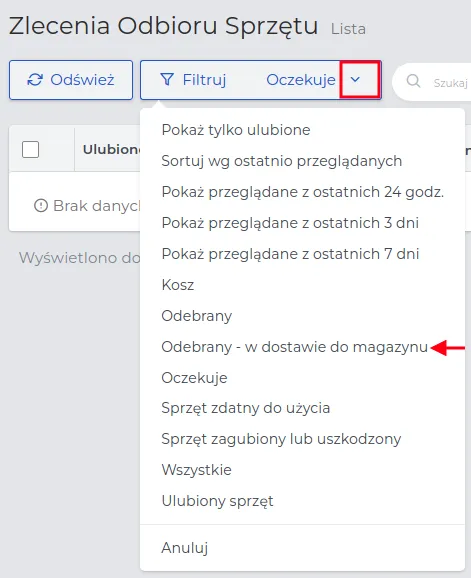
Apply a filter on the “Equipment -> Receipt” list, selecting the “Received - in delivery to warehouse” option.
-
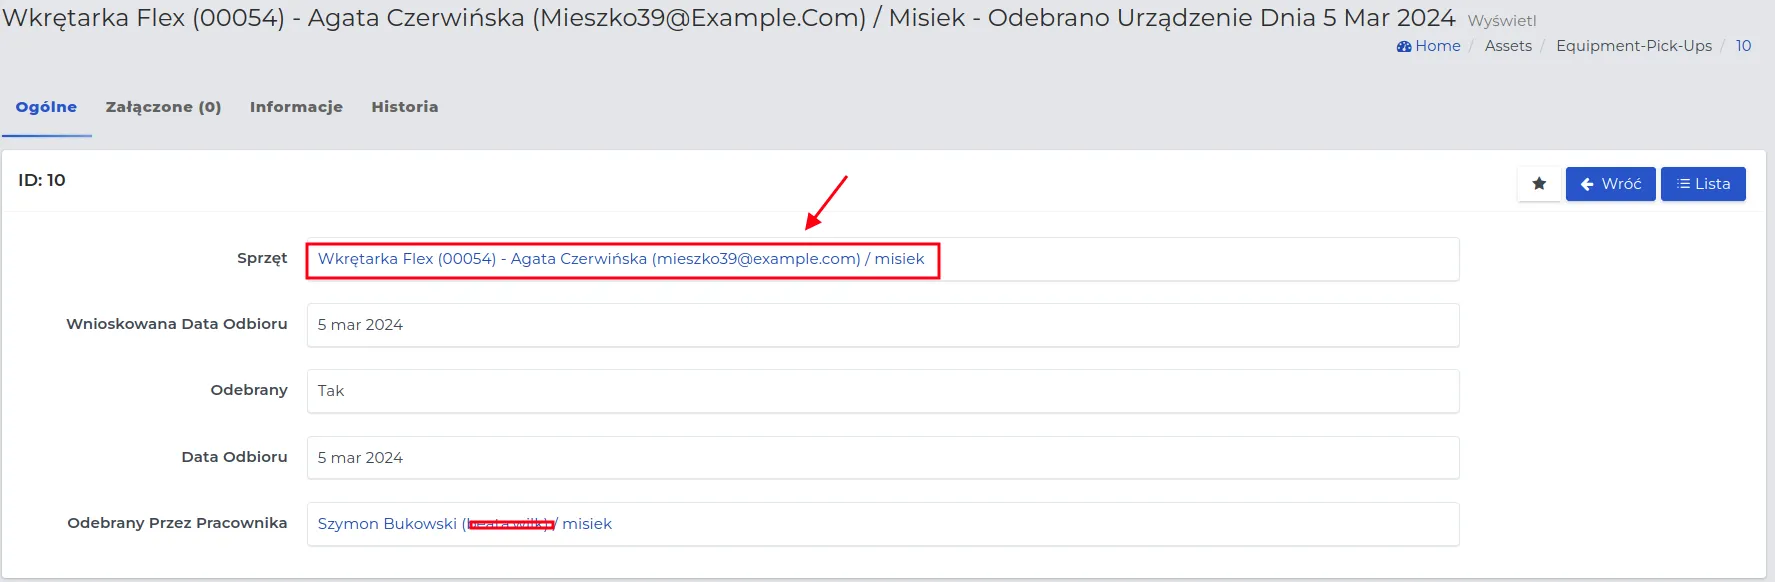
Once the equipment is delivered by the driver, find this equipment on the displayed list and click on its name.
-
In the displayed preview, select the equipment name again.
-
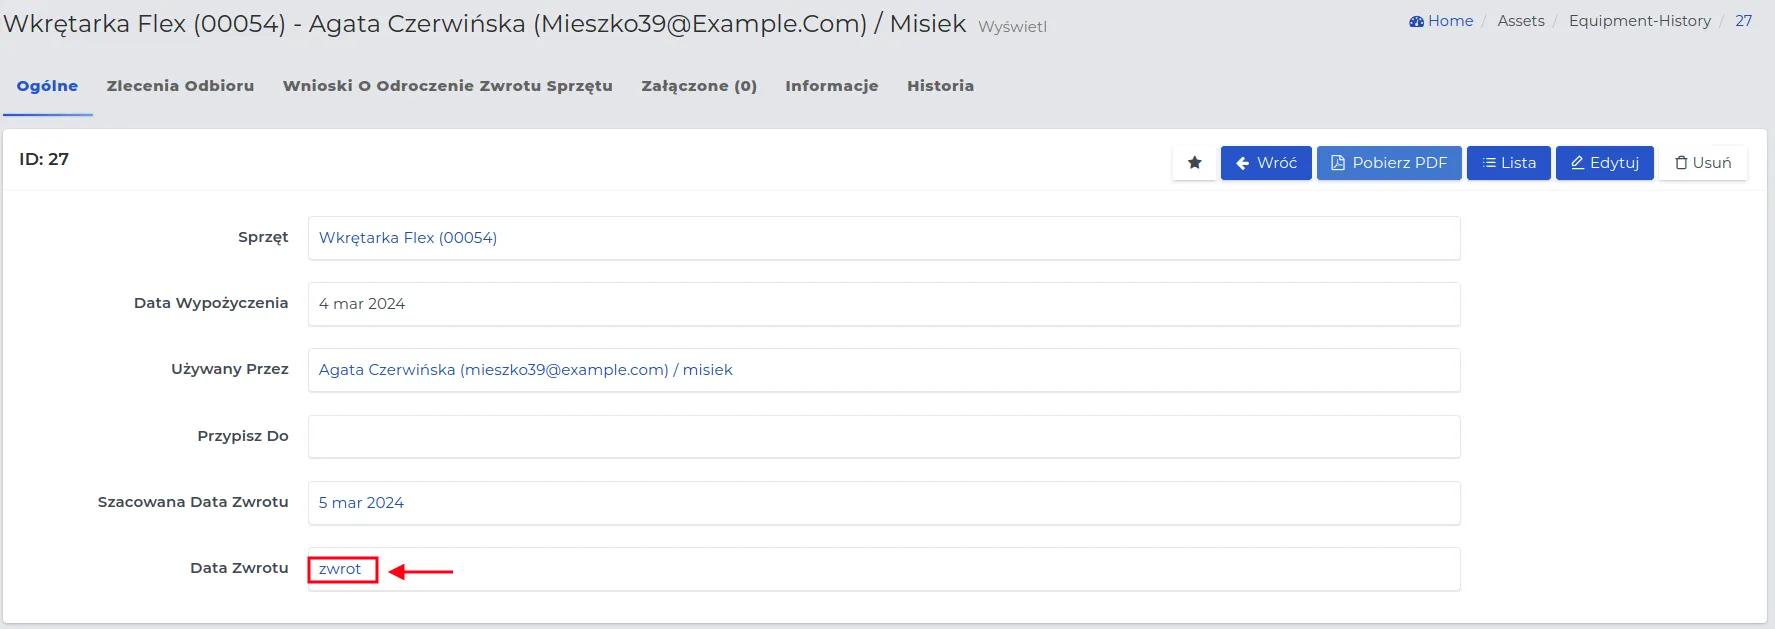
Then click on the word “Return” in the “Date of return” field.
-
Fill in the form according to the description of the fields available here and save the changes with the “Confirm” button.
Receipt of equipment using barcode labels
In response to innovative technologies, the Contractors.es system allows for the registration of equipment receipt with the help of barcode labels. As a result, the procedure itself is quick, and returns are automatically registered in the system.
NOTE: Equipment and devices can be labeled with barcodes generated by the system, which can be downloaded and printed from the system.
REMEMBER: To use the barcode scanning function, you must be logged into the system on a mobile device such as a phone or tablet and have the appropriate barcode scanning software installed.
Receiving rented equipment marked with a barcode is done according to the description below:
-
Log in to the Contractors.es system on a mobile device and select “Equipment -> Rental Register” from the menu.
-
Click on the “Scan barcode” function button.
- Scan the barcode from the equipment that is to be collected.
NOTE: If you do not have a barcode scanning program installed, a request to install the required program will be displayed on the mobile device.
-
In the displayed form regarding the return of the rented equipment, fill in the required fields,
-
Save the data using the “Confirm” button.
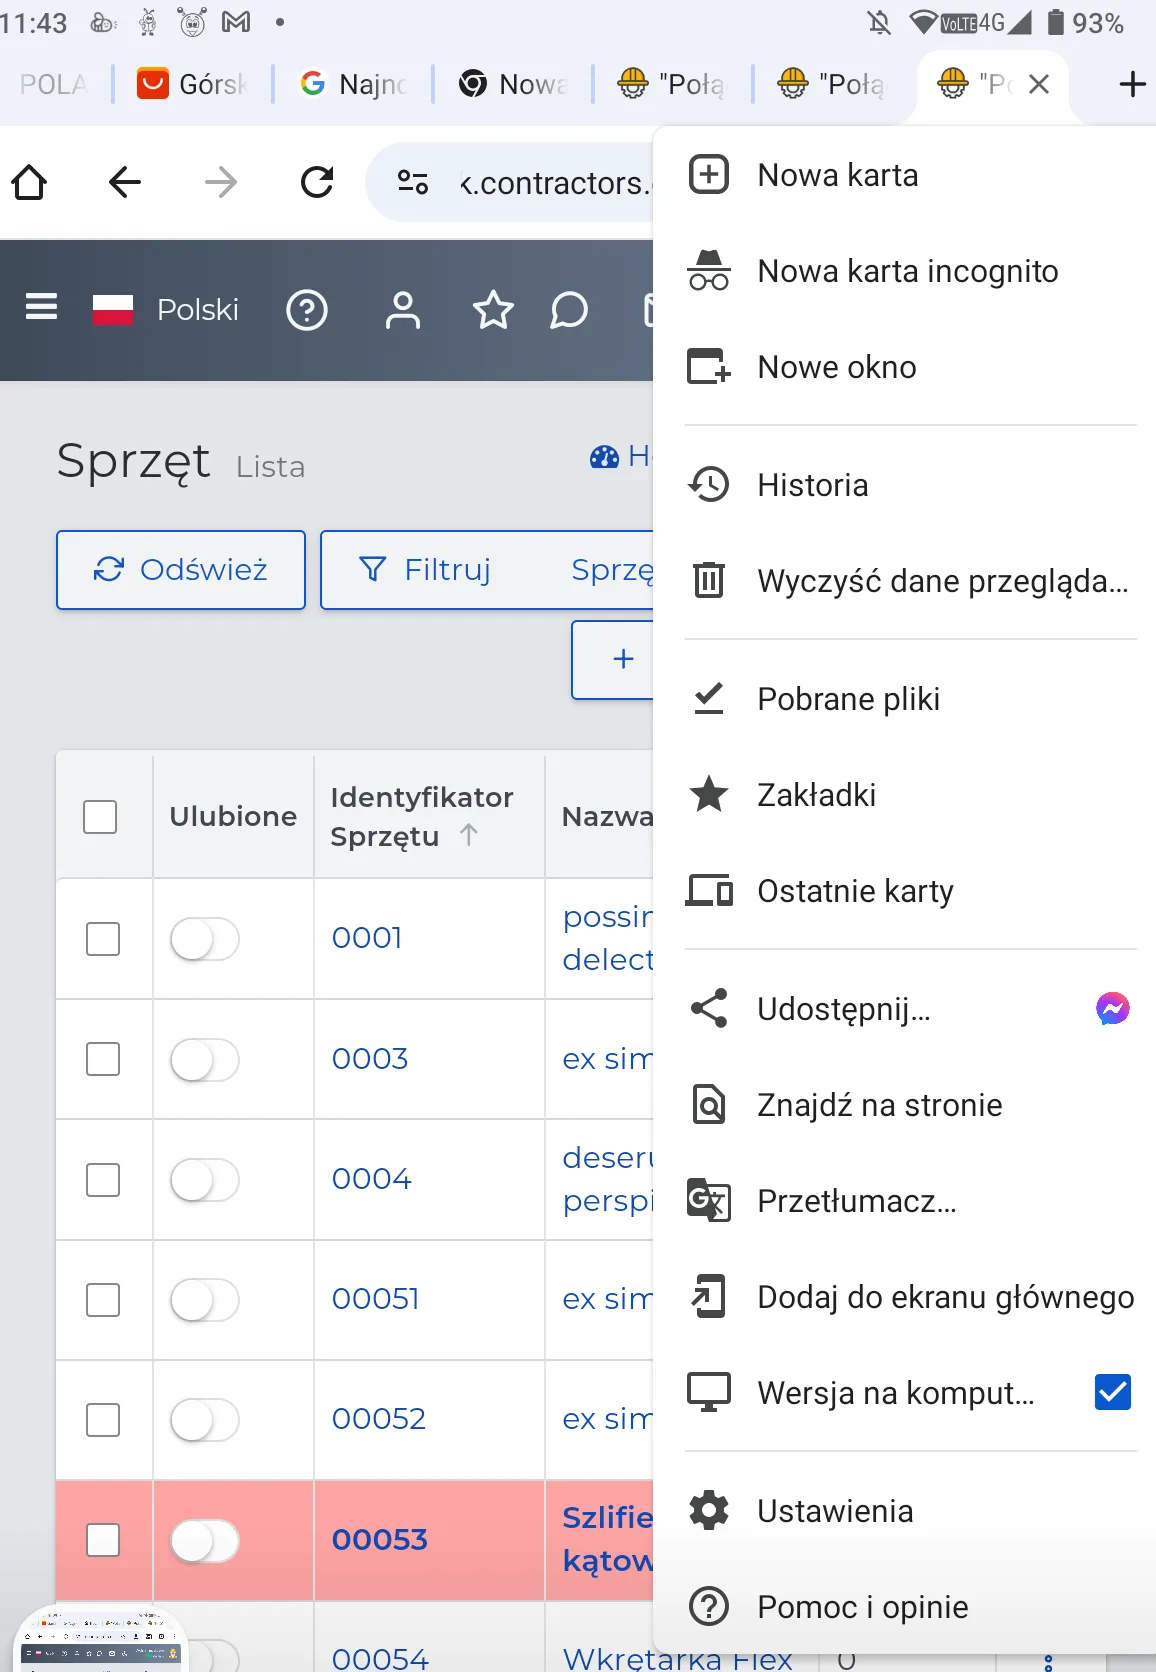
NOTE: If the “Scan barcode” button does not appear for you, make sure in the mobile device’s web browser settings that the “Desktop version” is not selected. With the function enabled, the “Scan barcode” button will not be active.
Equipment Service
In this module, equipment sent for service inspection or repair is registered. Reporting equipment to the service list is done in the following order:
-
Go to the “Equipment -> Service” menu and click the “New” button.
-
Fill out the form, the meaning of the fields is as follows:
-
Equipment: Indicate the type of equipment the service report concerns.
-
Date: The date of handing over the equipment or device to the service.
-
Serviced by: Specify the entity responsible for the service or repair. It can be any employee or external company selected from the list of available contacts.
-
Estimated return date: The return date specified by the service technician.
-
Description: Additional information related to the handover for repair, for example, existing problems, visible damage.
-
Meter reading before service: Specifies the meter reading or other parameters of the equipment at the time of handing it over to the service.
-
Due to damage: A field used to indicate whether the equipment was damaged during use.
-
Choosing the option “No” - the equipment was not damaged during use.
-
Choosing the option “Yes” - the equipment was damaged and it is necessary to select from the list the employee responsible for the damage, filling in the “Employee responsible for damage” field.
NOTE: If the device has already returned from service, fill in the “Return date” field.
- Save the form using the “Confirm” button.
Acceptance of equipment from service
After the repair or service is completed, the transferred equipment is accepted back into the equipment warehouse. To record the acceptance of equipment from service in the system, follow the scheme:
-
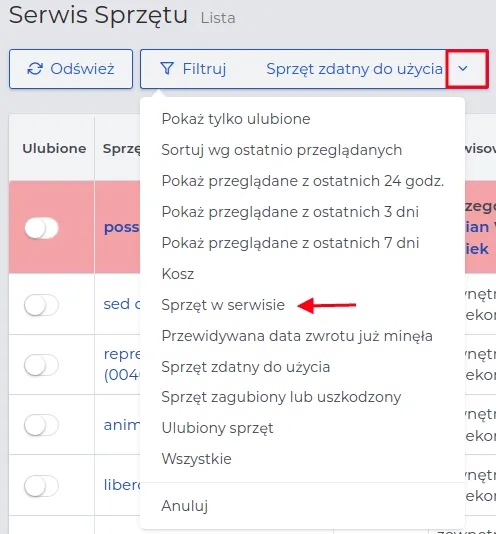
Open the menu “List -> Service” and filter the list with records, using the “Equipment in service” option.
-
Find the equipment that is to be accepted from service or repair and in the “Return date” column click on the word “Return”.

-
Complete the form for accepting equipment from service to the equipment warehouse, paying attention to the fields:
-
Return date: The date on which the equipment is collected from the service.
-
Cost: The amount payable for the service performed.
-
Meter reading after collection from service: The meter reading at the time of accepting the equipment.
-
Materials from our warehouse used for service: If materials from the warehouse were used for the repair, select the “New” button and choose from the list its name, type of storage, and quantity.
NOTE: The amount of material used for the repair of the equipment will be recorded as an expenditure.
- Note: Description of the service performed or the condition of the device after servicing.
REMEMBER: If an “Service interval” has been specified for the equipment, the registration based on meter readings will take into account the meter status after collection from service. This is important for further monitoring of equipment usage.