Inventory
The list of records in the “Inventory -> List” section contains data regarding available quantity, requested quantity, and minimum level. The visible values allow for the control of inventory levels and the execution of material requests.
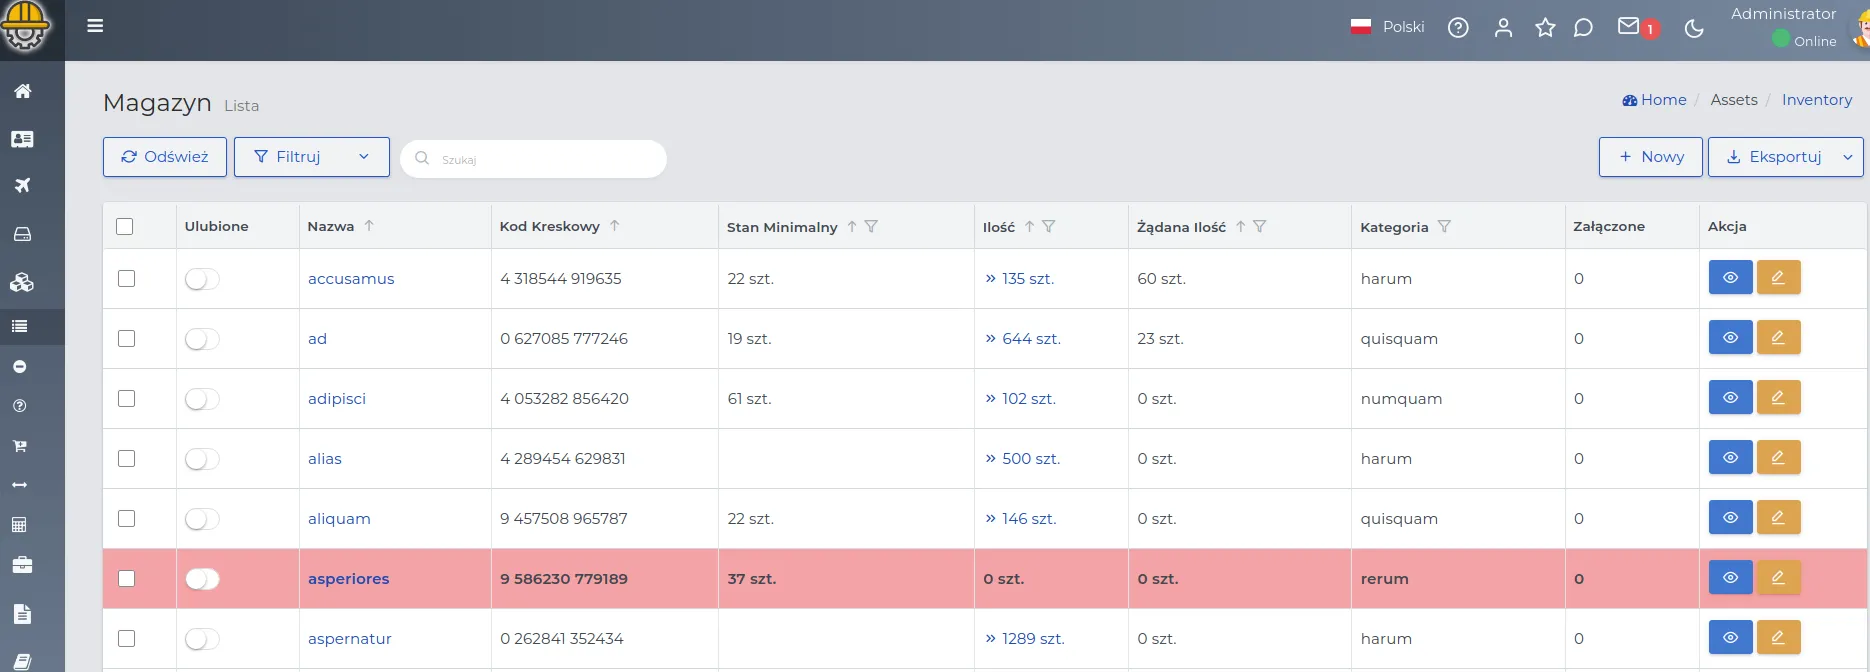
REMEMBER: When the inventory level falls below the specified “Minimum level,” the material will be marked in red on the list of records, signaling the need to replenish stocks.
Using the action buttons, you can view, edit, or delete selected entries from the list. The record preview shows standard tabs available in different types of records where you can use auxiliary buttons, described in more detail here. In each section, there is the possibility to filter the list, and detailed information on this can be found here.
Creating a materials list
You can import materials into the system by preparing the appropriate data file as described here, or add them to the list manually in the following order:
- Open the “Inventory -> List” section from the menu and click the “New” button.
REMEMBER: Before adding material to the inventory, make sure that an appropriate category for the resource has been created in the system. Details are described here.
- Fill out the form, paying attention to the fields:
-
Name: This is the name that identifies the product being added to the inventory. It usually corresponds to the name given on the invoice from the Supplier, but it can be established according to the internal needs of the company.
-
Barcode: A unique string of characters used to identify the material on a barcode label. This is not a required field.
-
Minimum level: The value that specifies the minimum amount of material that should be maintained in inventory as a so-called “safety buffer.”
-
Quantity unit: The measure in which the material quantity is expressed, for example, kilograms (kg), running meters (mb), pieces (pcs), liters (l), etc.
-
Category: Indicates the material’s belonging to a specific group or classification.
-
Note: Optional additional description or information related to the entry being created.
- Save the data using the “Confirm” button.
Request for Quotation
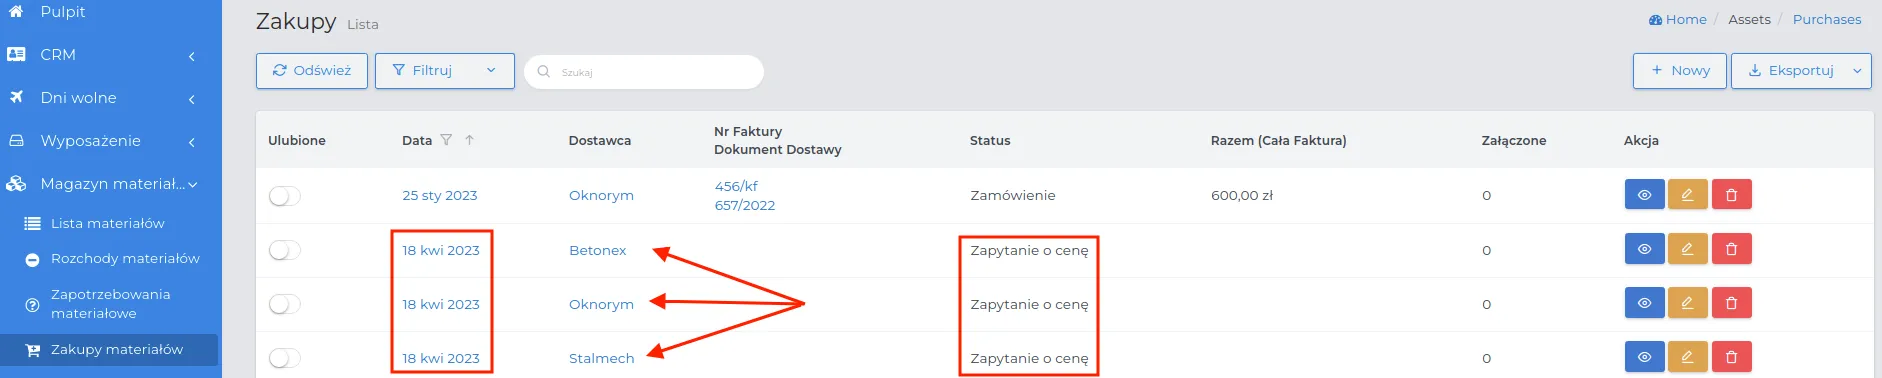
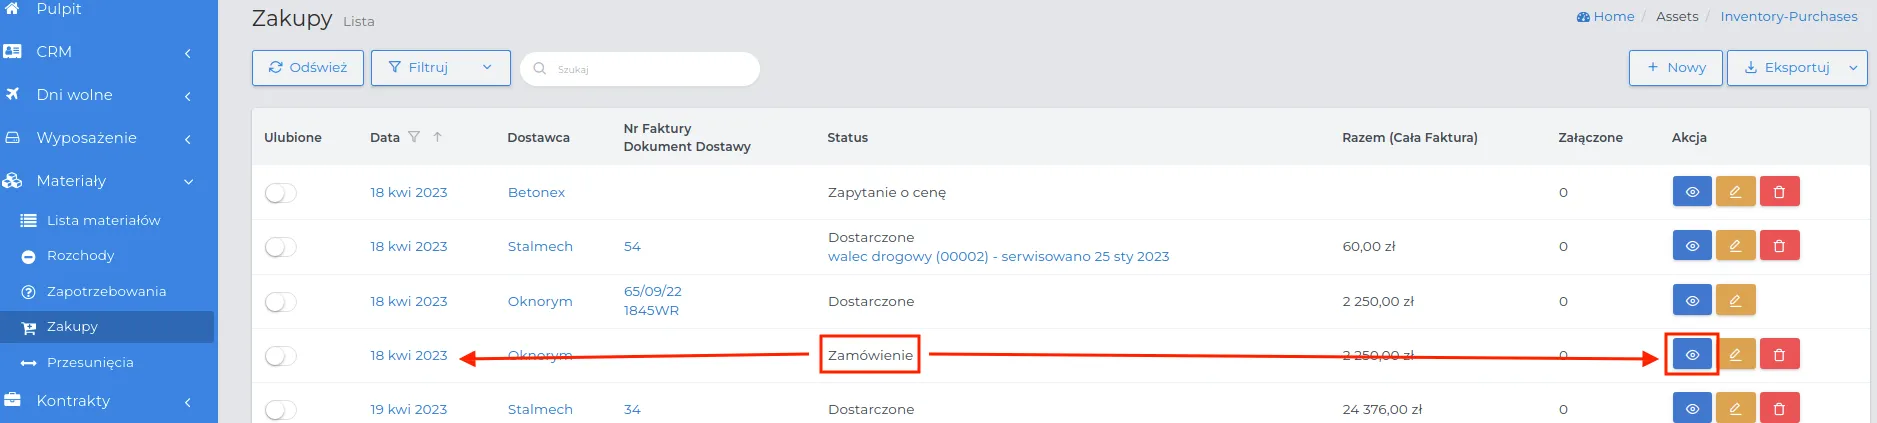
Preparing orders for specific materials needed for project implementation often starts with submitting a request for quotation to the Supplier. After accepting the terms, you can change the status of the order being created and accept the material into the warehouse, or in the case of another inquiry to a different supplier, duplicate its content with the “Copy” button and easily send the inquiry.
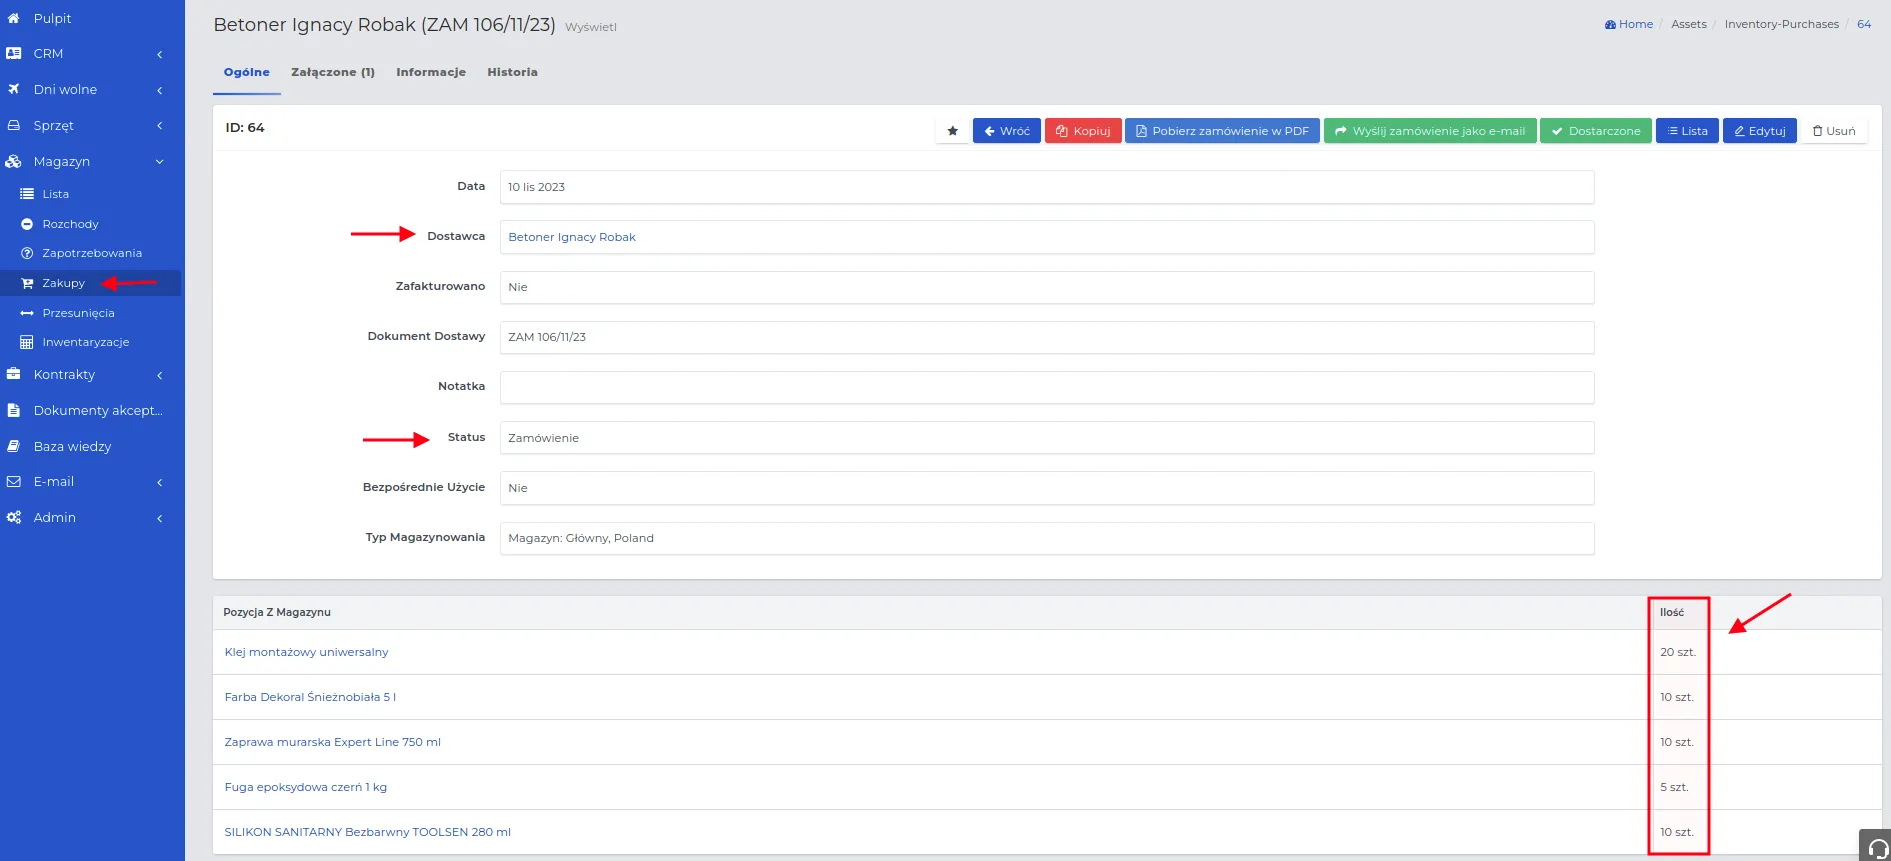
ATTENTION: Choosing the appropriate status in the “Purchases” section allows for creating material price inquiries, placing orders, and marking goods in the system as delivered.
REMEMBER: Before you proceed to create a request for quotation, make sure that the supplier it concerns has been entered into the system in the “Supplier” group.
To send a material price inquiry to the Supplier, follow the scheme:
-
Go to the “Materials -> Purchases” menu and click the “New” button.
-
Fill out the form paying attention to the fields:
-
Date: The date of document creation.
-
Supplier: Select a record belonging to the “Supplier” group.
-
Status: Determines the current stage for the record being created. Set to “Price Inquiry”.
-
Note: Optionally additional description, information.
-
Items: Add the names of the materials the price inquiry concerns.
ATTENTION: If you want to add a material whose name is not in the system database, use the “Create” button, which will automatically add the material to the list without the need to close the currently displayed form.
-
Add more material names to the list being created with the inquiry and save the form with the “Confirm” button.
-
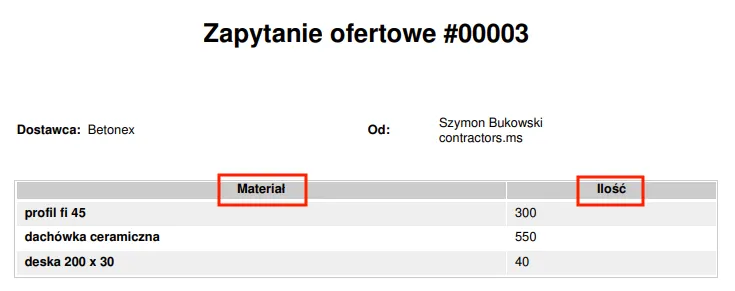
In the preview of the selected record, choose how to send the request for quotation to the Supplier. You can download the request for quotation in PDF format or send it as an email.

ATTENTION: The lack of an email address provided in the Supplier’s contact will prevent the message from being sent electronically.
Example illustrating the appearance of a request for proposal saved in PDF version.
REMEMBER: You can send the same request for proposal to another Supplier using the “Copy” button, where in the form you change the name in the “Supplier” field, confirm the changes, and click the “Send request for proposal as an email” button again.
All copied requests for proposals, where another Supplier has been added, will be set in the list of records in the “Purchases” module in the order they were created. In the “Supplier” column, the subsequent Suppliers to whom the document was sent will be visible.
Updating the status of the request for proposal
Updating the status of the request for proposal allows tracking the progress of the process and effective coordination of actions related to a given request for proposal.
If you want to change the status of the visible “Request for proposal”, follow the scheme:
- With the selected request for proposal, click the “Edit” action button and select a new status from the available: “Cancelled”, “Ordered” and “Delivered”.
REMEMBER: Cancelling a request for proposal will not remove it from the list of records. The entry will still be visible on the list with appropriately set filters.
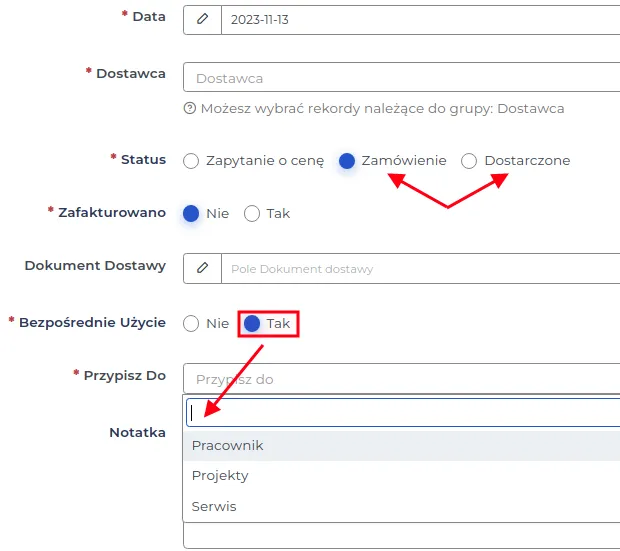
- For the statuses “Ordered” and “Delivered” fill out the form, where the meaning of additional fields is as follows:
-
Invoiced: Determines the method of financial settlement for the ordered goods.
-
Choosing the option “No” - applies to orders processed at the Supplier on the basis of financial settlement issued, for example, at the end of the month.
-
Choosing the option “Yes” - applies to orders where prepayment for the purchase of goods before delivery is required, payable upon receipt, or with a short payment term, to which a sales invoice is attached.
-
NOTE: Goods delivered without an invoice, for which a monthly settlement will be issued, can be moved between warehouses or projects without the need to enter their final price. After receiving the invoice and entering the prices, their cost will affect the profitability of the projects on which the material was or will be used.
-
Delivery Document: This is a document confirming the receipt of goods into the warehouse, for which a registration number has been assigned. This field is mandatory when goods have been delivered without an invoice. It should include, for example, the number of the external issue document from the supplier’s warehouse.
-
Direct Use: Specify the destination where the ordered goods are needed and for which the consumption of the entered quantity will be automatically recorded. These are goods that cannot be transported to another construction site, such as ready-mixed concrete along with transport to a specific construction site.
-
Choosing the option “No” - the ordered goods will be put into stock and only then will it be possible to use them by generating consumption through the foreman, project manager, or another responsible person. Specify the value of the “Type of storage” field, allowing the choice between storing the material in the warehouse or its direct delivery to the project.
-
Choosing the option “Yes” - specify the direct consumption of the material for the selected target group, visible on the drop-down list in the “Assign to” field (Employee, Projects, Service).
-
- Verify the values for the fields defining warehouse positions and save the form with the “Confirm” button.
REMEMBER: The ordered goods are added to the warehouse list after being delivered by the Supplier, regardless of whether an invoice has already been issued or not.
Ordering Materials
The system allows replenishing warehouse lists in four ways:
Method I: Ordering based on the Supplier’s quotation.
- Select the record with the status “Price Inquiry” from the “Menu -> Purchases” list and proceed to edit it.

-
In the form, change the status to “Order” and fill in the remaining fields according to their description available here.
-
Save the changes with the “Confirm” button.
REMEMBER: Send the prepared and saved order to the Supplier via email.
Method II: Ordering copied from completed orders in the system.
-
Select the record with the status “Delivered” from the “Menu -> Purchases” list and go to its preview.
-
Click the “Copy” button.
-
In the form, change the status to “Order”, fill in the remaining fields and save the changes using the “Confirm” button.
REMEMBER: Send the prepared and saved order to the Supplier via email.
Method III: Creating a new order based on purchase invoices assigned to a given record on the materials list.
-
On the materials list available in the menu “Warehouse -> List”, select the material you want to reorder and click on its name.
-
Go to the “Purchases” tab and find the most recently issued purchase invoice using the filter on the column named “Date”.
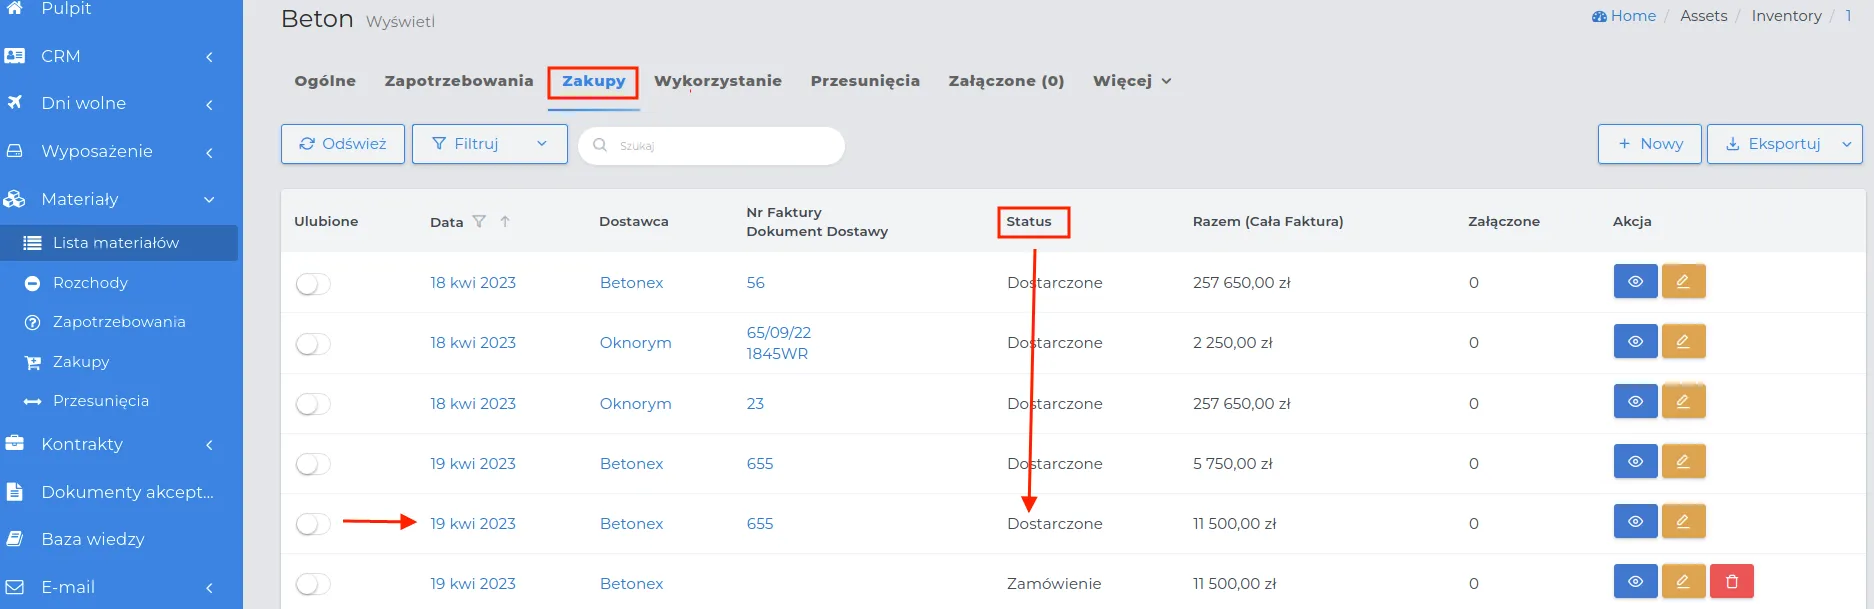
- Go to the order preview by clicking on the date of its issuance and check at what purchase price you acquired the selected material.
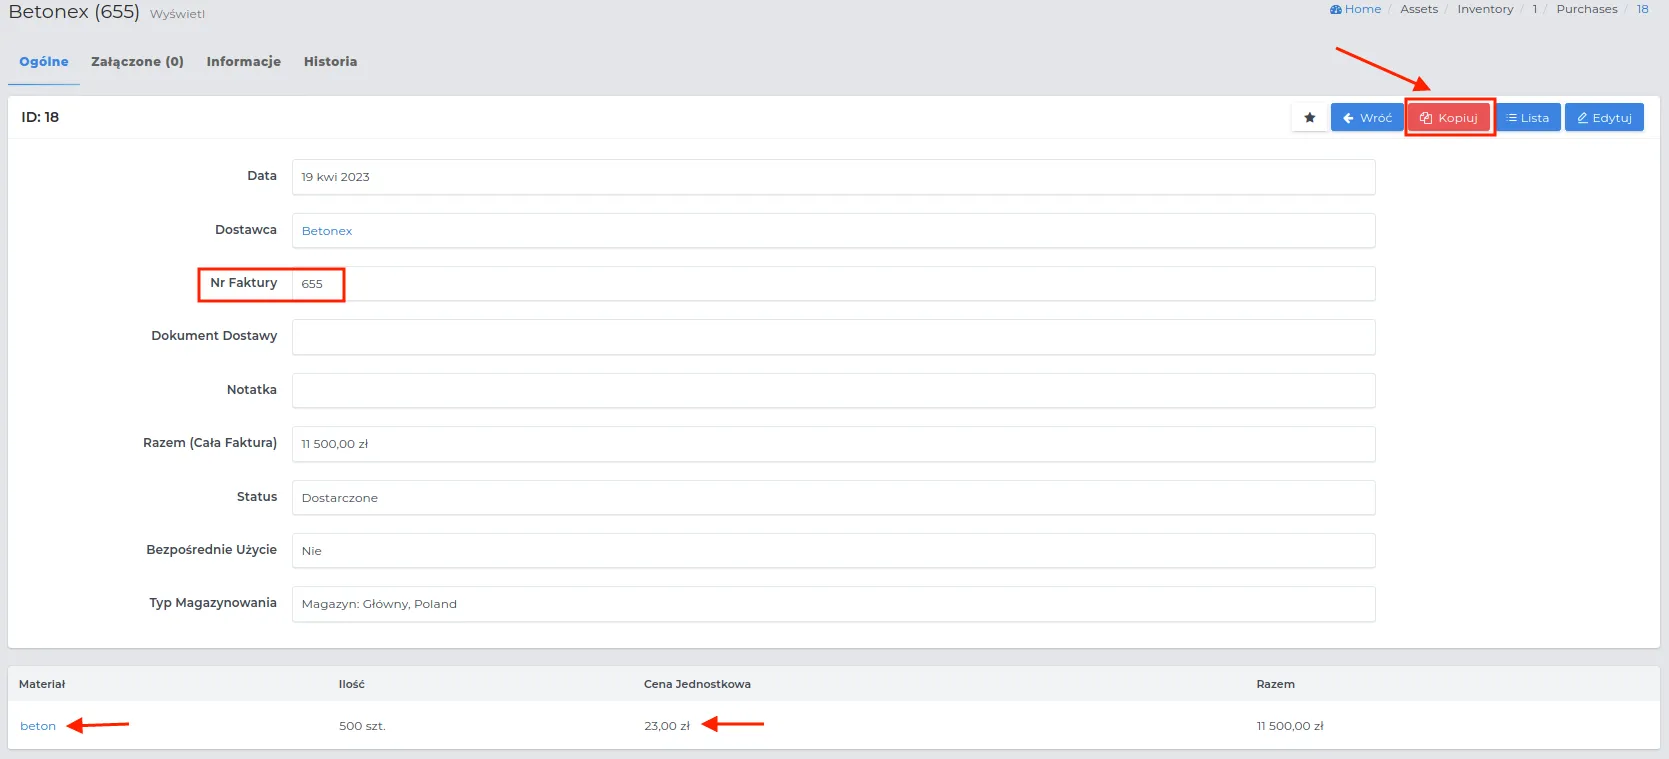
- Copy the order, make any changes, verify the remaining fields in the form and save with the “Confirm” button.
REMEMBER: Set the status to “Order” and send the document to the Supplier via email.
Method IV: Uploading to the system a file saved on the disk with the goods order in PDF format or as a photo of the document that was sent by the Supplier during the request for quotation.
REMEMBER: Thanks to the automatic document reading feature, the Contractors.es system not only shortens the time needed to process documents but also minimizes employee work.
- Above the purchases list available in the menu “Warehouse -> Purchases”, select the “Scan file” button.

- Fill in the form displayed on the screen, paying attention to the following fields:
-
Status: Choose the current status of the file you want to upload.
-
Direct use: Optionally select whether the material will be directly used and assigned to one of the groups: Employee, Projects, Service.
-
Type of storage: Choose the storage location for the material.
-
File Type: The document format that will be uploaded to the system.
- Upload the file using the “Browse” function and save the data using the “Submit” button.
REMEMBER: Documents issued by Suppliers, with different formats and graphic layouts, are automatically read, grouped, and saved in the system according to the names of their headers, e.g., order, invoice, delivery document.
NOTE: In the case of an order from a new Supplier, a record with their data is automatically created in the “CRM → Companies” module. You do not need to manually enter all the contact details from the invoice.
NOTE: If the document contains names of goods that have not been available on the inventory list so far, the system automatically creates new records with names in the “Inventory → List” module. You can recognize such materials by the lack of a completed category. From time to time, filter the inventory list by selecting “No category” from the dropdown filter and complete the missing data in such products.
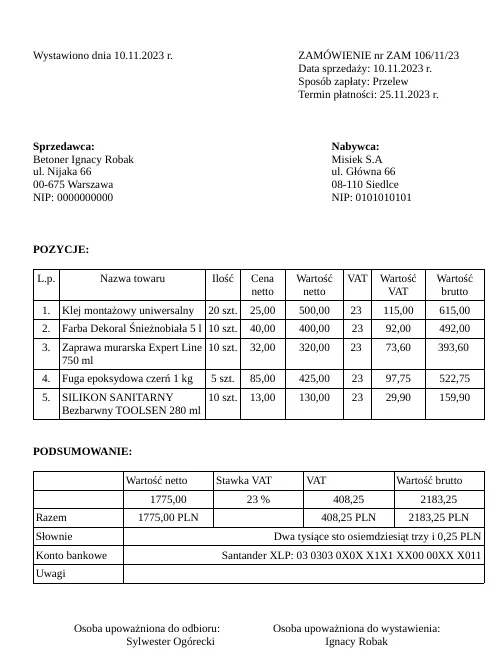
Example of data import into the system using the function of scanning an order saved in PDF format
- Follow the scheme described above, for which the preview of the uploaded document is as follows:
REMEMBER: You can change the status to “Delivered” only when you are uploading a delivery document or external issue document file, not an order file.
NOTE: When scanning the file, you can upload only one PDF document or several photos in the order of the document pages to the system at the same time. If the order of the pages does not match, the record may contain incorrect data or you will receive a document import error.
- After saving the form, all the data from the order will be displayed, specifying at least the quantities and names of the ordered goods, status, serial number, and Supplier.
- Verify the values generated for entries marked in blue font. You can edit these values.
NOTE: Delivery Documents and External Issue Documents, transferred directly by the driver delivering the goods, can also be immediately registered in the system using the mobile application by the foreman.
Receiving Materials into the Warehouse
The process of receiving materials into the warehouse is associated with changing the statuses in the records concerning orders from the Supplier. The delivered material will be summed up and visible on the warehouse list in the column named “Quantity”. The update of the available quantities of materials in the warehouse is done automatically, after performing the following steps regarding the receipt of materials into the warehouse.
- Go to the “Materials -> Purchases” menu and select the order at which you want to change the status to “Delivered”.
NOTE: The status to “Delivered” can only be changed based on a purchase document or delivery issued by the Supplier.
- Click on its order date or use the “View” action button.
- In the displayed preview, select the “Delivered” button.

- Fill in the displayed form and save the changes with the “Confirm” button.
REMEMBER: The statuses of material purchases can be reversed and changed according to the principle of “one step forward and one step back”.
NOTE: Orders for building materials covered by a collective invoice at the end of the settlement period can be used on projects without the need to enter purchase prices into the system.
REMEMBER: If goods are ordered and delivered without a registered purchase invoice, in the “Invoice Number/Delivery Document” column, only one document name will be visible instead of two. Additionally, the value in the “Total (Whole invoice)” field will not be filled in.

Low Warehouse Stock
It is important to monitor and replenish the quantities of materials in the warehouse based on their consumption and reported needs.
NOTE: Records with stock levels below the minimum are highlighted in red, signaling the need to order additional goods. Additionally, there is a widget on the dashboard informing about the too low stock levels of goods.
Replenishing low warehouse stocks, you will perform according to the following steps:
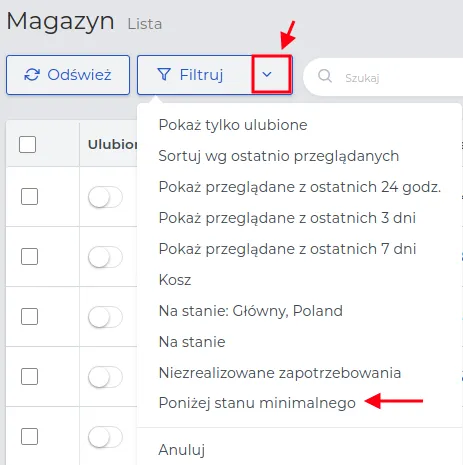
- Go to the “Warehouse -> List” menu and apply the “Below minimum stock” filter.
-
Among the records, select the type of material you want to replenish and click on its name or the “View” action button.
-
In the preview, go to the “Purchases” tab where you can choose how to place an order for the goods, by:
-
Creating a new order using the “New” button.
-
Copying a previously supplied order (with the possibility of editing it) and resending it to the Supplier as an order.
- Save the selected form using the “Confirm” button.
REMEMBER: After changing the order status to “Delivered”, the material can be registered in the system as consumption and fulfill reported demands by transferring it.
Material Expenditure
The full list of materials issued and used on projects will be visible in the “Warehouse → Expenditure” menu. This system module records all events related to the use of materials, both in terms of equipment service and their allocation to a specific employee.
REMEMBER: The final value for the used material will be included in the financial balance of the project.
You can register the use of material in the system as follows:
-
Go to the “Warehouse - Expenditure” menu and select the “New” button.
-
Fill out the form, the meaning of the fields is as follows:
- Stock Item: The name of the material that has been issued from the warehouse.
NOTE: If there is not enough material in stock, in such a case, select the available quantity and save the material expenditure, and for the missing quantity, create a record concerning the demand for the material or generate an order for the missing amount.
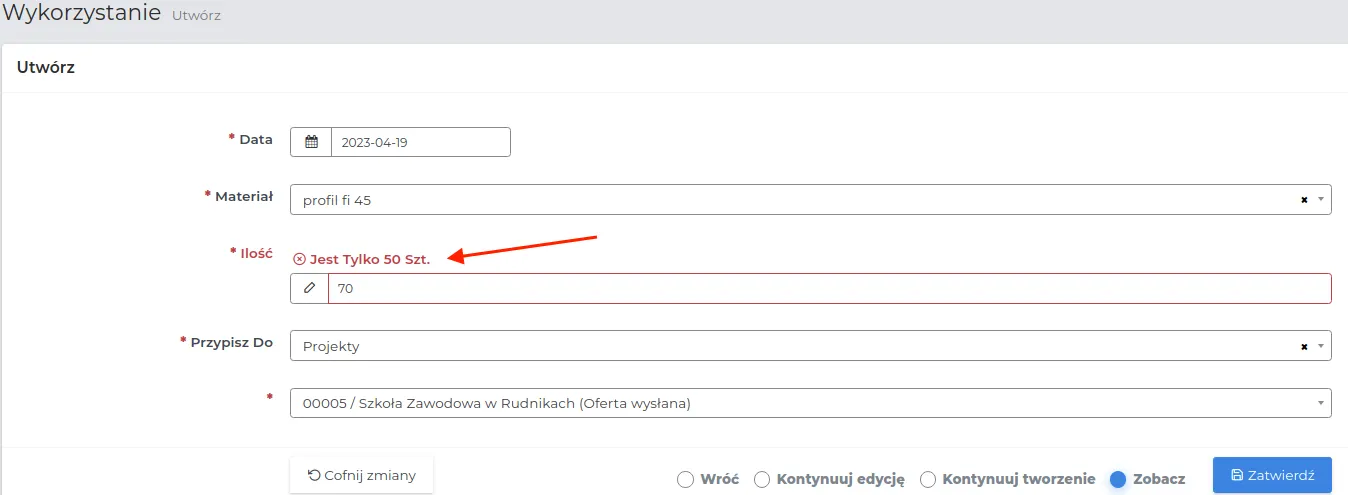
- Quantity: Enter the amount of goods taken from the warehouse.
REMEMBER: If the material expenditure concerns a partial unit, defined in the system for a given type of material, it is possible to enter a fractional part for this consumption. Such a value should be specified in decimal form, entering it into the system after the dot, for example, 0.5 pcs.
NOTE: During the inventory process, it is not possible to select goods to generate an outflow. Finish the inventory before creating an outflow record.
- Assign to: Specify the association for the outflow being created by selecting the target group from the available options: Employee, Projects, or Service.
- Save the form with the “Confirm” button.
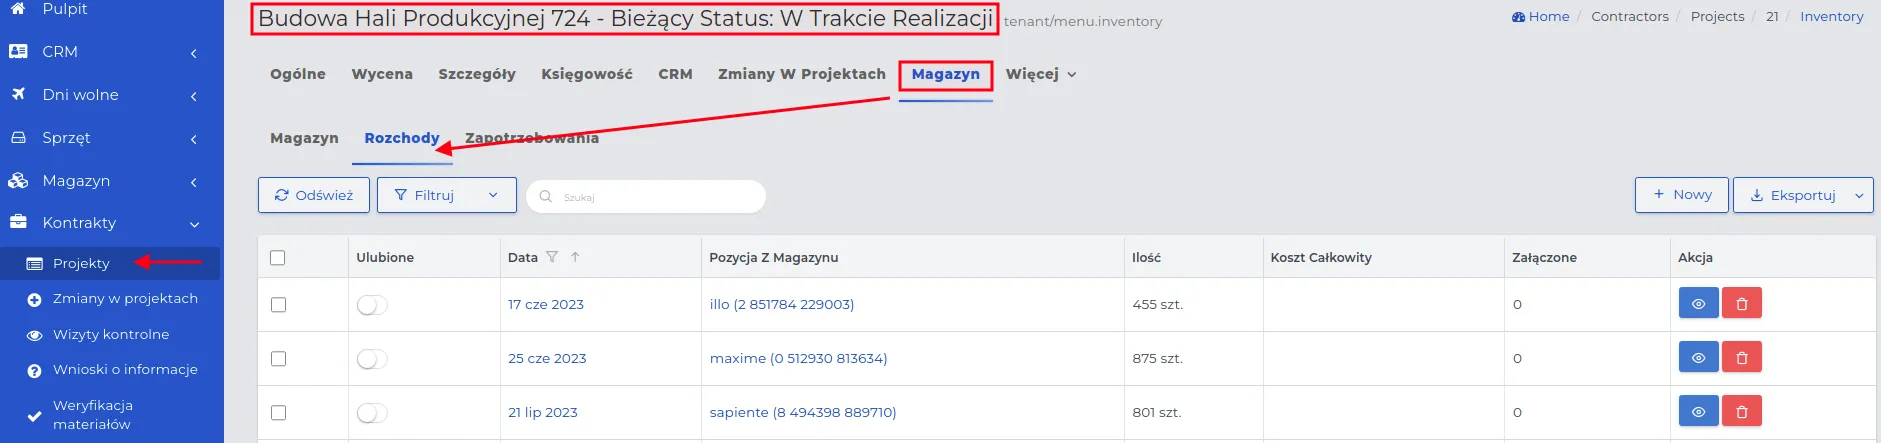
Depending on the specified destination of the material, the quantities registered as outflow will be noted in the system in the following sections:
- Contracts → Projects, for the selected project on the list in the “More” tab → Warehouse → Outflows.
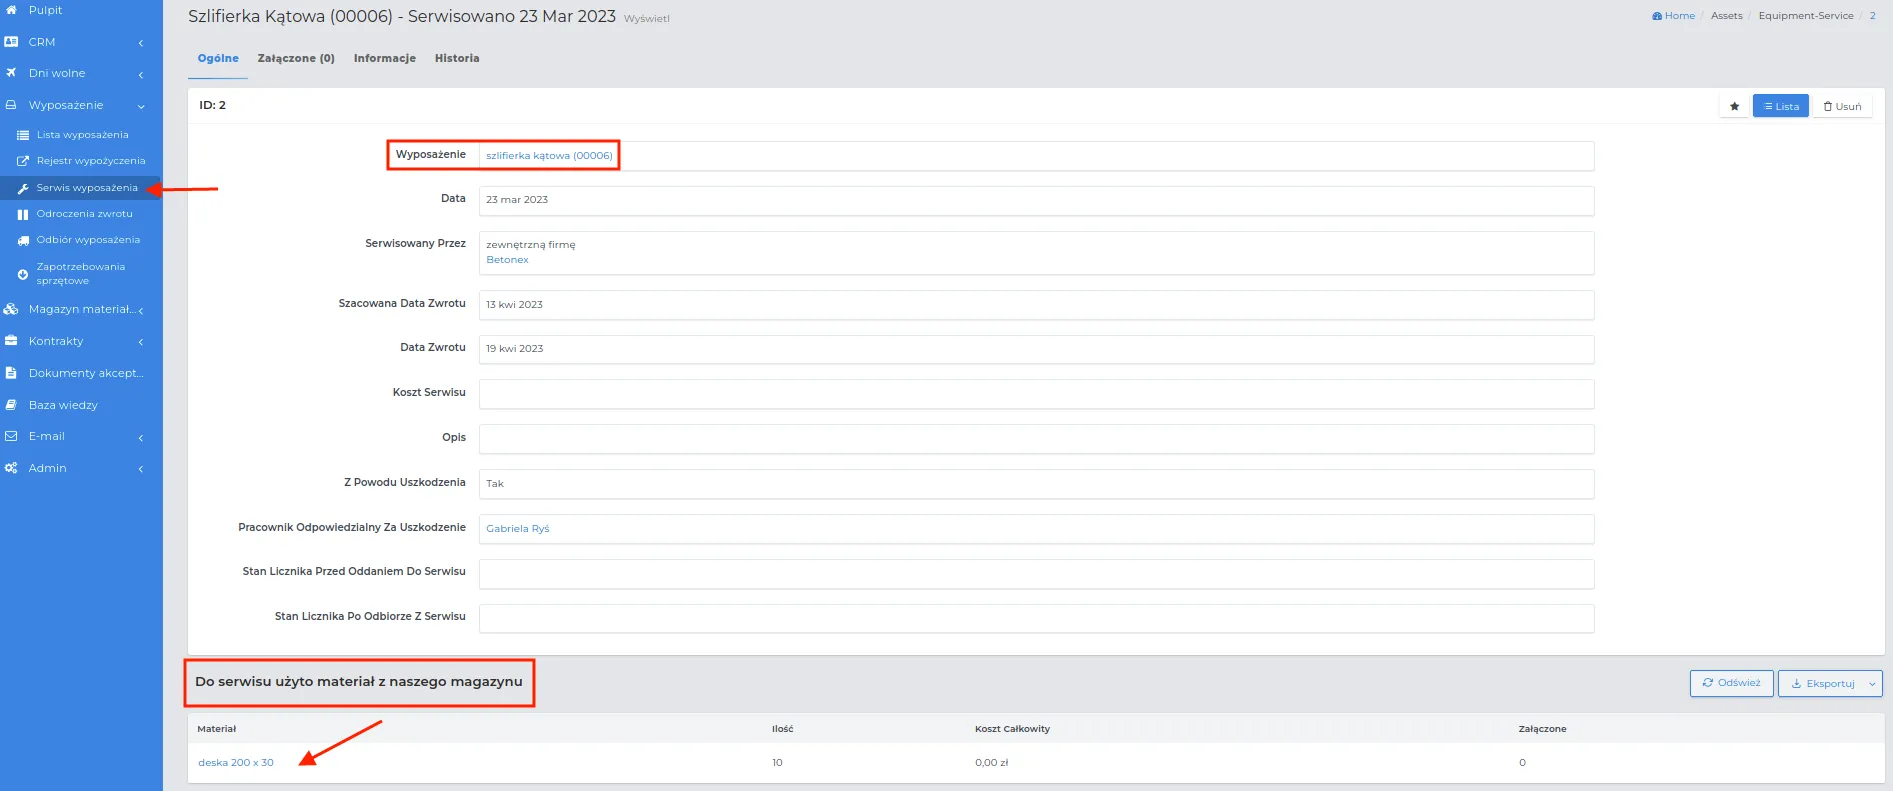
- Equipment → Equipment Service, denotes equipment that has been sent for service and requires repair, for which it is necessary to use materials from the warehouse.
- Warehouse → Outflows, material used directly by an employee will indicate on the list in the “Used by” column the person for whom the outflow was generated.

REMEMBER: Using materials before issuing a collective invoice for their purchase may cause price deviations in the project’s balance report until the invoice is entered.
Material Requirements
Reporting material requirements allows for the efficient execution of projects and ensures the provision of appropriate resources.
NOTE: Each reported requirement can only concern one type of material or equipment per record entered into the system. Therefore, an employee needing several materials or pieces of equipment at the same time must enter each of them separately as a new record.
You can add a requirement for missing or needed material to the system in the following order:
-
Go to the “Warehouse -> Requirements” menu and click the “New” button.
-
Fill out the form, the meaning of the fields is as follows:
- Needed by day: Specify the deadline by which the material requirement should be met.
- Material: Select the required material from the list.
ATTENTION: If the required item is not available on the inventory list, first add it to the list, and then select it when creating the requisition.
- Quantity: Specify the amount of material needed.
- Assign to: Define the association for the requisition being created by selecting the target group from the available options: Employee, Projects, or Service.
ATTENTION: For Employee and Service, the fulfillment of the requisition will generate material consumption (expenditure). A requisition assigned to a Project will create a record with “Inventory Transfer” with the status “Pending” during its fulfillment.
- Save the form using the “Submit” button.
ATTENTION: Viewing the contents of records is always available, while their deletion is only possible when their fulfillment has not been started (partial or complete). During editing, it is possible to reduce the quantity of the requisition to the amount equal to the requisition fulfillment carried out so far.
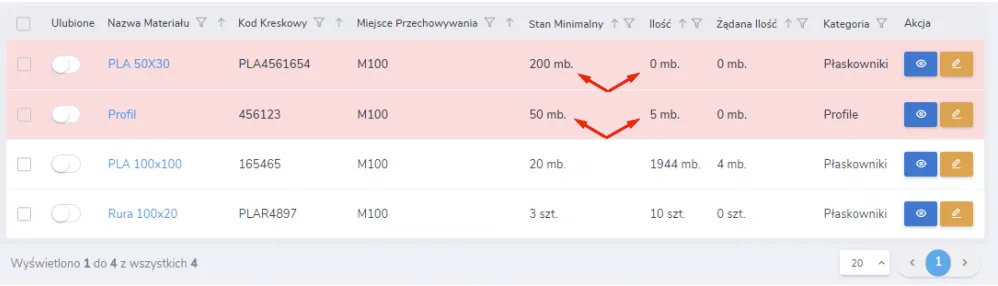
In the records of the “Warehouse → List” menu, in the “Requested Quantity” column, the amount of material for which requisitions have been reported is visible.
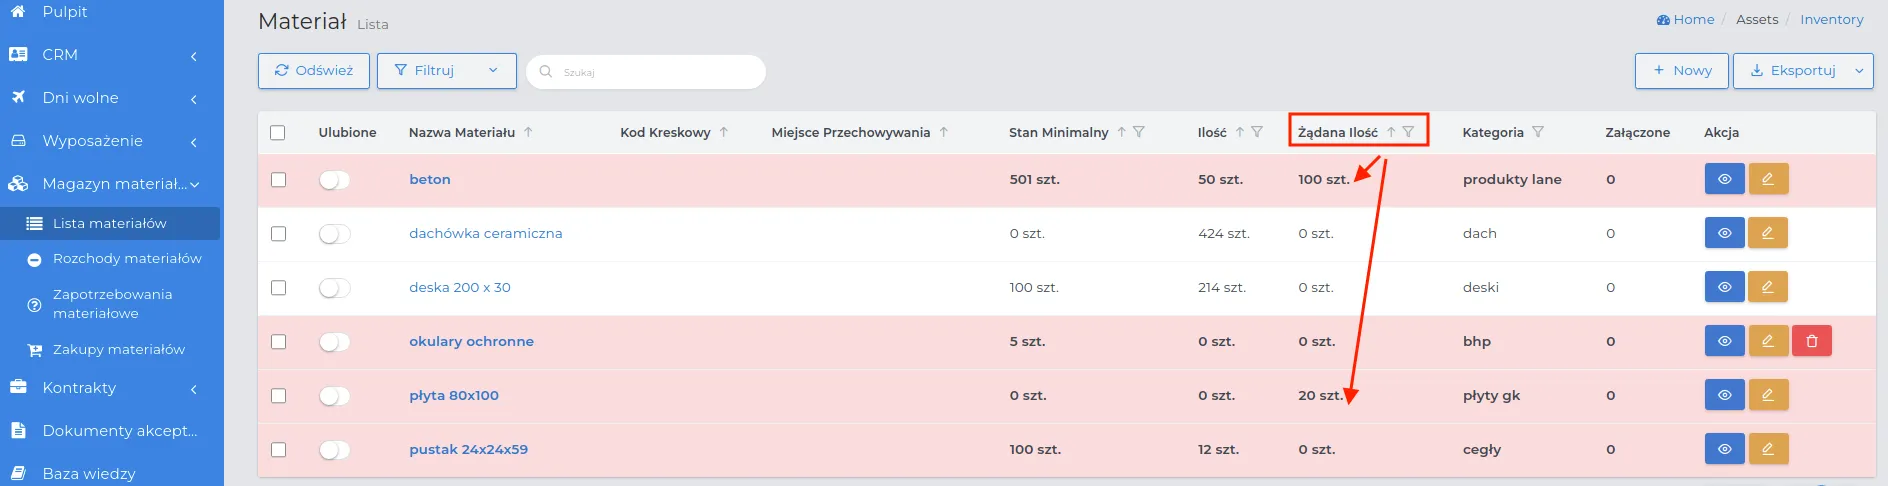
ATTENTION: Records highlighted in red indicate the quantity of material below the defined minimum level and the situation where the quantity of material in stock is lower than the reported requisition.
REMEMBER: After updating the inventory levels with the material reported in the requisition, its fulfillment will be possible, provided that the quantity of material in stock is sufficient.
ATTENTION: When creating a project estimate, it is possible to supplement the necessary materials. The project manager can generate material requisitions based on such an estimate using the button in the materials table in the project estimate tab.
Fulfillment of material requisitions
To fulfill a reported material requisition, proceed in the following order:
- Go to the “Warehouse -> Requisitions” menu and set the list of records according to one of the available filters: “Partially Fulfilled” or “Not Fulfilled”.
REMEMBER: To narrow down the displayed list, use the “Detailed Filter,” which is described in detail here.
- Select the record with the demand you want to fulfill and click the “Fulfill” action button.
REMEMBER: An active “Fulfill” button means that the demand visible on the list can be fulfilled, in whole or in part, because the material is available in storage locations.

-
Specify from which storage location the material is to be moved.
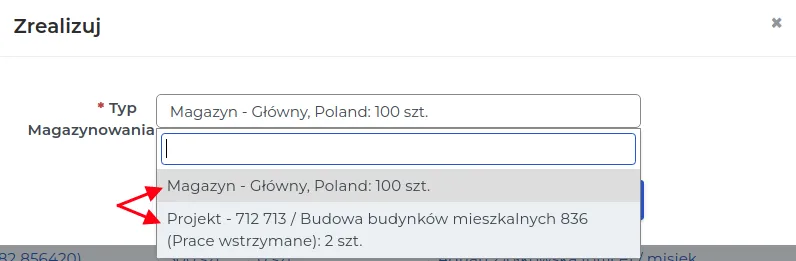
REMEMBER: If the quantity of material in stock is not sufficient to fully meet the reported demand, then the fulfillment of the demand remains on the list of records as “Partially fulfilled” with information on the quantity of items fulfilled so far.

- Save the form with the “Confirm” button.
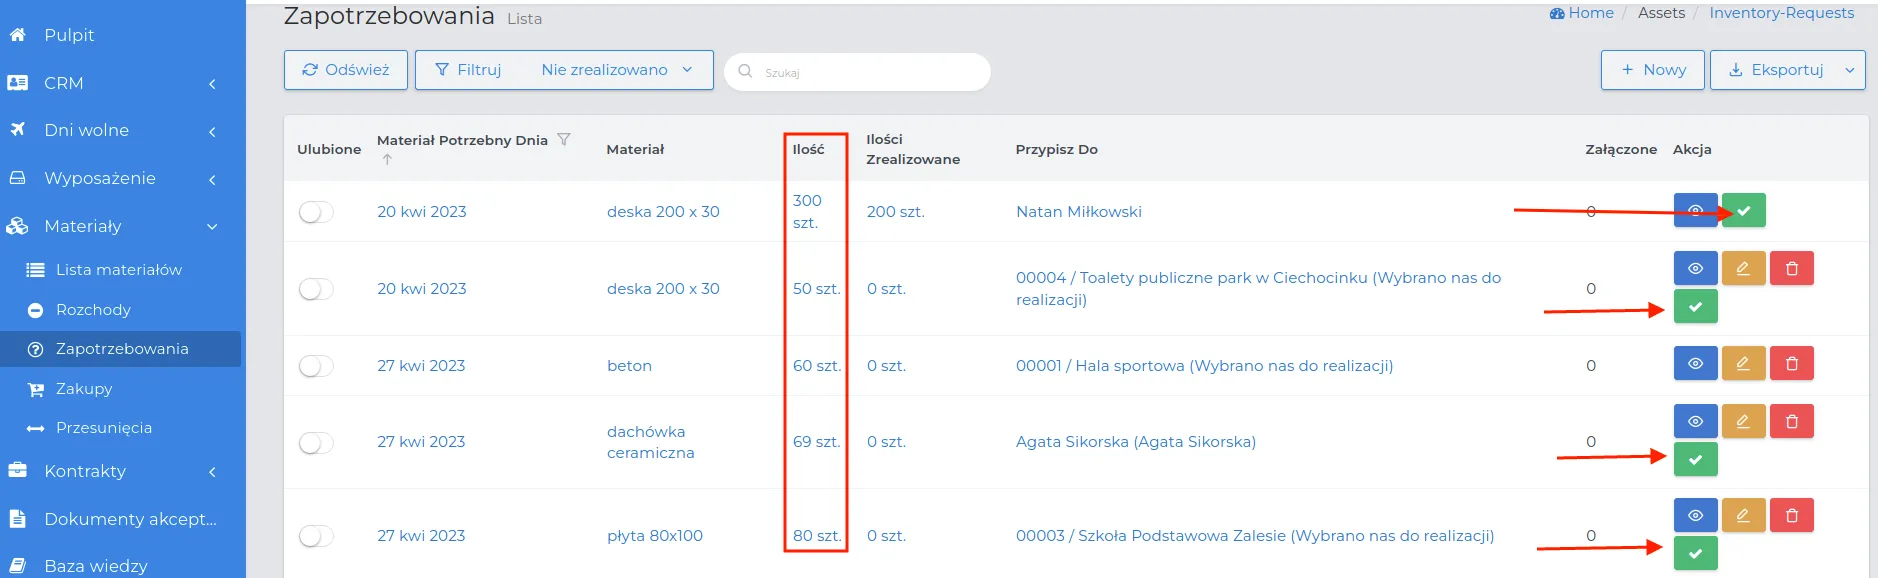
Example: Partial fulfillment of an employee’s reported material demand.
- The list of records shows a demand for 300 pieces of boards.

- We check how many boards are currently in stock.
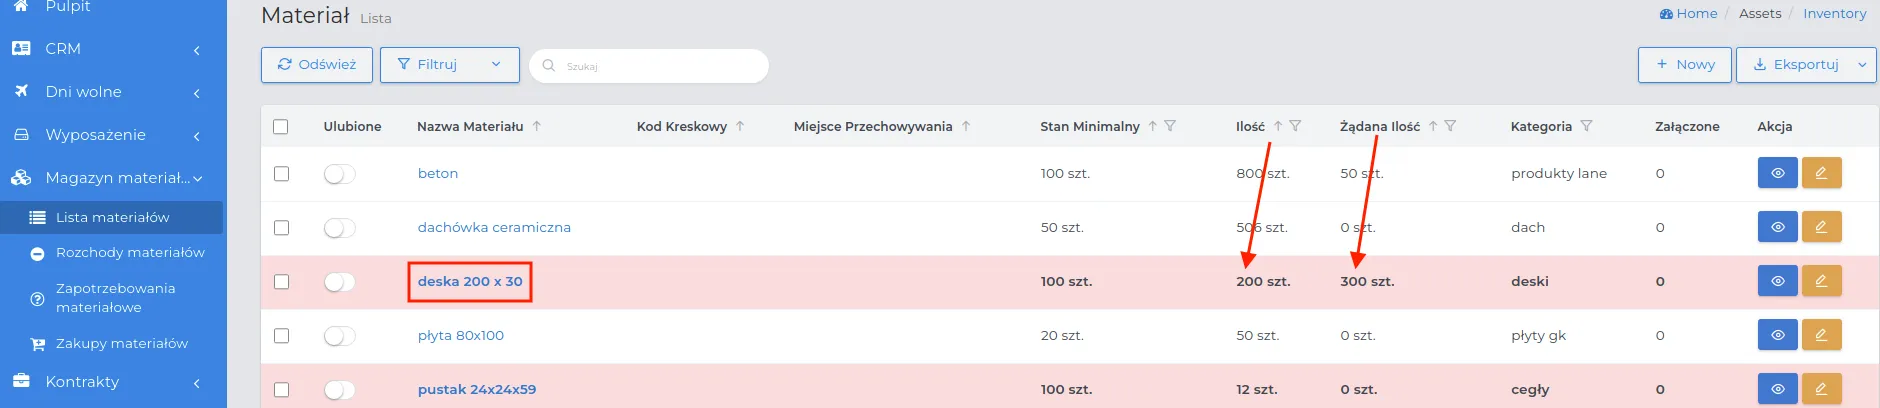
NOTE: The number of boards in stock is 200 pieces, which means it is lower than the reported demand for 300 pieces. Therefore, the record has been highlighted in red.
-
We know that we are still short of 100 pieces of boards to fully fulfill the order.
-
We return to the list where the request is located and fulfill the demand for 200 pieces of available boards, using the “Fulfill” action button.
-
We go back to the list of materials and see that the current stock level of boards is now zero, and the requested quantity has been reduced to the 100 pieces of boards we are missing. Therefore, it is necessary to place an order.
-
We create an order for 100 pieces of boards in the “Warehouse -> Purchases” menu.
-
When the goods are delivered to the warehouse by the Supplier, our stock level will be replenished, which will enable the continuation of demand fulfillment according to the description in point 4.
REMEMBER: Fulfilling a requirement will generate an expenditure (consumption of material per worker, e.g., gloves) or the transfer of material to a project.
Warehouse Transfers
Warehouse transfers are the process of moving materials or equipment from one storage location to another, increasing workflow fluidity on projects.
Warehouse transfers may concern situations:
-
Verification of unused materials on the project and their return to the “Main Warehouse”.
-
Demand for material not available in the target warehouse, which must be transported to the ongoing construction from another storage location.
-
Lack of space for ordered material at the target storage site, which requires its storage elsewhere.
REMEMBER: In the case of borrowing material from another currently ongoing project, it is necessary to register in the system the demand for the transferred amount of material and then order it to stock.
ATTENTION: A warehouse transfer is a change in the storage location of goods, whose expenditure must be appropriately marked during the execution of a specific project.
REMEMBER: Special marking of the material that will be subject to warehouse transfer, for example by placing reservation description tape on it, will protect against its use by an employee unaware of the planned transfer of goods. If there is a planned transfer in the system, it is not possible to generate an expenditure of material being transferred, so it may happen that there will be less material available in the system to generate an expenditure than there is physically.
The method of creating a warehouse transfer proceeds in the following order:
-
Go to the menu “Warehouse -> Transfers” and click the “New” button.
-
Fill out the form, specifying the pickup and transfer locations of the goods, whose field meanings are as follows:
-
Source Warehouse: Specifies the place from which the needed material will be collected. It can be a warehouse or project selected from the list.
-
Target Warehouse: Indicates the place to which the material from the source warehouse will be transported. The system allows for the selection from the list of another warehouse or project.
NOTE: The source warehouse can be any project, regardless of its current status. This means that material remaining on a project that has already been completed can be reported for collection and transported to the destination warehouse.
-
Save the data using the “Submit” button.
-
In the next visible form, enter the information concerning the goods that the registered warehouse transfer will pertain to. The meaning of the fields is as follows:
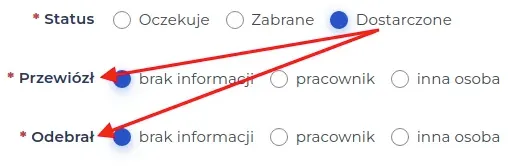
- Status: Specifies the current state of the transfer, set in chronological order: Pending, Taken, Delivered.
REMEMBER: When changing the status of the warehouse transfer to “Taken” or “Delivered”, you must mark who transported or received the goods.
-
Warehouse Item: Selection from the list of those materials belonging to the “Source Warehouse” that are to be transferred to the “Destination Warehouse”.
-
Quantity: A numerical value specifying how many units are to be taken.
NOTE: The names of materials visible on the dropdown list in the “Warehouse Item” field specify in parentheses the quantity of that material that should be there.
REMEMBER: If you want to take all the materials from the “Source Warehouse”, add more items using the “New” button, and in the “Quantity” field enter the number visible in parentheses. Proceed in this manner until the last material from the list is selected.
NOTE: We create warehouse transfers as separate records on the list, where for each type of material we separately define the source and destination warehouses.
- Save the changes made using the “Submit” button.
REMEMBER: In the “Quantity” column on the “Warehouse List” next to the selected record, there are all available storage places for that material, along with the total quantity corresponding to the total warehouse stock available for use.

Changing the statuses of warehouse transfers
Changing the statuses for warehouse transfers allows tracking the progress and current state of each movement of goods in the system.
If you want to change the status for reported warehouse transfers, follow the sequence:
- Open the list of entries in the menu “Warehouse -> Transfers” and click on the name of the current status visible in the “Status” column for the selected record.

REMEMBER: Accurately marking employees or persons responsible for receiving or delivering goods is crucial for monitoring the history of material movement and ensuring transparency in warehouse management.
- Complete the form according to the description available here and save it with the “Confirm” button.
NOTE: Reporting material consumption will only be possible for transfers with the status “Delivered”.
Inventories
The inventory process includes systematic checking and updating of warehouse stock levels, both in the main warehouse and on projects where warehouse transfers are possible.
In the system, depending on the need, inventory can be performed in two ways:
Method I: The system allows you to create a list of materials based on a manually prepared inventory, where it is not necessary to specify their quantities.
-
Go to the menu “Warehouse -> Inventories” and select the “New” button.
-
Specify the “Type of storage” from the available options “Warehouse” or “Project”.
-
Add “Warehouse items” by selecting the “New” button.
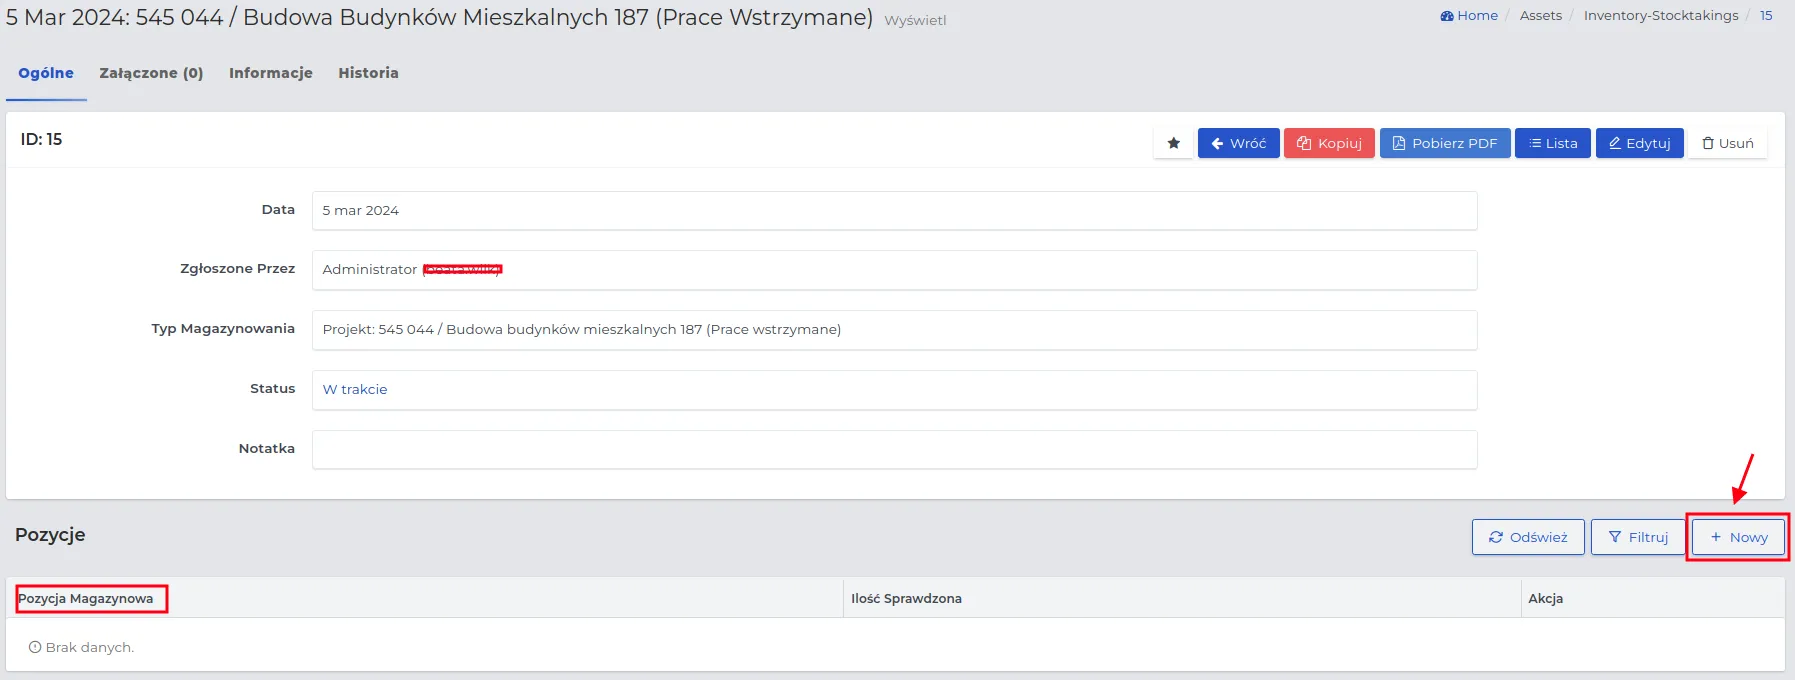
-
Save the selection of materials from the list along with their quantity (optionally) using the “Confirm” button.
REMEMBER: If you consider the inventory to be completed, change its status to “Completed” in the manner described here.
REMEMBER: You can download the prepared inventory to disk in PDF format using the “Download PDF” function button.
NOTE: For inventories created during the suspension of operations, where the quantity of materials should not change from the time of the last entered inventory, you can copy the last list using the “Copy” function button by entering the new date of its creation.
Method II: The system automatically allows you to create a full inventory of materials located in the selected warehouse or project.
-
Above the list of records available in the menu “Warehouse -> Inventories”, use the functional button “Create full warehouse inventory”.
-
In the form, specify the “Type of storage” that the inventory should cover, by selecting a specific project or warehouse from the drop-down list.
-
For the field “Pre-fill quantities according to recorded warehouse stocks”, specify:
-
Whether the quantities of materials are to be generated by the system based on theoretical warehouse stocks, by selecting the option “Yes”.
-
Whether the values specifying quantities are to be omitted, leaving only the names of the materials on the list, by selecting the option “No”.
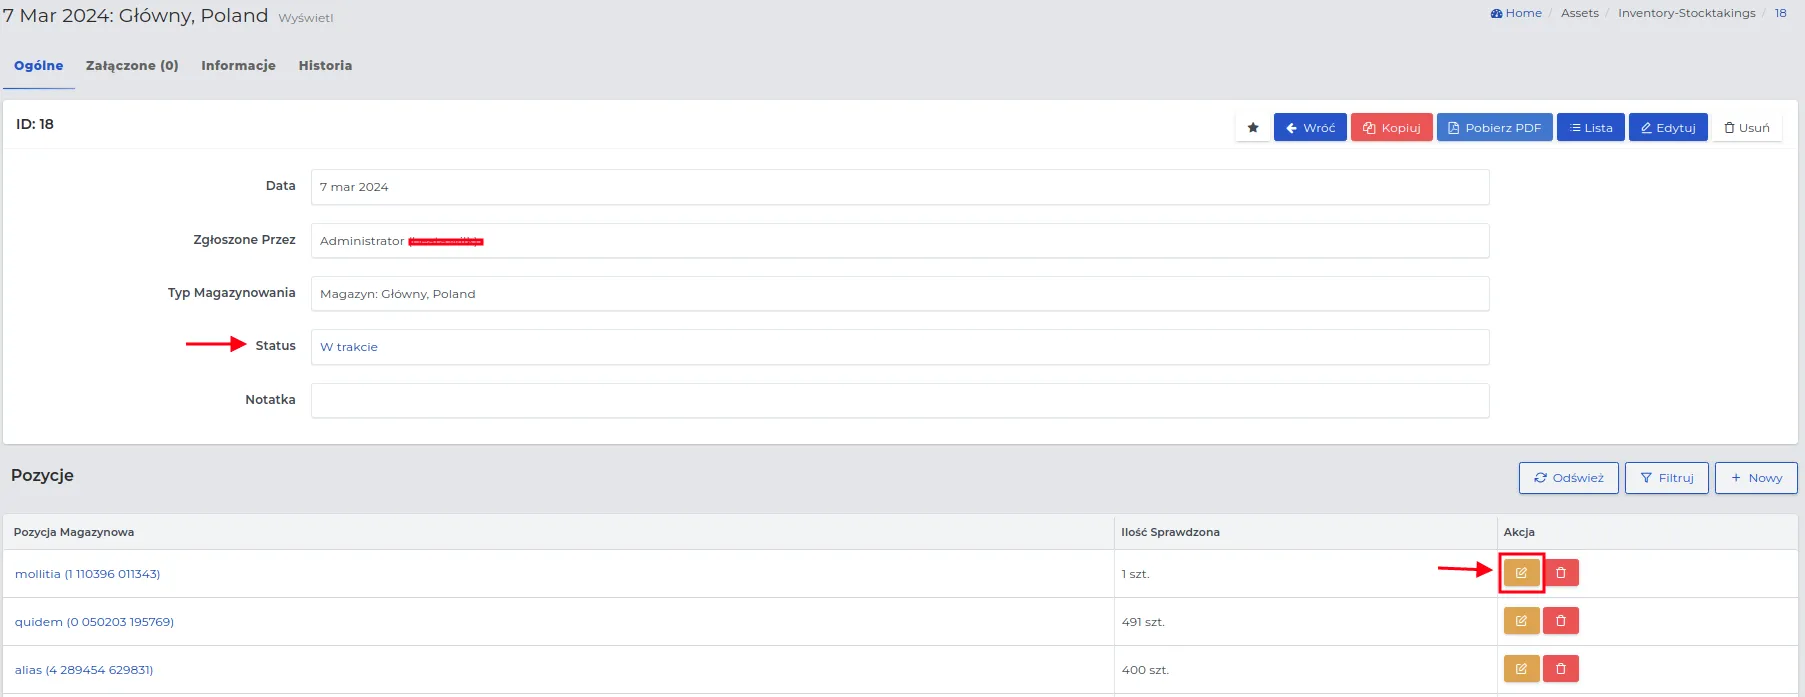
REMEMBER: You should verify the items on the inventory and modify/complete the quantity using the “Edit” action button next to the material row.
- Save the form using the “Confirm” button.
NOTE: A full list of materials without their generated quantities can serve as a template for preparing the inventory by an employee who is to count certain types of materials in the warehouse or project. Such a list can be printed and handed over for completion.
REMEMBER: During the inventory process, materials in the inventory warehouse for which a quantity has been entered are blocked.
Inventory Completion
The purpose of completing the inventory process is to confirm the current warehouse stocks. The inventory is considered completed when its status changes. The procedure for changing the inventory status proceeds in the following order:
-
Click the “Edit” button next to the inventory list you want to change the status of.
-
In the form, determine the new status from the available options: “Cancelled” and “Completed”.
NOTE: Return to the inventory list using the “List” button and at the selected inventory, choose the “View” action button to be able to edit the inventory items entered so far.
- Save the data using the “Confirm” button.
REMEMBER: Changing the status is also available in the record preview, after clicking on the name of the current status.
NOTE: In an inventory with the status “Completed,” you cannot edit the quantities of materials, nor can you delete it from the system.
REMEMBER: After completing the inventory, it is recommended to conduct a detailed analysis of any differences in material quantities to identify potential issues or areas that can be optimized.
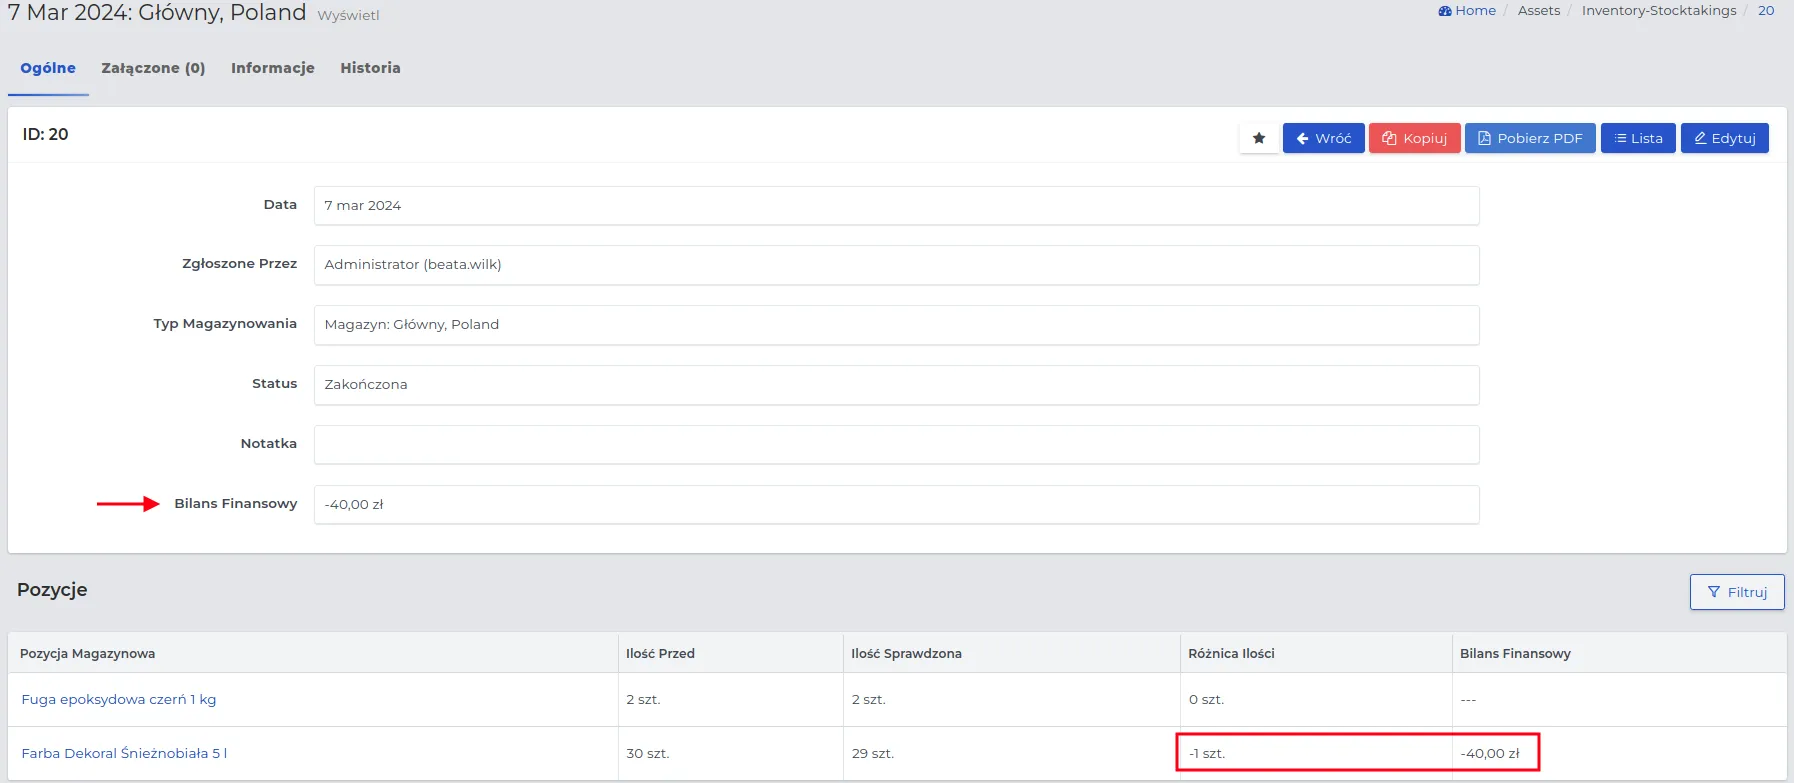
The difference in quantity noted in the screenshot above presents the “Financial Balance,” which reflects changes in stock values in relation to the quantities that should physically be in the warehouse or the project to which the inventory pertains.