Dashboard
The dashboard system of Contractors.es enables effective management of customer relationships and company resources. It is a space fully customizable by the user as they decide on its appearance and content.
REMEMBER: A properly set up dashboard positively affects work efficiency.
Dashboard Structure
The structure of the dashboard is the layout and arrangement of elements, such as the main view and functional buttons. Their purpose is to create an intuitive environment for the user, where they can easily and efficiently manage system functionalities, customize the dashboard to their needs, and quickly use key tools and information.
NOTE: Dashboards have been configured for system roles. After the first login, the user has a customized dashboard according to their assigned role in the system, and they can later modify the data according to their own needs. The administrator can modify the templates assigned to roles by editing them.
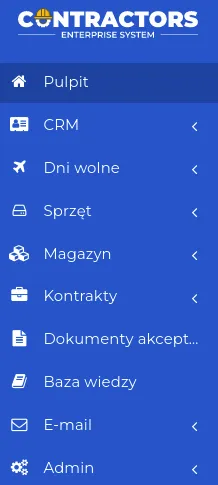
Always visible on the user’s dashboard are:
- Interface panels: side menu and top bar.
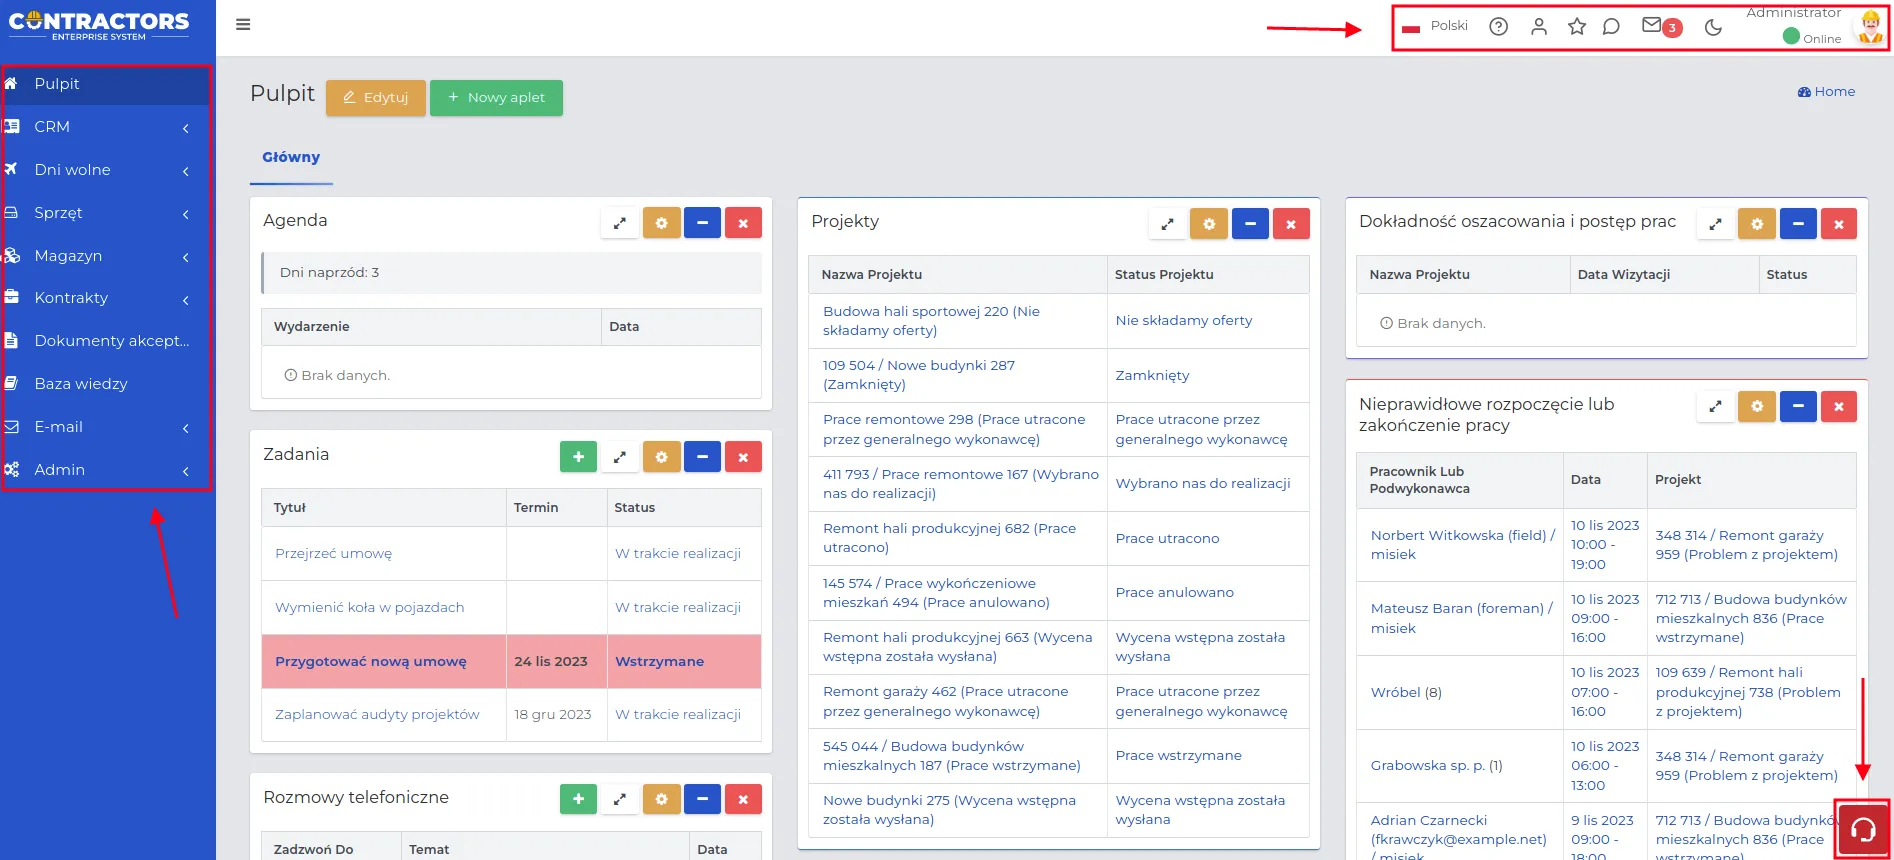
- Functional buttons.

- Dashboard tabs.

- Applets.
REMEMBER: The appearance of the sidebar, i.e., the color in which the list with system modules is to be displayed, belongs to the administrative settings.
Interface Panels
Interface panels are areas on the computer screen that gather and present various functions, tools, or information for the user. They facilitate access to system functions, helping in the intuitive use of the software. In the system, there is a side panel and a top panel.
The side panel in Contractors.es is called the menu, which contains the available system functions. Each tab, marked with a ”<” symbol, focuses on subcategories of a given module.
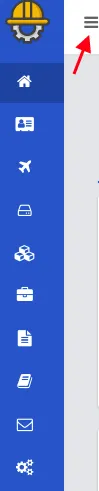
REMEMBER: To increase space on the dashboard, you can use the menu collapse function (marked with a red arrow). Office icons will remain visible, and upon hovering the cursor again, the menu will expand to its initial width.
The Top Panel provides quick access to user account settings.

Icons in the top panel include:
- Changing the language in the software (Polish, English).
- Going to the help section, which describes the system functions and settings.
- Filtering the CRM module by a different employee or entire contact groups. The way to create groups by which you can filter has been described here.
- Notifications about new entries in records marked as “Favorites”.
- New incoming messages on the company’s internal messenger, i.e., the so-called “Chat”.
- Notifications related to the appearing number of email messages, according to the meaning of symbols described here.
- Changing the screen display mode according to the “day → night” principle.
- User account settings and the ability to log out of the system.
Functional Buttons
Functional buttons facilitate quick access to key system functions. There will always be two functional buttons visible on the dashboard, whose meanings are as follows:
-
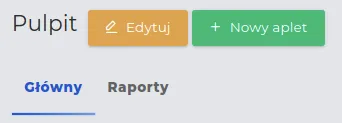
Allows editing the settings of dashboards and applets on them.

-
Allows adding a new applet to the dashboard with specifying its location and appearance.

REMEMBER: Depending on user permissions, they may not have access to all types of applets.
You can edit the layout and appearance of applets on your dashboard as described below:
-
Select “Edit” on the dashboard, then use the “Display” button or click on the tab name, e.g., “Main”.
-
A list with the names of applets for which their position on the dashboard has been specified will be displayed: left column, middle column, and right column.
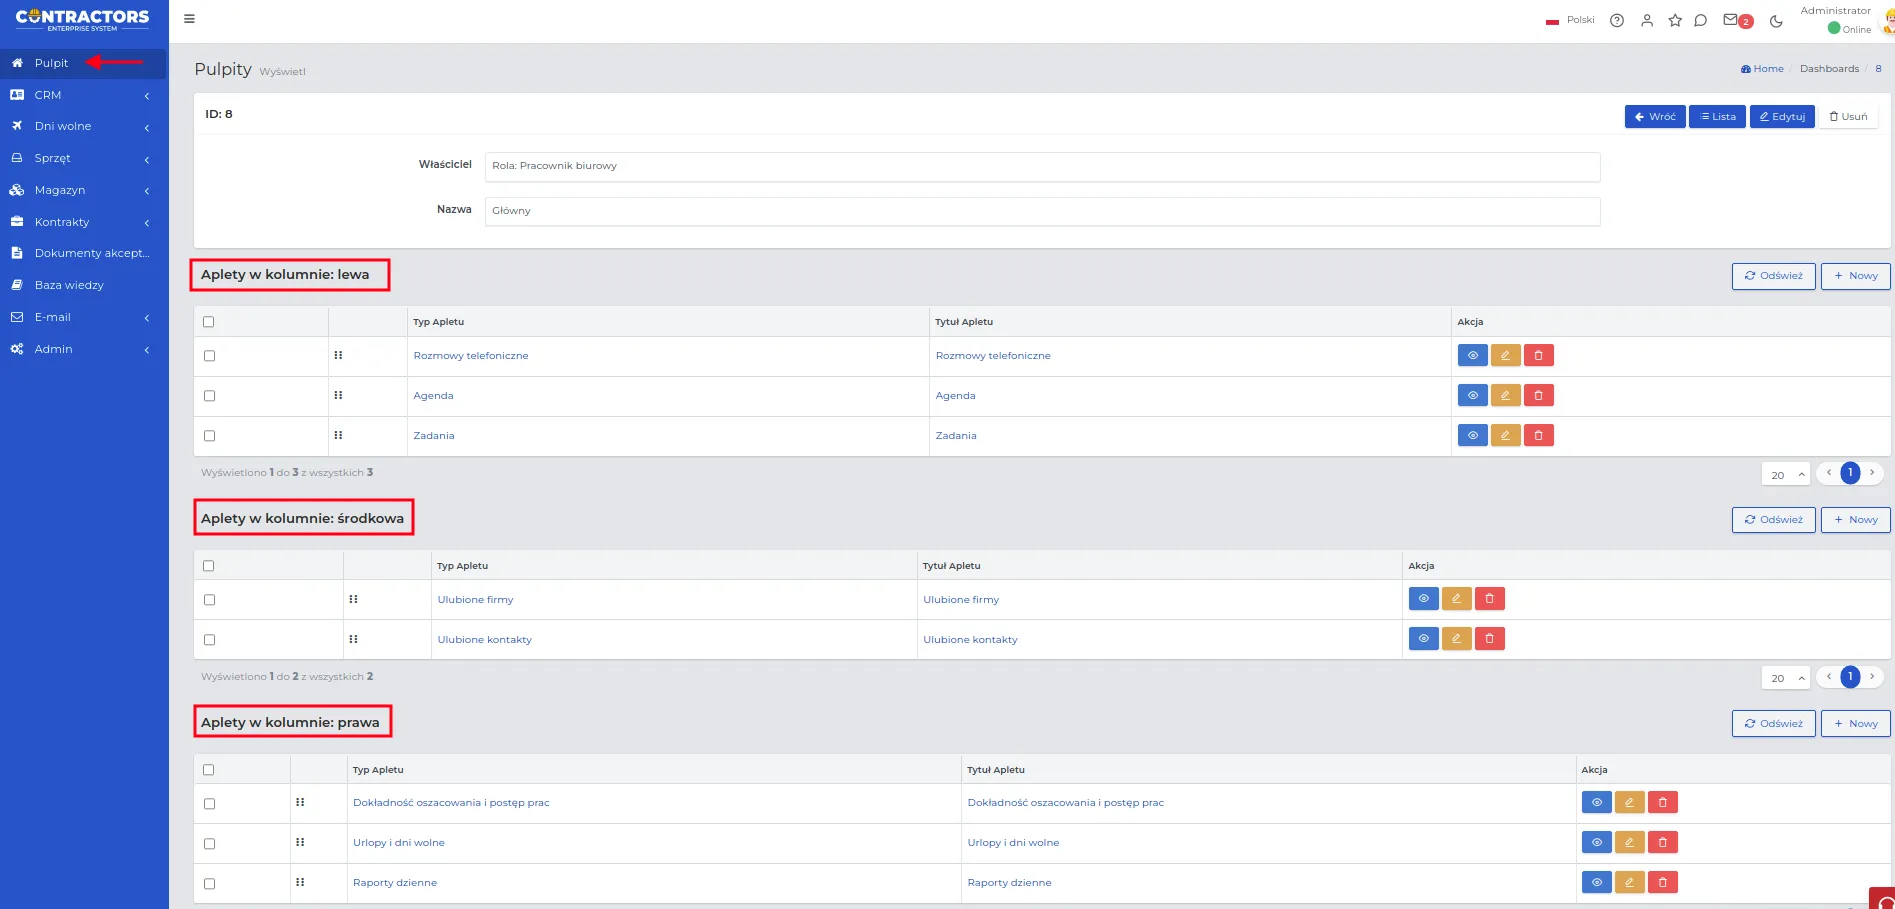
-
Adjust the order of the applets on the list by dragging them up or down as indicated in the screenshot below.
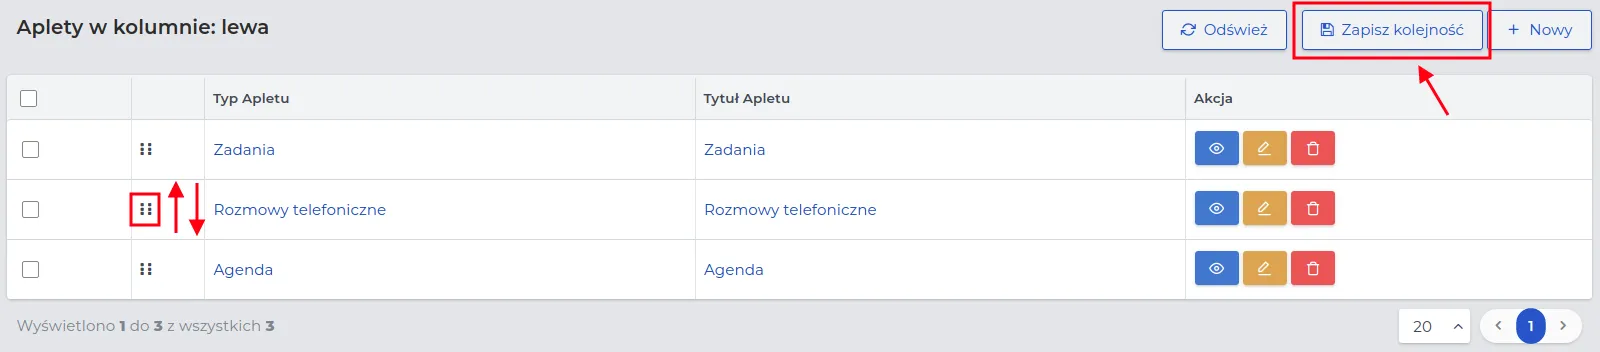
REMEMBER: After making changes to the order, press the “Save order” button to update the list.
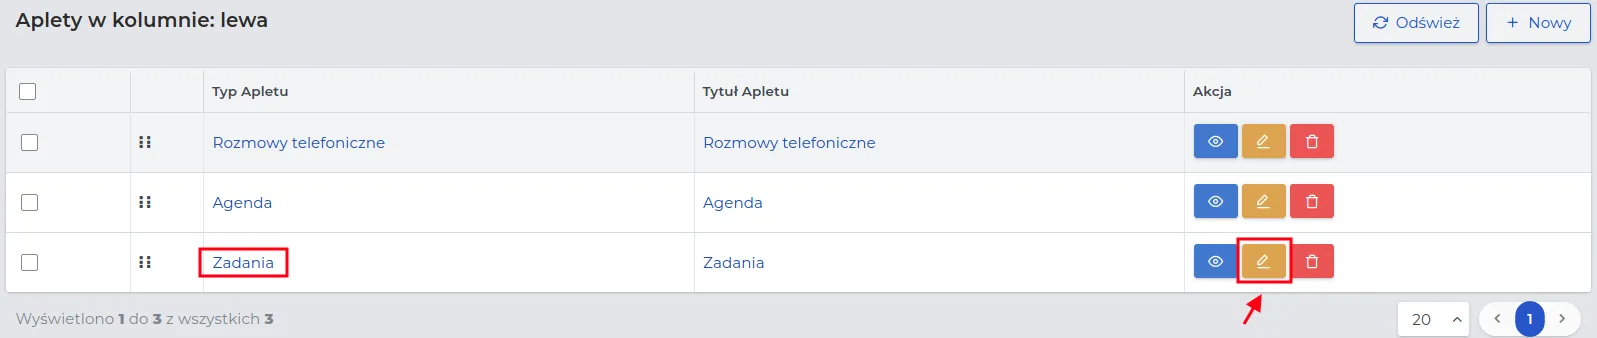
-
Optionally, change the appearance of a selected applet from the list by going to its edit form.
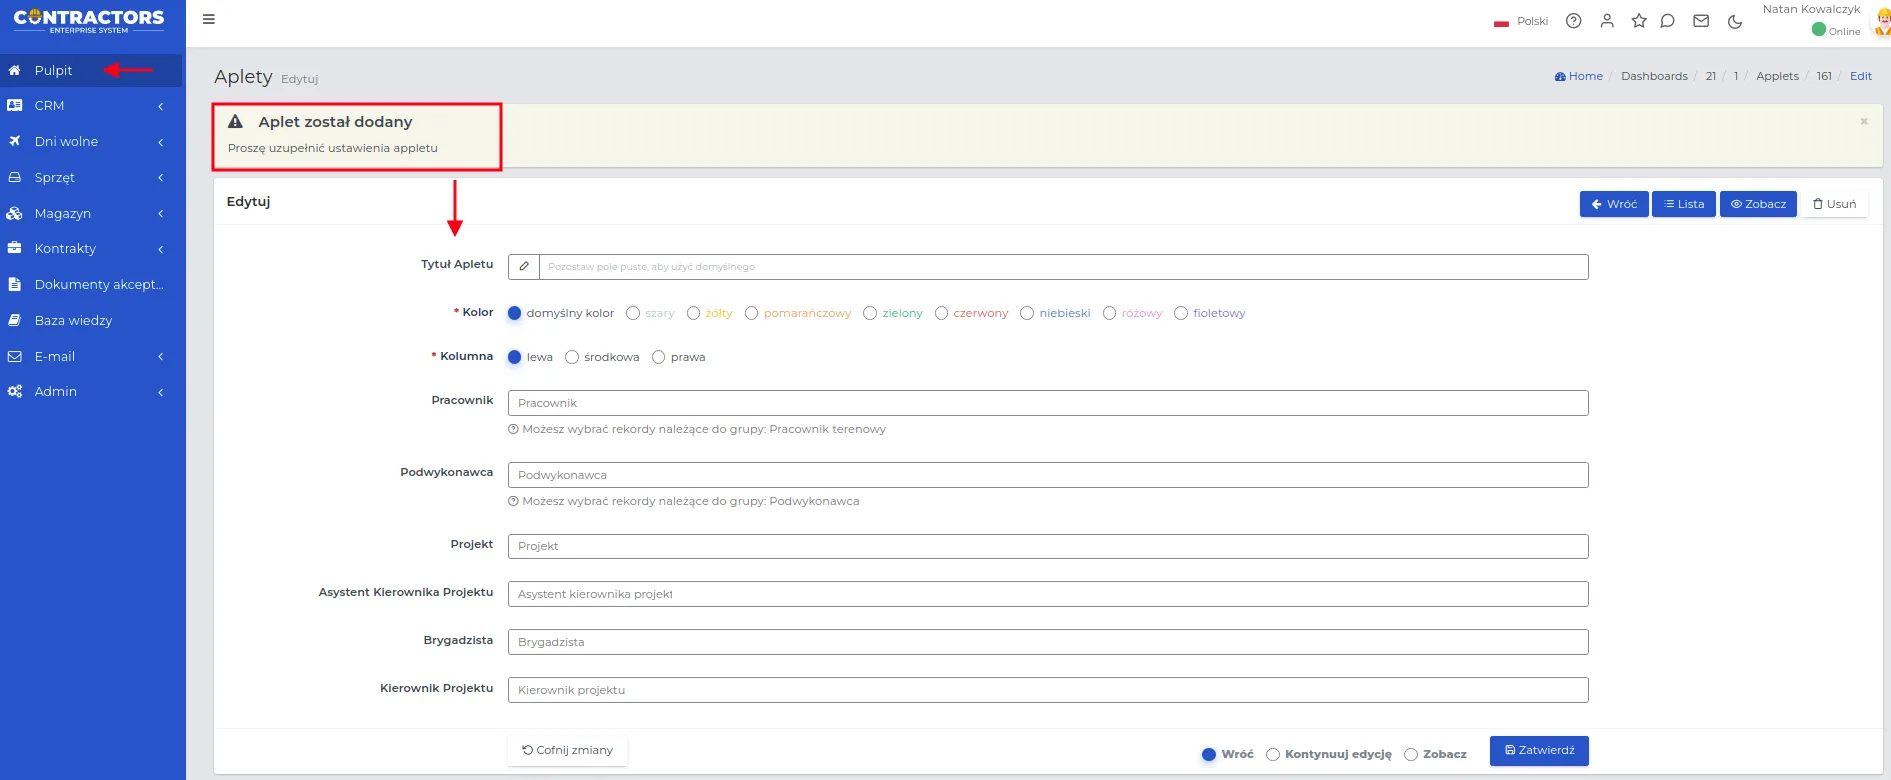
The repeatable meaning of fields in the applet edit form is as follows:
- Applet Title: The name of the applet. Leave this field blank to use the default name.
- Color: The applet frame will be marked with the selected color.
- Column: Changes the type of column in which the applet should be located.
NOTE: Depending on the type of applet, the fields in the applet edit form may vary.
More information about the types of applets available in the system can be found here.
- Save the changes with the “Confirm” button.
NOTE: Applets can only be moved (change order) within a given tab. It is not possible to move an applet from the “Tasks” tab to the “Balance” tab. The applet’s tab can be changed by editing its settings.
REMEMBER: The fastest way to go to the “Edit” form of a selected applet is to use the “Applet Settings” function.

REMEMBER: An unnecessary applet can be removed using the “Delete” button.
NOTE: Data in the deleted applet will not be lost and will be visible again in the applet when it is re-added to the desktop.
Desktop Tabs
Desktop tabs, referred to as “subsequent desktops,” allow users to customize functionality to their own needs and group applets according to their functions.
NOTE: The administrator, by creating so-called desktop templates for specific roles, adds tabs and edits settings only for new users of a specified role.
Add desktop tabs in the following order:
- Go to the desktop edit, and then click the “New” button.

- In the “Name” field, enter the name of the tab to be visible on the desktop, e.g., “Reports,” and save the entry with the “Confirm” button.
REMEMBER: You can edit, delete, and change the order of tab names on the list by dragging them up or down.
NOTE: You cannot remove all tabs from the desktop; at least one tab must remain visible. After removing the last one, a new tab will be created according to system settings.
Applets
Graphical components visible on the desktop are called applets. Arranging applets on the user’s desktop allows for quick access to important functions and information, which significantly facilitates daily work and increases the efficiency of system use.
REMEMBER: The way you organize applets on the desktop will affect the organization of your work. You can create desktop tabs and sort applets in them according to their purpose.
The buttons visible on each applet reflect their functions. These include:
- Allows you to go to the full (extended) list of records.
![]()
- Displays the applet’s configuration with the possibility to make changes within it.
![]()
- Minimizes (reduces) the applet window and hides the information contained in it.
![]()
- Maximizes (enlarges) the previously minimized applet window.
![]()
- Removes the applet from the desktop.
![]()
Other visible buttons depend on the type of applet and allow for additional actions to be performed within them. These include:
- Allows you to add a new entry to the list of records.
![]()
Applies to applets: Companies, Contacts, Recently Viewed Companies, Project Issues, Phone Calls, Equipment in Service, Favorite Companies, Favorite Contacts, Favorites from the Warehouse, Favorite Equipment, Verification of Materials and Other Products Used in Realization, Project Visits, Requests for Additional Information, Requests for Deferral of Equipment Return, Tasks, Material Requirements, Equipment Requirements, Reports of Weather Preventing Work, Project Changes.
- In the case of the Chat applet, two icons are available:
![]()
![]()
Allows changing the name of the chat and displays a list of users for that chat.
REMEMBER: Thanks to the buttons available on each applet, you can easily delete or edit applets in a simple and quick way.
Adding applets to the desktop can be done in two ways:
Method I:
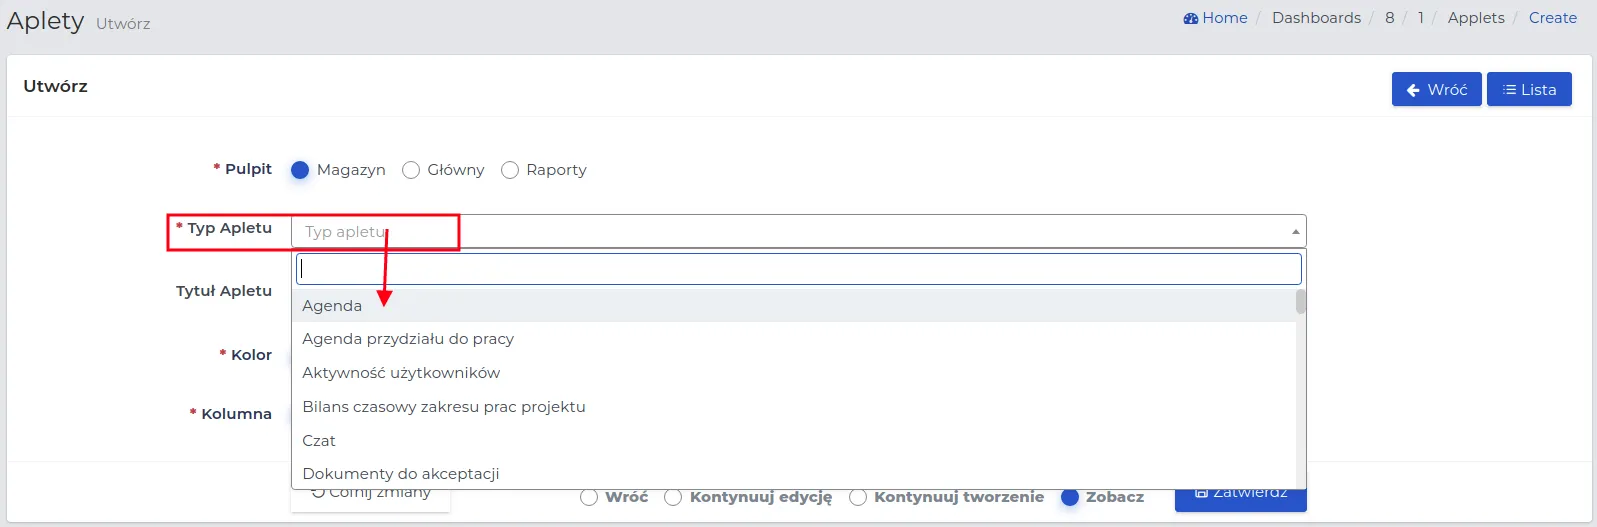
- Select the “New applet” function button on the desktop and fill out the form according to the meaning of the fields:
- Type of applet: The type of applet selected from the list.
- Applet title: The name of the applet. Leave this field empty to use the default name.
- Color: The applet frame will be marked with the selected color.
- Column: Changes the type of column in which the applet is to be located.
- Save the changes with the “Confirm” button.
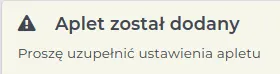
NOTE: If the selected type of applet requires filling in additional fields, the system will inform you with an appropriate message.
Method II:
-
Go to the “Edit” of the desktop, preview your desktop with the “Display” button.
-
At the selected column, click the “New” button.

- Fill out the form to add an applet to the desktop according to the description of the fields contained here and save the changes with “Confirm”.
REMEMBER: Added applets automatically position themselves at the bottom of the column to which they were added.
NOTE: You can move applets on the desktop, changing not only the order but also the column. Grab the applet with the cursor at the frame and drop it in the target location.
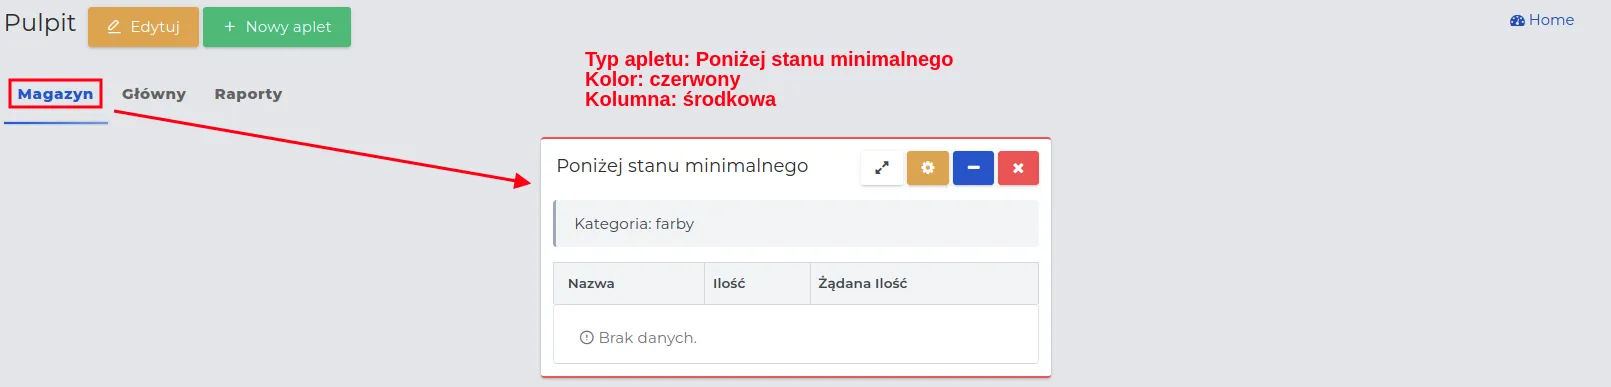
Example: Adding individual applets to two new tabs on the desktop.
- Create two new tabs on the desktop as described here, e.g., “Warehouse” and “Reports”.
- Add a new applet in the “Warehouse” tab, specifying in the form:
- Type of applet: Below minimum level.
- Color: red.
- Column: middle.
- Save the data with the “Confirm” button.
NOTE: If the selected type of applet requires filling in additional fields, the system will display a message and another form to enter further settings.
- Proceed in the same way and save the addition of another applet in the next tab “Reports”, selecting for example Daily Reports, blue color, right column.
The preview of the dashboard tabs created in this way will be as follows:
If you want to move a selected applet from one tab to another, follow the steps below:
-
On the dashboard, select the applet you want to move, and then click the “Applet Settings” button, which allows its configuration.
-
In the form, in the “Dashboard” field, select the name of the tab to which you want to move the applet.
-
Verify the remaining fields and save the changes with the “Confirm” button.
REMEMBER: The applet cannot be dragged with the mouse cursor to another tab. You can only move applets within the same group on the dashboard in this way.
Description of selected applets
Applets available on the system list should be customized according to individual needs. It is important to select the most helpful and frequently used ones and then set them up on your dashboard. The full list with applet names is available when adding them to the dashboard in the “Applet Type” field. The names of the applets on this list are arranged in alphabetical order.
This thread will describe a few popular applets.
Example: Agenda.
”Agenda” allows displaying events entered into the calendar of both ourselves and a selected employee from the list.
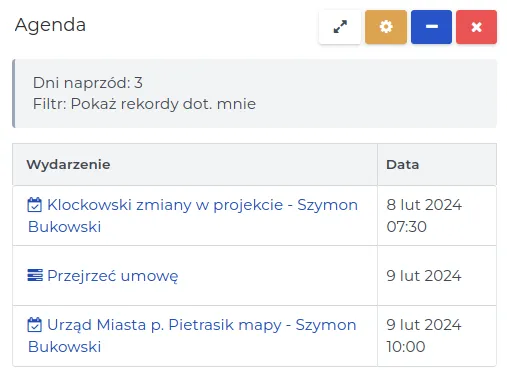
In the “Applet Settings”, pay attention to the following fields:
-
Days ahead – determines how far in advance tasks entered into the schedule will be displayed in this applet.
-
Filter – allows displaying events of a selected group of users:
-
Show records about me – will display only our calendar with tasks.
-
Show all (disable filters) – will display the calendars of all users.
-
Group (e.g., HR, Estimator, etc.) - will show events for the selected group of contacts provided that it has been added to the so-called “Filter List”.
-
-
Selected person from the list - will show only the calendar of a specific person.
NOTE: You can create several “Agenda” applets on the desktop, for which you define different filters for displaying events on the list.
Example: Time balance of the project work scope.
”Time balance of the project work scope” allows for reviewing and analyzing the progress of work on a selected project. The applet will display information regarding the work scope and the number of days worked, estimated, and exceeded, calculated based on daily reports sent by employees. Sometimes it may happen that the assumed number of days needed to complete the project is insufficient. Exceeding the number of days may be related to problems occurring on the construction site.
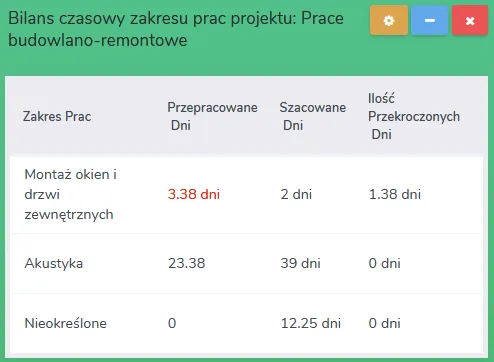
In the “Applet Settings,” pay attention to the “Project” field according to which data will be retrieved concerning the selected project from the list.
REMEMBER: Thanks to this system feature, it will be possible to verify at which stage of the work scope problems may arise, and what can be improved to fit within the planned project completion date.
NOTE: On the desktop, you can create several applets named “Time balance of the project work scope,” for which you will choose different projects.
Example: Chat.
Communicating between employees using the internal “Chat” is a commonly used method. The chat function eliminates the need to write to each user separately, translating into significant time savings and convenience.
NOTE: You can define chat participants for a newly created chat. All system users have access to the “Main Chat.”

In the “Applet Settings,” pay attention to the “Chat” field where you choose from the list the chat available in the system that you want to be visible in this applet.
If you want to create a new chat, follow the sequence below:
-
In the top panel, select the “Chat” icon and go to the “New chat” tab.
-
Fill in the form fields, which have the following meanings:
- Name: A name for the new chat, which will be visible to its users.
- Participants: Choose from a list of people who are to have access to this chat.
- Save the data with the “Confirm” button.
NOTE: Selected users can use this chat, but they cannot make changes to it. As an administrator, you have the ability to change its name, remove or add users, and delete the entire chat.
REMEMBER: The Chat applet is the same communicator that is available in the top panel.
Example: Projects.
The “Projects” applet facilitates tracking the progress of projects by customizing the displayed information based on various variables defined during its creation.
NOTE: Using many variables in the form at the same time will adjust the displayed information according to the introduced restrictions. This is not a mandatory requirement.

In the “Applet Settings,” pay attention to the following fields:
-
Project: Selection of a project entered into the system.
-
Project status: Determination of the stage at which the project currently is, its progress, and any potential issues or delays.
-
Assistant project manager, Foreman, Project manager, Project estimator: Optional, but not required selection of a user performing the selected role.
-
Department the project falls under: Selection of the department the contract concerns.
-
Fully settled: Status determining the method of financial settlement.
NOTE: On the dashboard, you can create several “Projects” applets, each of which may concern, for example, a specific project or its status. You can define these variables using the “Applet Settings” button.
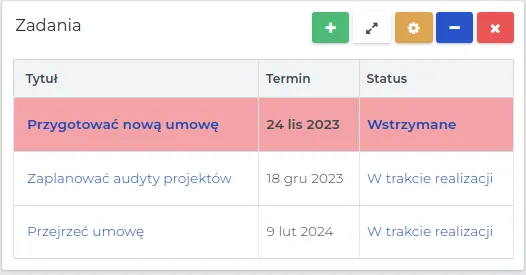
Example: Tasks.
The “Tasks” applet contains all entries with planned tasks to be performed. The user sees what needs to be done, by what deadline, and what their current status is.
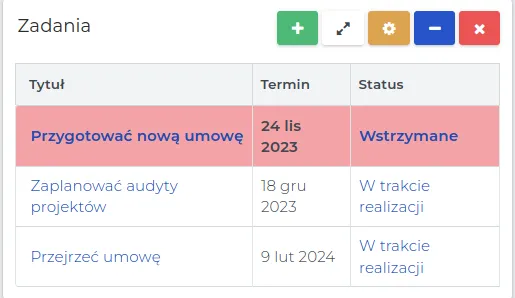
After selecting the “Go to the extended list” button, records will be displayed for which action buttons (View, Edit, Delete) can be applied, or create a new task by clicking on “New”.
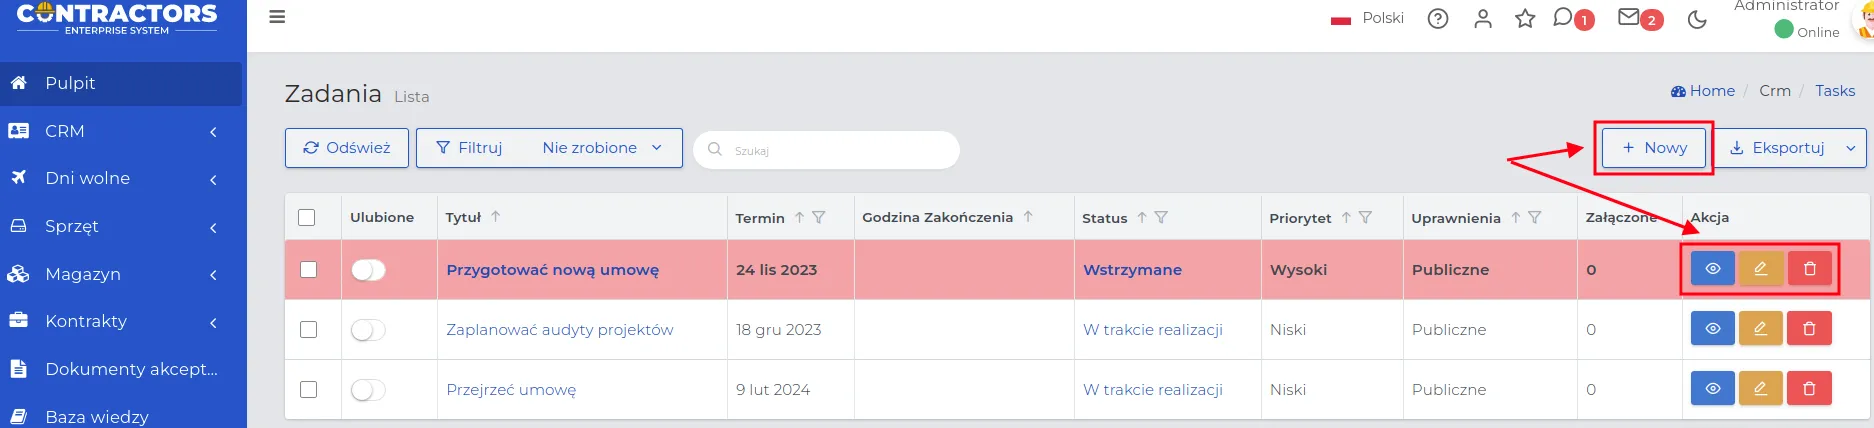
REMEMBER: You can also enter a new task by selecting the green “New” button, visible next to the applet name.
NOTE: All tasks with high priority will be highlighted in red on the task list.
REMEMBER: You can change the status of a task by clicking directly on the status name. You do not need to go to the edit form.
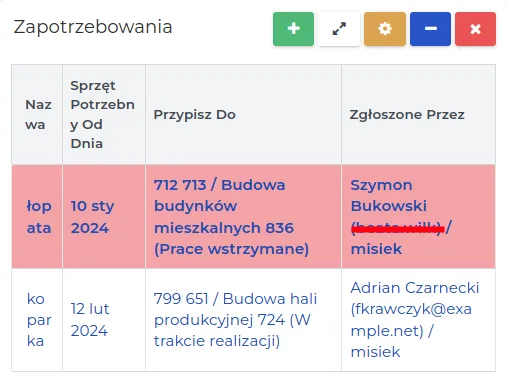
Example: Equipment requirements.
This applet is essential for an employee who manages the registry of equipment or machinery rentals, for which a demand has been reported. Rentals can be directly associated with a client or project, specifying who and until when they will be used.
After selecting the “Go to extended list” button, records will be displayed for which action buttons (View, Edit, Delete) can be used, or create a new demand by clicking on “New”.
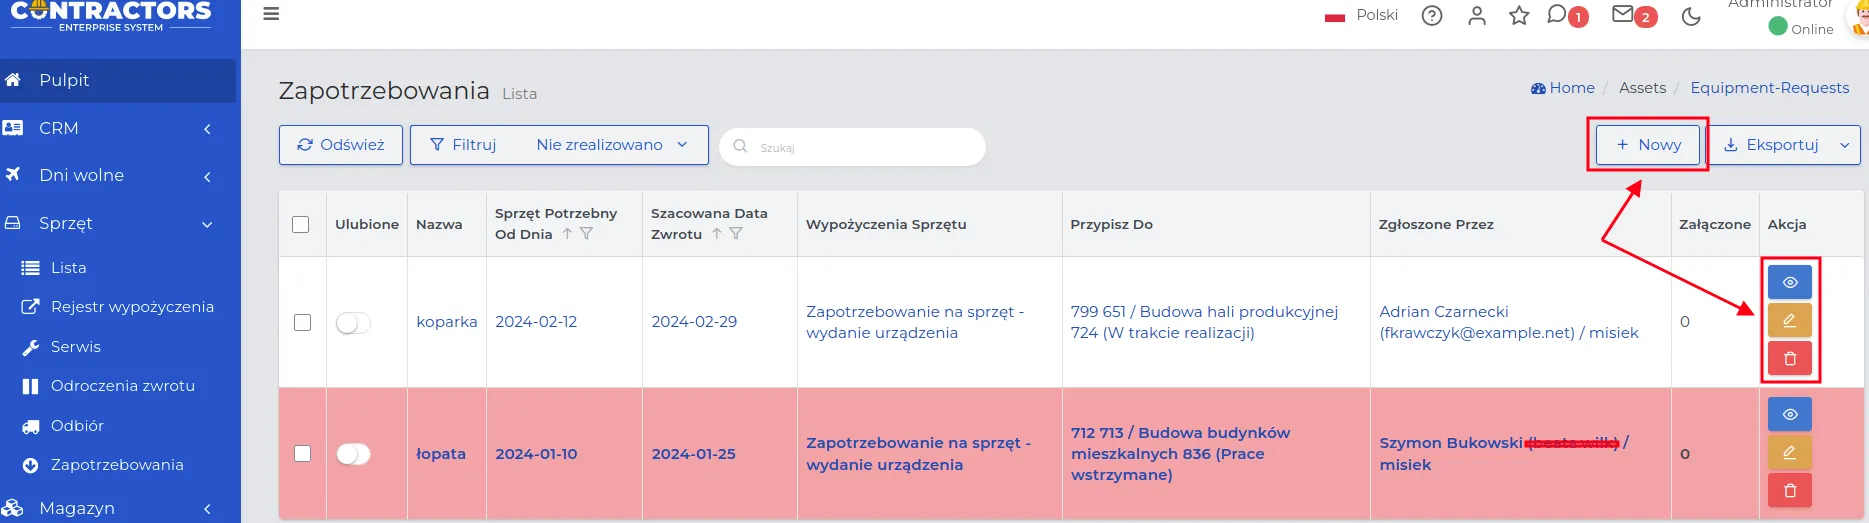
REMEMBER: You can also enter a new demand by selecting the green “New” button, visible next to the applet name.
In the form for creating a new task, pay attention to the following fields:
-
Assign: The ability to assign the demand to an entity belonging to the Clients or Projects group.
-
Reported by employee: Selection from the list of the employee who reported the equipment demand - upon realization, they will become responsible for the equipment.
NOTE: All reported requirements for which the deadline specifying their completion date has passed will be highlighted in red on the list.
REMEMBER: You can change the “Equipment Rental” status by clicking directly on its name. You don’t need to go to the edit form.