Contracts
This chapter will discuss the key processes related to the configuration of contract management.
Contract Transaction Parameters
In Step 8, described in the “First Steps of Configuration” chapter, you conducted initial settings for contract management. You can review and change them if necessary.
-
Go to the “Admin -> Contracts -> Settings” menu, verify the values in the fields, make changes and save them with each edited form.
The meaning of the fields on this list is as follows:
-
Working time: Number of hours in a working day Set the number of working hours per day for an employee in accordance with company policy and legal regulations.
-
Unit used for calculating working time: Determine whether project estimates should be billed according to standard hours or working days. If your company mainly carries out small orders, you may want to change this option to hours.
-
Default setting for details in PDF estimates: Decide whether the default PDF estimate should include visible amounts.
-
Default project manager assistant: Choose the appropriate “Contact” from the list or allow the field to be automatically filled with the data of the person creating the document.
-
Default foreman, default project manager, default estimator: Settings equivalent to the default project manager assistant.
-
Default department carrying out the project: Choose a specific “Department” from the list or leave the field blank with the option to select it during the creation of an estimate in the system.
-
Default margin percentage for materials: Define the margin for additional materials not included in the estimate.
-
Default status for a new project: Choose the default status for a new project depending on how your company acquires orders.
-
Default type of work for a new project: Choose the “Type of work” from the list for each new estimate, or leave the field blank with the option to select it later.
-
Invoicing: Invoice autonumbering: Set up automatic numbering for subsequent invoices issued in the system.
-
-
Invoicing: Default VAT rate: Specify the default VAT rate based on applicable tax regulations.
-
Invoicing: Default footer text: Add payment information and bank transfer details.
-
Invoicing: Default due date: Determine the default due date for the buyer’s financial obligation.
-
Invoicing: Default invoice type: Choose the method of accounting for work stages.
-
Invoicing: Last automatically generated invoice number: If you use auto-numbering and have previously used a different invoicing system, enter the last invoice number issued in the other system to continue the numbering.
-
Invoicing: Invoice auto-numbering prefix: Establish the numbering format for invoices covered by auto-numbering.
-
Features: Show fields related to material samples: Display fields related to the verification of materials intended for the project.
-
Features: Show the “Project Accounting Identifier” field: Display a field allowing the entry of an accounting number for the project.
-
Features: Show fields in the project related to insurance: Display fields allowing the determination of the required insurance coverage.
-
Features: Show in the project fields related to the general contractor: Display the entity responsible for the comprehensive execution of the project.
-
Features: Show in the project the field for the date of the pre-construction audit: Display a field allowing the entry of the date for the verification of the actual state before starting the project.
-
Features: Show in the project the field for the date of receiving drawings: Display a field allowing the completion of the date when the documentation was provided by the client.
-
Features: Show in the project the field related to the safety data sheet of hazardous substances: Display fields related to hazardous substances to be used in the project.
-
Features: Show in the project the field related to material verification: Display fields allowing confirmation of material compliance with the project.
-
Features: Show in the project the field for transferring the offer to accounting: Display a field allowing the entry of the date of transferring the offer to accounting in order to create a project record in the accounting software.
-
Features: Allow setting a project manager assistant: Display a field that allows entering a project manager assistant.
-
Features: Allow setting a project manager: Display a field that allows entering a project manager.
Types of Projects
The areas defining the company’s activity are otherwise known as the types of projects in which the company specializes. In Step 10, described in the “First Steps of Configuration” chapter, you made the initial system settings. Depending on the nature of the company, the types of projects can vary, e.g., roof assembly, plumbing and electrical installations, interior finishing works, renovations, etc.
Adding new types of projects to the list is done according to the following scheme:
-
Select the “Admin -> Contracts -> Types of Projects” section, verify the types of work visible on the list and add another name using the “New” button.
-
Fill in the form and save with “Confirm”.
NOTE: If the type of project is to be visible in the project settings, set the switch to “Active”. You can always deactivate it by moving it in the opposite direction.

Work Scopes
Work scopes are used when estimating projects. In Step 11, described in the “First Steps of Configuration” chapter, you made their initial settings. Depending on the company’s profile, the work scopes can be as follows:
-
Roof assembly: Roof structure, sheathing, membrane covering, felt covering, tile laying, gutter and downpipe installation.
-
Plumbing and electrical installations: Laying water and sewage systems, electrical installation assembly, cable laying, electrical distribution board execution.
-
Interior finishing works: Painting walls, installing floor panels, internal door installation.
NOTE: The work scopes will determine the way they are priced for the service performed. According to these settings, the proposed costs for the estimate will be calculated.
Adding new work scopes to the list is done according to the following scheme:
-
Select the “Admin -> Contracts -> Work Scopes” section, verify the work scopes visible on the list, and add another name using the “New” button.
-
Define the pricing method for it by choosing one from the list available. More about the pricing available in the system can be found here.
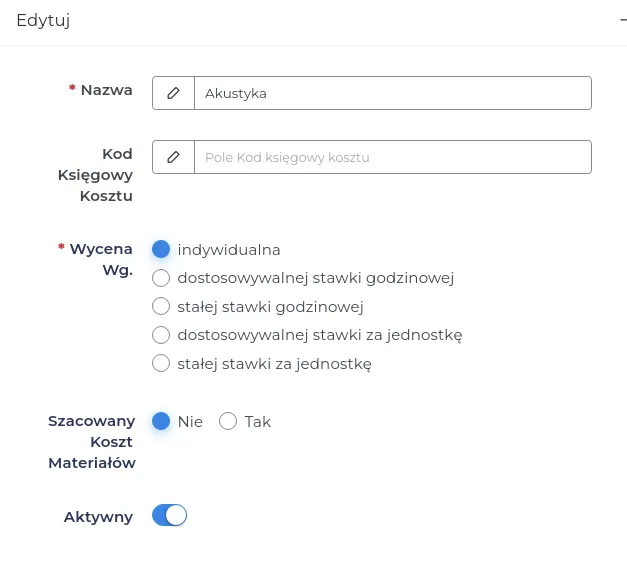
NOTE: If the client usually provides materials for the construction on their own or you want to price it individually, set the switch to “No” for the “Estimated cost of materials” field.
REMEMBER: The selected work scope along with the pricing conditions will be available during its entry into the system, as long as the switch in the “Active” field is turned on.
- Save the form with the “Confirm” button.
If you are interested in the process of creating a quote in the system and the possibility of later modifying the settings, familiarize yourself with the detailed description available here.
Work Planner Settings
Effective time management of work includes issues related to precise calculation of employee salaries. In Step 9, described in the “First Steps of Configuration” chapter, you made initial settings, which you can now change if necessary.
-
Go to the “Admin -> Contracts -> Planner Settings” menu, verify the values in the fields, make changes and save them with each edited form.
-
The meaning of the fields on this list is as follows:
- Time of free breakfast break: This is the time deducted from the working time designated for a breakfast break.
NOTE: In Poland, employees are entitled to a paid breakfast break, so enter the value “0” in this field. For countries where the breakfast break is not paid, specify the contractual number of minutes of the break for which no remuneration is due.
- Time of sending notifications: Determines the hour at which the employee receives information about the upcoming work assignment, i.e., the place and time to report to the project.
REMEMBER: For the employee to receive notifications about work assignments, it is necessary to install the Contractors.es mobile application on the employee’s mobile phone.
-
Default working hours: The range of working hours on different days of the week.
NOTE: If an employee is entitled to a free breakfast break, add it here.
- Salary calculation: Determinations regarding compensation for time worked during the week, taking into account the basic hourly rate and overtime.
NOTE: You can apply individual rates for a specific employee by editing the employee’s contact - HR tab.
-
Warning of being late or leaving early: Time margin (in minutes), after which the system marks such an entry warning of the situation that has occurred.
-
Warning of being too far from the project: Specifies the distance, beyond which the work assignment record will be marked as logging in outside the project area.
REMEMBER: Limits informing the supervisor about being late, leaving early, and moving away from the project site are recorded through the employee’s mobile application during their logging in and out of work. This data is helpful in assessing the employee’s reliability.
- Calendar hour range: Includes the range of hours visible on the calendar, giving the possibility to assign work within this time frame.
Types of Issues
Reporting issues on projects is a key element affecting their effective management. Thanks to the quick identification of potential difficulties, it will be possible to take the necessary corrective actions. Defining the types of issues in the system will allow for their efficient segregation. Employees, when reporting an issue, choose the appropriate category from the list, which enables the supervisor to determine what problems are most common, and what may require change.
Construction issues (not related to weather) may include, among others:
-
Delays in material deliveries.
-
Non-compliance with building regulations.
-
Employment of workers.
-
Equipment failures.
-
Conflicts within the team.
-
Poor project management.
You can add contractual issue categories in the following way:
- Select the “Admin -> Contracts -> Types of Issues” section, verify the names of issues visible on the list, and add more using the “New” button.
NOTE: If the issue category is to be visible in other system sections, set the toggle to “Active”. You can always deactivate it by sliding it the other way.
- Save the form with the “Submit” button.
NOTE: Reporting weather-related issues by employees is possible through the mobile application. Weather data is automatically retrieved, which further simplifies and authenticates the report.
REMEMBER: Precisely defining potential construction problems that are beyond our control can be useful in case of disputes with the client. It constitutes significant evidence in the event of failure to meet deadlines, which could result in a penalty.
Categories of Inspections on Projects
Conducting control visits is within the competence of selected employees, and the purpose of their designation can vary.
Types of control visits may include:
-
Building Inspections: Allow for checking the compliance of the execution with the building design and applicable regulations. Inspections can cover different stages of construction.
-
Technical Visits: Are focused on technical aspects and project specifications. They enable a coordinated analysis of the technical team’s actions.
-
Safety Visits: Focus on the safety aspects of employees and compliance with OHS standards. They include risk assessment and the effectiveness of preventive measures.
-
Problem Visits: Serve to analyze and solve problems encountered during project implementation. They allow for a quick response to potential complications.
-
Control Visits: Serve for regular monitoring of construction progress. During control visits, timeliness, quality of work, and adherence to the planned schedule can be assessed.
You can edit or add the types of visits available in the system according to the scheme:
- Select the “Admin -> Contracts -> Types of Site Visits” section, verify the names visible on the list, and add more using the “New” button.
NOTE: If you want the employee to fill out the “Estimation Accuracy and Work Progress” form during the inspection visit, set the switch to “Active”.

REMEMBER: The selected inspection category will be available during its entry into the system as long as the switch in the “Active” field is turned on.
- Save the form with the “Confirm” button.
NOTE: The visit to the project will be visible on the employee’s CRM calendar.