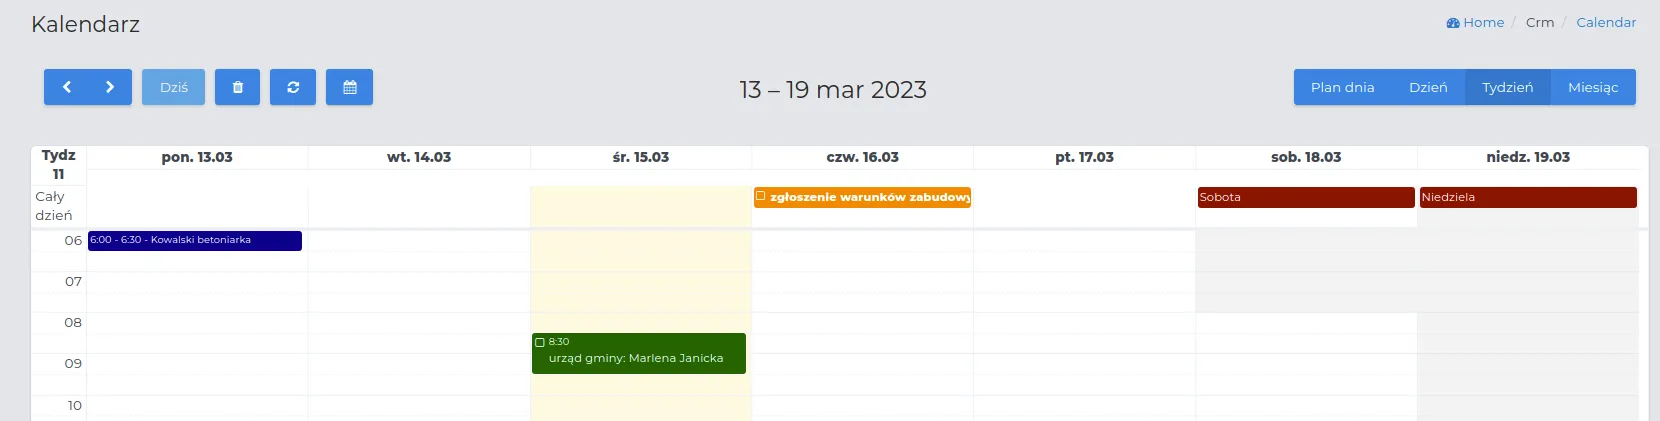
Calendar View
In the “Calendar” section, users gain access to a key functionality of the system, which allows tracking tasks, meetings, calls, and inspection visits. Thanks to a clear layout in the form of colorful cards, users can quickly and conveniently plan their duties and meetings for specific days.
The functions available in this module include:
-
Adding a new event.
-
Copying events.
-
Moving events on the calendar.
-
Viewing other users’ events.
-
Deleting events from the calendar.
REMEMBER: Meetings, tasks, and phone calls visible after being added to the calendar are available on the record lists in the “CRM -> Meetings/Calls/Tasks” menu.
The functional buttons visible on the system users’ calendars are responsible for:
- Selecting the period for displaying data on the calendar.
![]()
- Switching the calendar period back or forward, taking into account the currently set display period.
![]()
- Going to the calendar period that includes today’s date.
![]()
- Deleting items from the calendar.
![]()
- Refreshing data and updating displayed information. The view is automatically updated considering the default time interval. Using this button, we can force a refresh.
![]()
- Changing settings for what types of events to display and settings for importing/exporting calendars in iCalendar (ICS) format - using this function, it is possible to set up displaying events from Google Calendar / Office 365, etc., and displaying events from Contractors.es on other calendars.
![]()
NOTE: Data in user calendars will be displayed according to the options previously set by the administrator in the CRM calendar settings. More about these settings can be read here
Permissions
Each CRM record has a defined access level for other employees regarding the record being created, where:
-
Public: Anyone can edit, delete, or view the record.
-
Public, read-only: Anyone can only view, without the ability to edit or delete.
-
Private: Visible only to the author of the record.
Adding events to the calendar
Creating events in the calendar is simple and intuitive. Users can quickly add new events by specifying the date, time, and additional details such as a description or selected event participants. Removing events from the calendar is just as easy as adding new ones, allowing users to quickly update their schedule. The method of adding events to other users’ calendars, where the number of entries is significant and it is necessary to exclude people who are busy at that time, has been described in detail here.
NOTE: Access to the CRM menu is only available to users who have been granted appropriate roles and permissions in the system by the administrator.
The simplest way to create a new event in the calendar is to follow the sequence below:
-
On the calendar, select the spot where you want to save the new event and click once with the mouse cursor.
-
Choose the type of event from the available options, such as: meeting, task, phone call, or project visit.
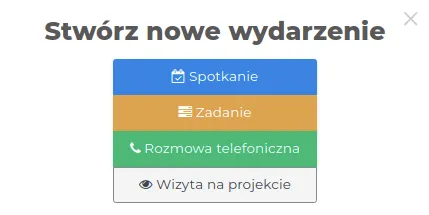
- Fill out the form, paying attention to the appropriate fields depending on the selected type of event.
NOTE: Events have been described here.
Project visit
-
Project name: The project selected from the list that the visitation will concern.
-
Visitor: The person responsible for the conduct of the visitation.
NOTE: If you remove your name from the “Visitor” field, the event will only be visible on the calendar of the selected person from the list. Use the CRM filter to view other people’s events.
-
Status: A project visitation can have various statuses that inform about its progress or completion.
-
Type of inspection: Selection of the inspection category.
-
Date of inspection: The date of the visit to the project.
Removing events from the calendar
To remove an entry from the calendar, follow one of the methods below:
Method I:
-
Click on the “Trash” function button above the calendar. The icon will be marked with a black background.
-
Select the event you want to remove and click again on the place of the card with its name.
-
Confirm its removal on the visible message.
Method II:
-
Click and drag the selected event over the “Trash” button.
-
Drop it over this button.
-
Confirm its removal.
Method III:
-
Select the entry to be removed on the calendar and click on its name.
-
In the event preview, click the “Remove” button.
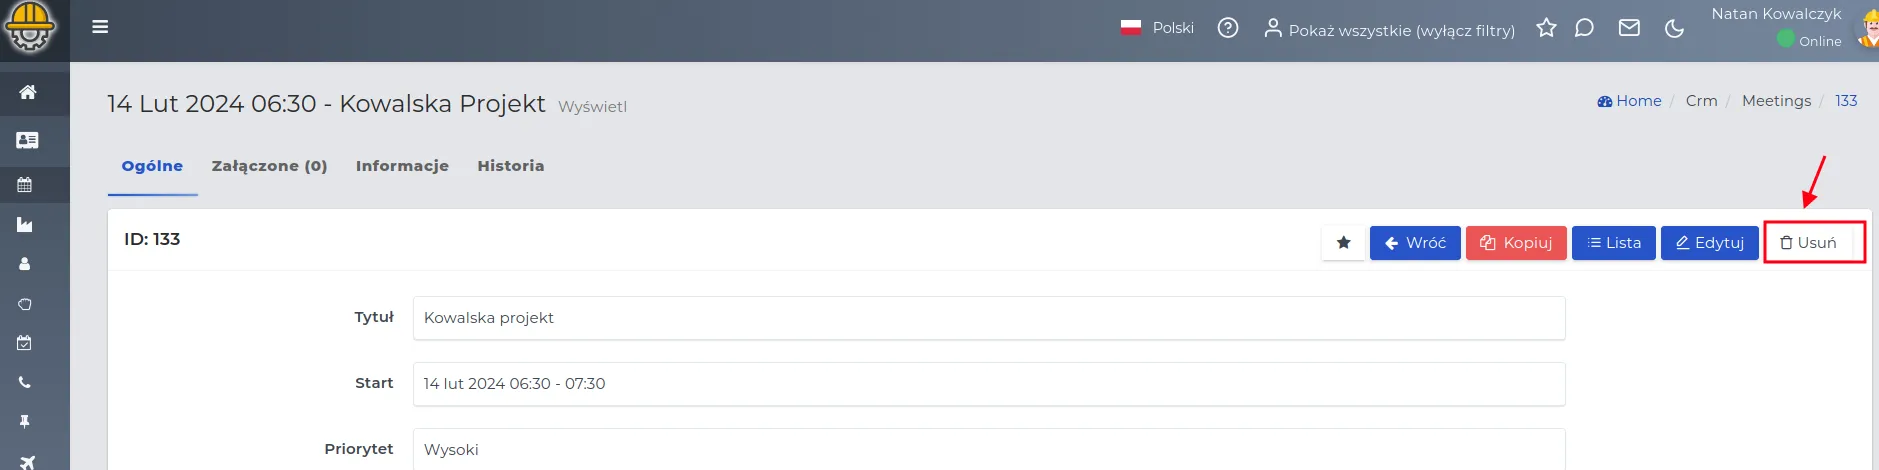
- Confirm its removal on the visible message.
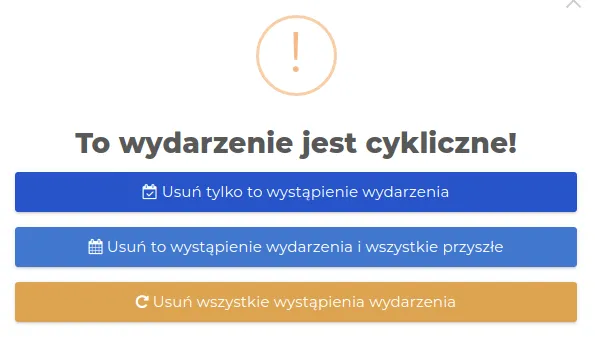
NOTE: For recurring meetings, you have the option to collectively remove entries from the calendar, according to the three available options visible in the screenshot below.
Editing, copying, and moving entries
Editing and copying events on the calendar give users flexibility in adjusting their plans to changing needs without having to create them from scratch. These features facilitate modifying existing events and replicating them with the possibility of introducing changes.
Edit saved events on the calendar in the following way:
-
Click on the card with the event on the calendar that you want to edit.
-
Use the basic button in the record view named “Edit”.
-
Enter the appropriate changes in the form and save it using the “Confirm” button.
To copy an event on the calendar, proceed in the following order:
-
Locate the event you want to copy and go to its preview.
-
Select the “Copy” button.
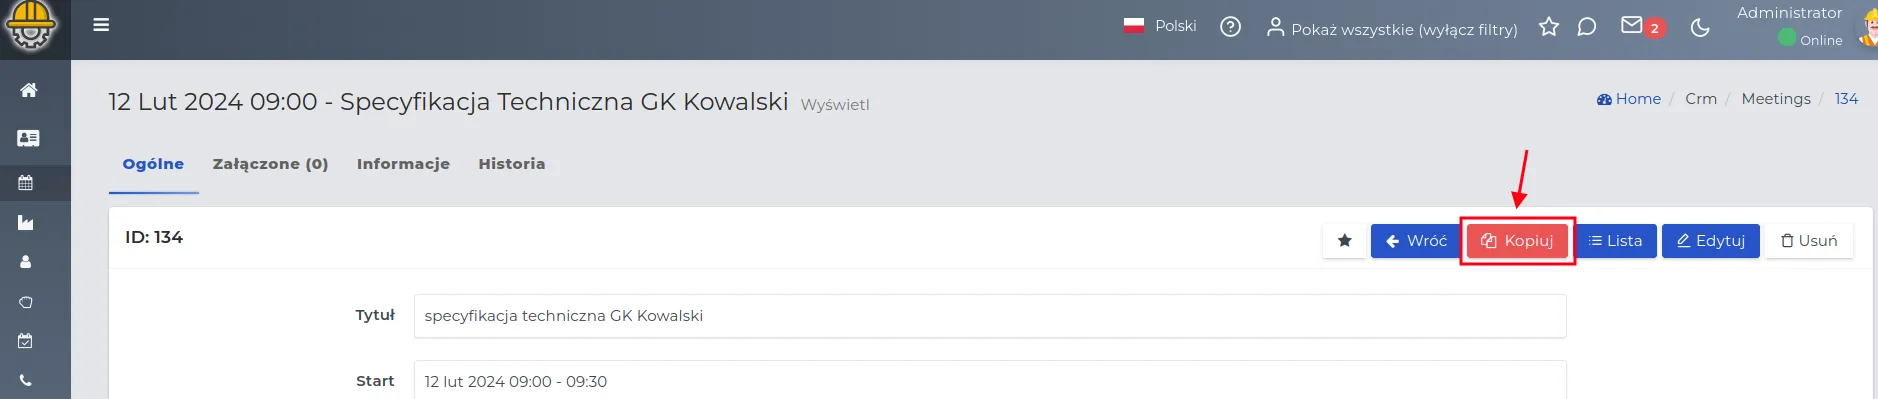
-
Fill out the form for the new copied event, taking into account any changes you want to introduce.
-
Save by clicking the “Confirm” button.
Moving events on the calendar is done using the “drag and drop” method. This allows for a quick change of the event date without the need to open its edition. To move an entry, follow these steps:
- Grab the top or bottom edge of the entry you want to move with the cursor.
- Move it to the appropriate direction (place on the calendar) and release the mouse cursor.
To move an event to a distant location:
-
Locate the event you want to edit and go to its preview.
-
Select the “Edit” button.
-
Modify the event, taking into account any changes you want to make.
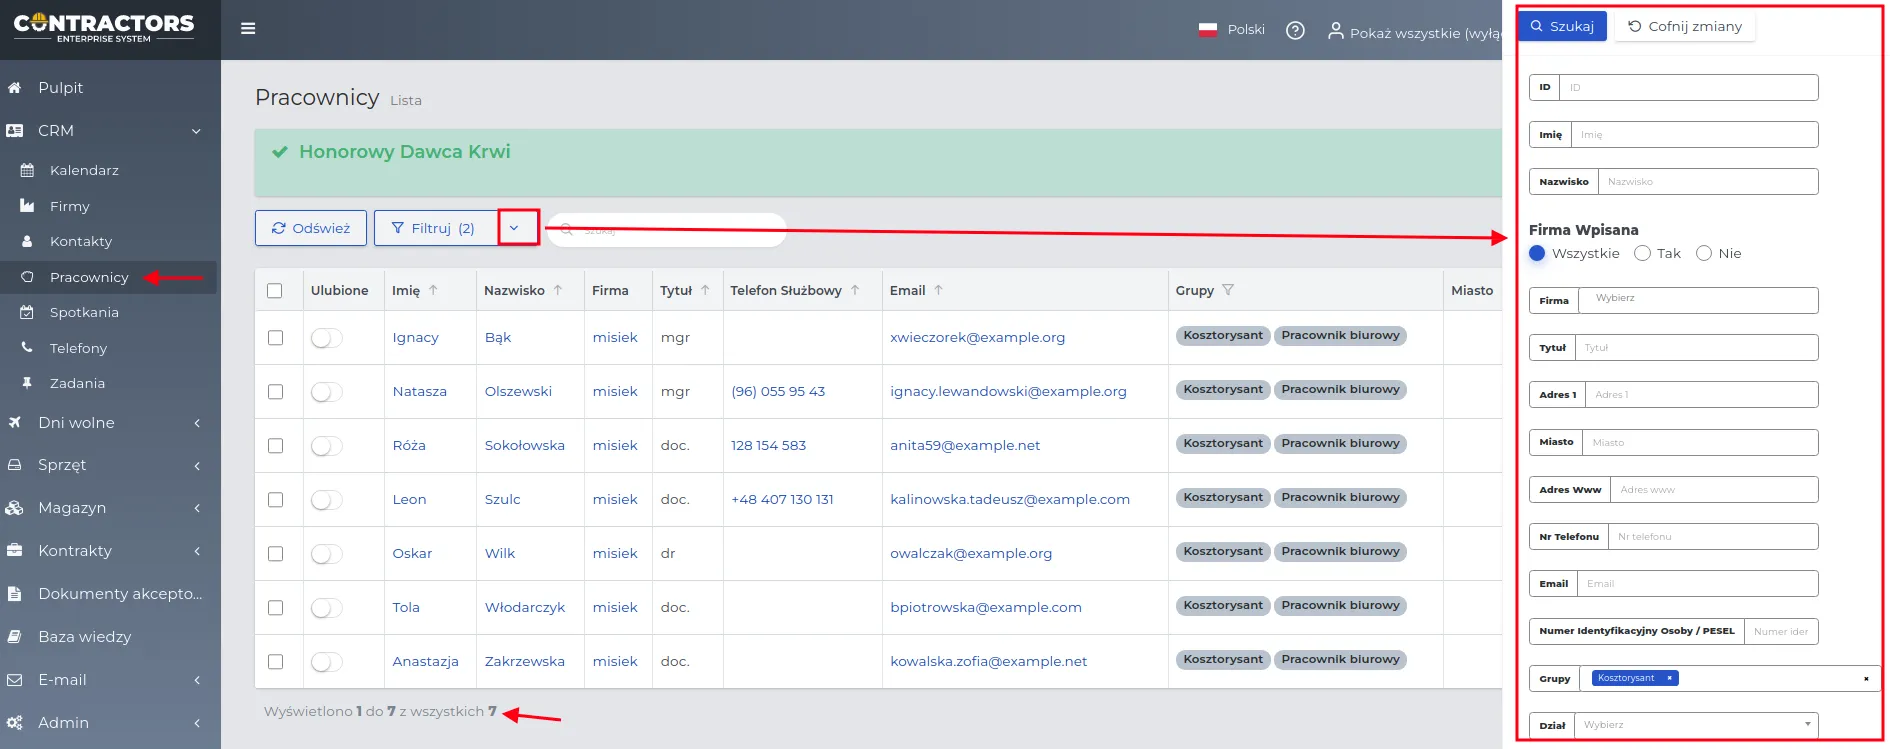
CRM Filter
This type of system feature is useful in planning meetings for one employee as well as for a whole group of employees. After applying the “CRM Filter”, the calendar will reflect entries on the selected calendars and it will be possible to fill gaps or schedule everyone for a certain date.
The “CRM Filter” is located in the top panel, where you should select a group of employees or a person for whom the filter will display the calendar from the dropdown list.
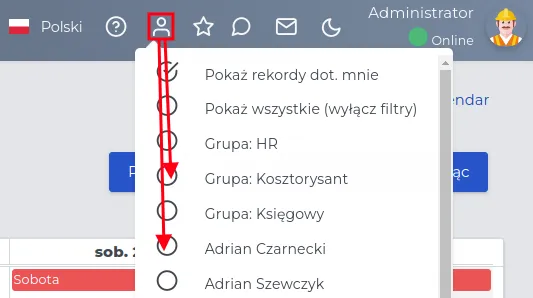
Example: Reviewing entries of users belonging to the Cost Estimator group in order to schedule a meeting with a client for one of them.
-
Select the Cost Estimator group from the filter - if it is not there, the administrator must enable its selection in the group settings - details here.
-
Open the menu “CRM -> Calendar” and see which employee does not have a scheduled meeting at a time that suits the potential client, e.g., on Monday at 8:00 AM.
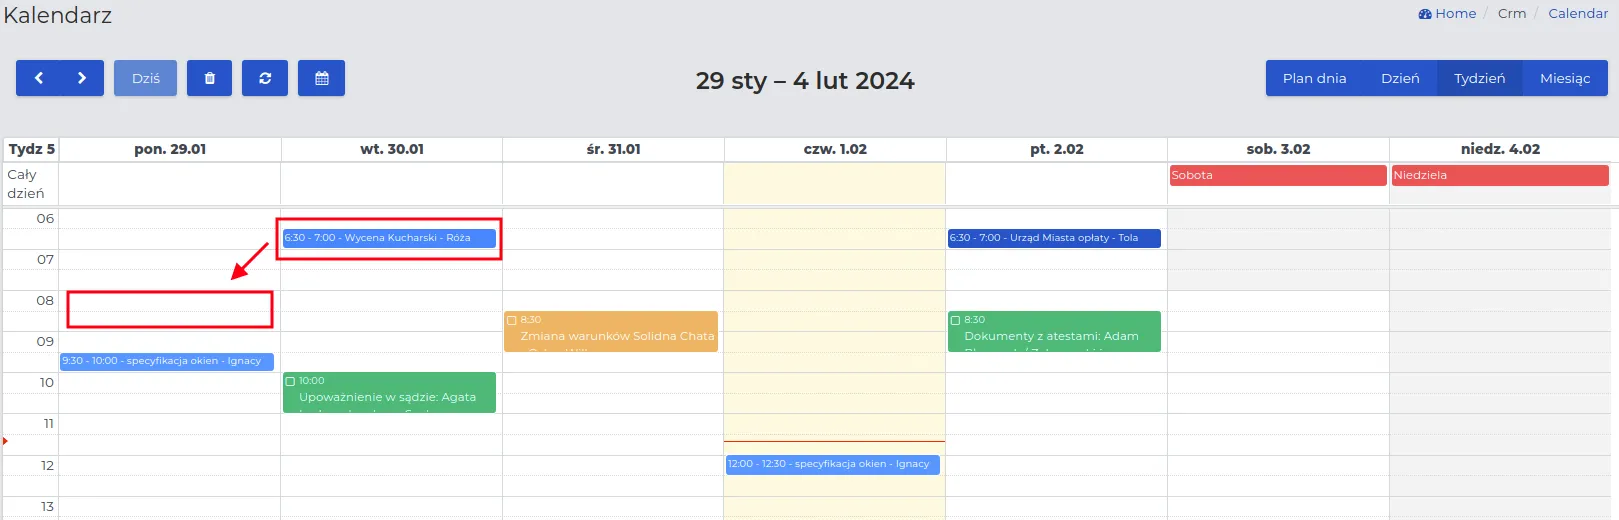
-
Click on the field with the meeting time and create a new event for the selected employee.
-
An entry consistent with the introduced assignment will appear on the employee’s calendar.
NOTE: If at the given time in the calendar two employees already have scheduled meetings, hover the cursor over the fields with the entry and check which employees they are.
REMEMBER: Using the detailed filter on the “CRM -> Employees” list, you can check who belongs to the Cost Estimator group.
Importing iCalendar (ICS) Calendars
An iCalendar (ICS) file is a format used for exporting and importing calendars. It allows for easy sharing and synchronization of calendar events between different applications and platforms. By exporting calendars to the iCalendar format, users can easily share their schedules with others, integrate them with other time management applications, or transfer them between different devices.
To import a calendar into Contractors.es, follow these steps:
- Select the “Calendar Settings” icon above the calendar.
![]()
- Pay attention to the fields displayed in the form:
-
Calendars: Types of events visible on your Contractors.es calendar - we do not edit this at the moment.
-
ICS Calendar Export: Initially set the types of events you want to export to the ICS format. Only events concerning you will be exported.
-
Calendar URL: A special web address that allows transferring events from Contractors.es to another calendar (e.g., Mozilla Thunderbird, Google Calendar, or Office 365).
-
Reset Calendar URL: By setting this field to active, the current calendar URL will stop working. You will need to change it to a new one in all your applications or services that use this calendar.
-
-
ICS Calendar Import: Paste the URL of the calendar from another application or service that you want to import. Additionally, you can choose the color for these events to be highlighted. They are only visible to you, so each user must add the imported ICS calendars according to their own choice.
-
Active: Automatic downloading of data from the imported calendar. Deactivating this field will stop fetching entries visible in external calendars.
-
If you want to import more than one calendar, select the “New” button and make the import settings in the same way.
-
- Save the data using the “Submit” button.